Topic

Hiking Condensation-free in Rain

  • This topic is empty.
Viewing 25 posts - 1 through 25 (of 40 total)
John Reid BPL Member
PostedJan 21, 2015 at 9:52 am

Hiking Condensation-free in Rain

For 50 years I tried new, improved, versions of rain gear and remained uncomfortably wet from condensation.

http://sectionhiker.com/why-you-should-hike-in-the-rain/

With the RNP (Rain? No Problem) garment described herein I hike dry, warm, and enthusiastic in cold rain.

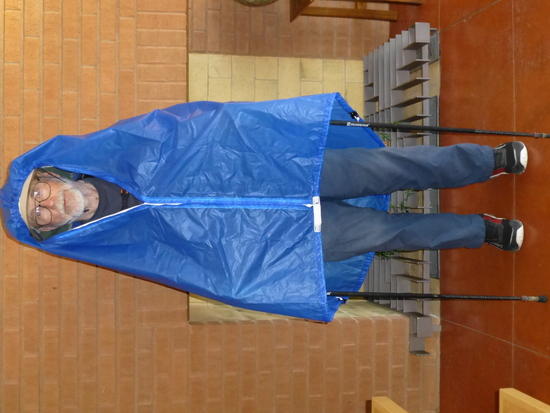
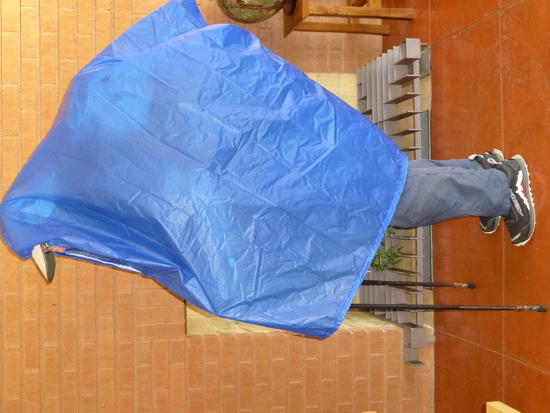
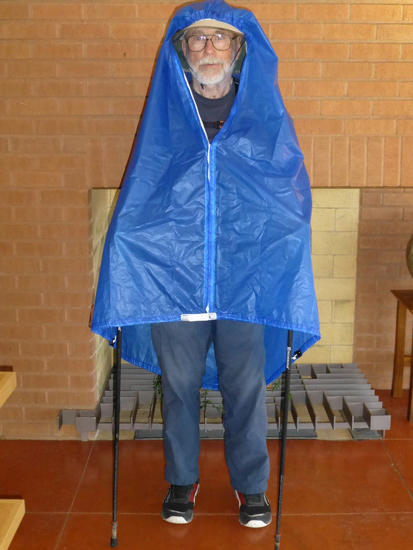
The RNP is a loose, waterproof, inverted bag supported only by the top of one’s head and pack. The brim (bigger is better) of one’s cap protects the face opening and allows abundant exhaust to exit between the chin and front zipper. Head, hands, poles, and pack remain inside. Condensation does occur on the inside surface but there is no hood, no sleeve, no chest contact. Only gloves and the outside corner of the shoulders touch wet surfaces and they dry from body heat as fast as they pick up moisture. I wear a cotton dress shirt (for sun) which remains dry and warm inside.

The RNP is fingertip length to allow circulation, pole manipulation, and hands to reach outside. Its bottom hem drawstring tucks under the pack in wind and allows foot visibility on steep descents. Because one’s poles and pack provide separation from runoff (exterior and interior) the accompanying skirt is needed only in heavy rain, wind, or sitting. the skirt’s ventilation easily beats β€œbreathable” rain pants.

On a hike in day-long rain I tried an umbrella fastened to my packstrap The rain was gentle without wind. No condensation, satisfactory protection (except for a wet pack), only occasionally clumsy. Later, when the rain intensity increased, I started to get wet and put on the RNP. I would have been dryer and warmer wearing the RNP the whole time. Perhaps warm rain is an umbrella’s useful condition.

A sense of watching rain from inside a shelter comes from the absence of runoff sapping body heat from contact surfaces (since there are so few). In a very cold rain you will want gloves for poles as the exterior flow past the hands is chilling but rain mitts are not needed.

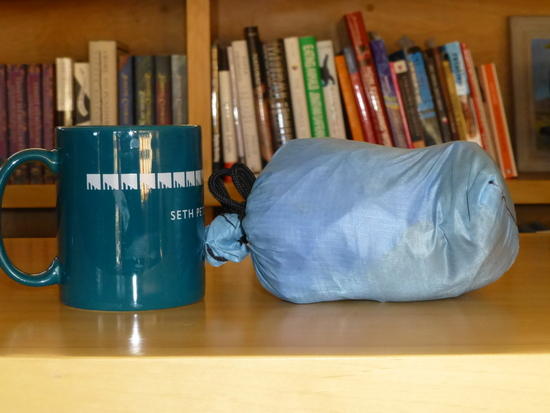
The RNP weighs 6 1/8 oz, the skirt 1 5/8 oz. It works well in wet snow and big wind.

To be explicit about what makes the RNP work: The air in a rain storm is saturated but the air next to the wearer becomes warmer and able to carry additional water. Warmer air is lighter and wetter air is lighter so it exits from the chin opening.

When you need to get into your pack you can pull the zipper over the cap brim to be completely inside, but the garment steams up immediately. This interruption of the chimney-like air flow makes clear why the RNP is so effective even though it is irreparably unfashionable.

Rough Instructions

My RNP is a sylnylon sheet 48” X 88” (4 oz). The top is just a fold across the short dimension. The front has a brow tunnel for the chin cord, a nape cord behind the neck, and a zipper. The rear is seamed shut. The bottom has a hem cord tunnel. Add 4 short velcro strips and you are done.

The skirt is a silnylon tube 50” in circumference. A trash compactor bag minus its bottom works.

More detailed instructions and photos are in section 2 of this thread. I expect that if you are unwilling to tackle this simplest of sewing projects the repair lady at your dry cleaners will whip it out for you. It might help if you understand the instructions and coach her.

I intend for this to be open source, for use without restrictions.

Brett Peugh BPL Member
PostedJan 21, 2015 at 11:44 am

It does sound a lot like Roger’s system. I am basically using something similar in a tarp/poncho, trash bag rainskirt and Pertex Equilibrium hooded jacket after talking with both Roger C and Dale W. I really don’t get wet, the system is cheap and versatile and no huge microclimate is created inside the rain gear. In fact I sold off one of my rain jackets last week, selling off the other rain jacket soon hopefully and I am just keeping the rain pants for winter.

PostedJan 21, 2015 at 12:23 pm

I'm trying to visualize your setup.

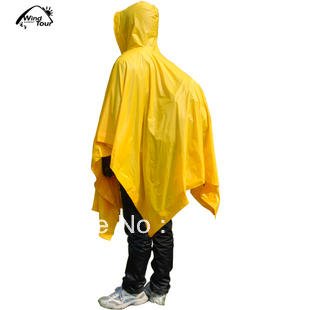
Is it anything like a Packa? The Packa is, to me, the most likely design to have less condensation and more protection than most other alternatives.

John Reid BPL Member
PostedJan 21, 2015 at 1:14 pm

It is just a big droopy bag with a face opening in one corner. That's all. Caffin's had a hood and sleeves. My original insight was a Stephenson Warmlite poncho with a big cowl neck. The air just rushed out but the hood sweated up and wind is hard on ponchos.

John Reid BPL Member
PostedJan 21, 2015 at 1:17 pm

The Packa has a big saddle between head and pack the RNP spans the gap, if any.

Bob Moulder BPL Member
PostedJan 21, 2015 at 4:44 pm

I've heard one photo is worth a thousand words.

Could be just a rumor, though.

Nick Gatel BPL Member
PostedJan 21, 2015 at 5:18 pm

z poncho

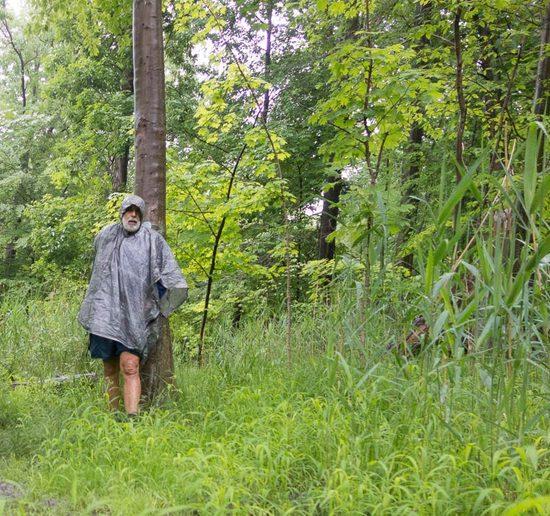
I have hiked for hours in this zPacks poncho with no interior sweating. It is waterproof. It really is too short and my shorts get wet and uncomfortable in a cold rain. I have supplemented it with a cuben rain skirt.

PostedJan 21, 2015 at 5:39 pm

"The Packa is, to me, the most likely design to have less condensation and more protection than most other alternatives."

Especially since it's also available in eVent. :)

PostedJan 21, 2015 at 7:20 pm

"Especially since it's also available in eVent.'
Not sure about that.
My understanding is that eVent needs a temperature differential to work well and that is possibly the reason why pit zips were not originally allowed on eVent jackets.
But as stated, I don't know for sure.

mik matra BPL Member
PostedJan 21, 2015 at 8:43 pm

I just did the Overland Track in Tassie and I had an eVent rainjacket. The one day it did rain all day the day's temp was around about 20deg maybe a bit less. I was soaked on the inside within 30mins of walking and did the last 2hrs feeling cooler than I wanted to.

If you want to stay dry(er) you definitely need ventilation and LOTS of it!! I am not confident that a garment that is held down tight against the body via the pack and also tight to your back due again to the pack that there is enough ventilation happening through the front only of a rainjacket. Even with pitzips fully unzipped they are next to useless as your arms are down closing off the ventilation through the said pitzip.

Stephen Barber BPL Member
PostedJan 21, 2015 at 9:26 pm

So how do we get the more detailed instructions? At the moment, you have not given BPL an email address, so…?

Dale Wambaugh BPL Member
PostedJan 22, 2015 at 12:10 am

"Even with pitzips fully unzipped they are next to useless as your arms are down closing off the ventilation through the said pitzip."

Yup. That's where Outdoor Research's torso type pit/side vents work– they unzip all the way to the hem and you can let the whole front of your jacket drape over your hip belt like an apron. That lets the whole front of your rain shell breathe rather than being tucked under your belt.

Another ventilation trick is having snaps or Velcro tabs on the front storm flap, so you can leave the zipper open, but still have some sort of seal on the front with the gaps behind allowing some air flow.

And of course there are ponchos :)

PostedJan 22, 2015 at 2:53 am

Another ventilation trick is rolling up the sleeves over your elbows. Forearm venting is highly efficient (for me).

Jerry Adams BPL Member
PostedJan 22, 2015 at 7:56 am

Unzip the front zipper – that let's in some ventilation – you'll still get sweaty at shoulders, back, and head

If the wind is blowing the rain towards your front, this won't work

PostedJan 22, 2015 at 3:15 pm

+1 for picture of RNP garment.

I think I accidentally figured out the solution to this problem 30 yrs ago when I bought my first Gore-tex jacket 2 sizes too large (and it has massive pit zips). It's sort of half-way between jacket and poncho. Even goes over a smallish pack (does that make it a poncho by definition?). The Gore-tex is probably superfluous.

I've bought a series of "better" jackets since then, only to be disappointed by wet-out under conditions where my 30-yr old over-sized jacket doesn't. Ventilation is key and it doesn't necessarily need to be the total openness of a poncho. I wish the various cottage industry and/or bigger manufacturers would figure this out. Kudos to Sierra Designs for at least starting to explore possibilities with their Cougle (sp?).

John Reid BPL Member
PostedJan 22, 2015 at 7:36 pm

Making an RNP (much harder to read than to do)

MEASUREMENTS

My measurements are for a 5’ 7” 160# guy.

Measure your vertical distance fingertip to top center of head (call it FTL): Mine = 44”

Length of sylnylon = 2 X FTL: Mine = 2 X 44” = 88”

Width of sylnylon: Mine = 48” You might want more for a really big pack. It will be easy to reduce but not to add.

Measure from the bottom of your earlobe to the top center of your head (call it EAR): Mine = 8”

Length of brow tunnel = 2 X EAR. Mine = 16”

Cord length between anchor loops at ends of brow tunnel when puckered over hat brim: Mine = 9”

MATERIALS

Sylnylon rectangle = 48” X (2 X FTL). Mine = 48” X 88”

Skirt material: Mine = 24” X 50” (comes 12” above the ground)

Cords: (2 mil)
Chin: 30” one cord lock
Nape: 26” one cord lock (perhaps a different color)
Bottom hem rear: 52” 2 cord locks
Bottom hem fronts: (26” 1 cord lock) X 2
Waist: drawstring and cord lock. Mine = 56”
Total, 18’ of cord and 7 cord locks.

3/4” velcro: 3” each of hook and of loop.
Optional: additional 3” each of hook and of loop to connect the RNP top to the cap top. See step 11.

Flat synthetic (fusible) 3/4β€œ webbing (for melted holes at mid sides of bottom hem in lieu of grommets): 2” X 2 = 4” (or perhaps use more velcro just as webbing)

Flat 3/16” webbing (perhaps flat shoelace stuff or parachute cord casing) for anchor loops at ends of brow tunnel): 6”

Zipper, single pull, separating. Mine = 29” #5
It should come within 5” of the brow tunnel end loops and not completely reach the hem tunnel. Zippers are measured by length of hardware, not tape length. The space available is (FTL – EAR – 5” – 1 1/2”). Less is ok. Mine = (44” – 8” – 5 – 1 1/2”) = 29.5”

SOURCES FOR MATERIALS

rayjardine.com
thru-hiker.com

DIRECTIONS

It is assumed that the ends of all webbing and cord are fused (melted) to prevent unraveling. The start and end of seams should be backstitched.

1. Sew 1/4” hems on both long edges of the sylnylon. The hems’ raw edges determine the inside of the RNP

2. Fold the sylnylon in half across its short dimension so that the hem raw edges are exposed, not hidden inside the fold. This fold is the RNP’s top. One pair of the 1/4 inch hems will form the front (zippered). The other pair of hems will form the back seam. Along the same line as the hem stitching sew the back seam from the bottom up to the top fold. The RNP is presently inside out.

Optional: If your tallest pack tops out below head height
shorten the back seam as follows so the RNP does not hang low behind you. Measure the vertical distance from head height to pack top. Call this the DROP. Mark at a distance equal to DROP up from the bottom of the back seam. Draw straight lines from this mark diagonally down to the bottom corners of the front opening and cut along these lines. (I have not done this on my RNP and it works fine but the back hangs low and looks even worse than necessary.)

3. Turn the RNP outside out. Fold a 3/4” wide brow tunnel. The tunnel is to be centered on the front long edge with the raw edge inside the tunnel. this places the tunnel edge inside the RNP. Tunnel length = 2 X EAR (mine = 8” + 8” = 16” ). Sew along the original 1/4” hem stitching.

4. Double over 3” of 3/16” webbing and sew together except for a 3/8” loop at the fold. The top end of this loop is to sit 3/8” below the present end of the brow tunnel. The stitched together tail is to be aligned downward along the (not yet extended) brow tunnel seam.

5. Leave a 3/4” gap in the brow tunnel seam, for access to the loop, and continue sewing the tunnel to the end of the loop webbing (1 1/8”) thereby anchoring the loop in the seam.
Repeat steps 3 and 4 at the other end of the brow tunnel.

6. Sew a 1/4” hem around the bottom, with the raw edge inside the RNP. Starting from the back seam, fold to form the 3/4” bottom hem tunnel. The 1/4” hem raw edge is to be inside the tunnel and the tunnel finished edge is inside the RNP. Sew along the same line as the 1/4” hem.

7. Along the bottom tunnel mark the midpoints between the back seam and the front opening. Center on this mark a 2” length of 3/4” webbing inside the RNP and covering the tunnel (hide the hooks or loops against the tunnel if using velcro but these instructions will still refer to it as webbing to distinguish it from other velcro.). Sew 2” along the tunnel stitching to fix the webbing parallel to the tunnel. Sew the lower edge of the webbing through the tunnel. Do not sew the webbing ends. The tunnel must continue under the webbing (although constricted). Repeat on the other side.

8. Sew the 3” velcro strip (loops) in a similar alignment along the bottom tunnel but ending at the vertical front edge. The velcro will run horizontal (loops exposed) and end at the zipper opening. Sew the lower edge of the velcro through the tunnel. Do not sew the velcro ends. The tunnel must continue under the velcro (although constricted).

9. The 3” velcro strip (hooks) is to have only have 3/4” of its end similarly sewn onto the opposite vertical front edge so that its hooks will engage 2 1/4” of the loops. Do not sew the velcro end. The tunnel must continue under the velcro (although constricted). The velcro will hold the two vertical hems just touching. The zipper will be sewn under the touching vertical hems.

10. Sew the zipper inside the RNP. It must start above the bottom velcro and reach to 5” below the brow tunnel loops. The zipper pull is to be operated from inside the RNP. The 1/4” hems are to just touch outside over the zipper teeth.

11. An optional 3” strip of velcro (hooks) on top of head is centered 6 1/2” behind edge of brow tunnel and inside. The mating loop velcro is sewn crosswise on the cap to make connecting easy. A big wind inflated my entire RNP like a balloon and lifted my cap straight up from my head. The nape cord probably solves the problem but I tried this velcro first and have not experimented without it.

12. The skirt is a tube 50” in circumference with a drawstring at the waist and ends 12” above the ground. Add a rear slit to above knee level.

An easy alternative is cutting the bottom from a trash compactor bag and punching holes every 2” for the drawstring. It weighs 2 1/2 oz. Ace hardware Stores’ brand is 10 for $6 and odor free.

The first 12 steps complete all sewing. Seam sealing seems unnecessary.

13. Heat a wire or nail or icepick (perhaps on the stove) to melt holes in the webbing patches and in ends of the velcro strips. These holes should be little larger than the bottom hem cord you plan to use so that end knots cannot pull through.

When melting a hole you will pierce the webbing (or velcro) and two sides of the tunnel. You must squeeze the tunnel during the melting so the two sylnylon holes do not fuse together because your cord must have access to the tunnel interior after passing into the holes.

Make 2 holes in each webbing patch spaced to divide it into 3 equal parts.

Make a hole in the hook velcro where it is sewn to the tunnel. Make a hole in the end of the loop velcro where it is not covered by the hook velcro.

14. To insert cords into hem tunnels soften 1/2” of the cord end above a candle flame until it droops and wearing a leather work glove draw and twist the heated end to a point. This is the lead end. It will stiffen somewhat as it cools.

Tie a figure 8 knot in the trailing end of a 26” cord (google knots by name). Starting at a hole in the velcro pass the sharp end through all 3 layers and then loop it back through a single sylnylon layer and into the tunnel. Work it along the tunnel to the webbing patch and out through the single sylnylon layer. Then loop it back through all 3 layers. Pull both loops into the tunnel. The holes through the sylnylon opposite the velcro and webbing are only for passing the cord and serve no further function. The cord does not end up running through them. Apply a cord lock and adjust it so the cord is exactly as long as the tunnel between the velcro and the webbing. Secure with a figure 8 knot and trim and fuse. Repeat for the other front hem cord.

The rear hem cord is the same except it has a cord lock on each end at the webbing.

15. Run the chin cord through the brow tunnel. Fix its length between the loops at the tunnel ends and hence the amount of brow tunnel pucker with sheet bend knots. These are easily adjustable. Keep the ends even and apply a cord lock over both. An overhand knot will suffice to retain this cord lock.

Tie a figure 8 knot in the center of the nape cord and slide the cord lock over both strands. The nape cord simply passes through the center of the sheet bends and is secured with a figure 8 stopper knot. When the chin cord is snug the sheet bends will hold the nape cord.

You are done. Rain? No Problem.

PostedJan 22, 2015 at 7:40 pm

RNP
I am glad that it works for you and I have to say I am surprised that you hold trekking poles because having the poles under that cape would drive me nuts (banging the hands against the fabric at every step) besides there are many trails here where one needs to use the hands to either move vegetation aside or to go over obstacles and I mean more than just a few times a day.
But if it works for you, that is the important bit.

Viewing 25 posts - 1 through 25 (of 40 total)
Loading...