Topic

Quick question on quilt making

  • This topic is empty.
Viewing 14 posts - 1 through 14 (of 14 total)
jimmy b BPL Member
PostedAug 5, 2014 at 7:51 pm

Im going to give it a go on sewing myself a down quilt. I have watched a number of videos and read articles but most of them are a bit lacking on the finer details. The question I have is when you get to stitching up the exterior side seams how do you handle the baffle ends. Seems like folks are taking them from a standing vertical to laying them flat into the side seam, either all laying flat oriented to the top or bottom uniformly . I just wonder if there is a better way to keep the baffle in a more upright position at the end so as to retain better loft to the end, or is this not really necessary. I noticed on my WM bag that it seems to have a full length side baffle full length but that may be a nightmare to duplicate without knowing EXACTLY how it is done. Not to mention overkill if not necessary. I'm guessing there will be enough hair pulling on the first one as is.

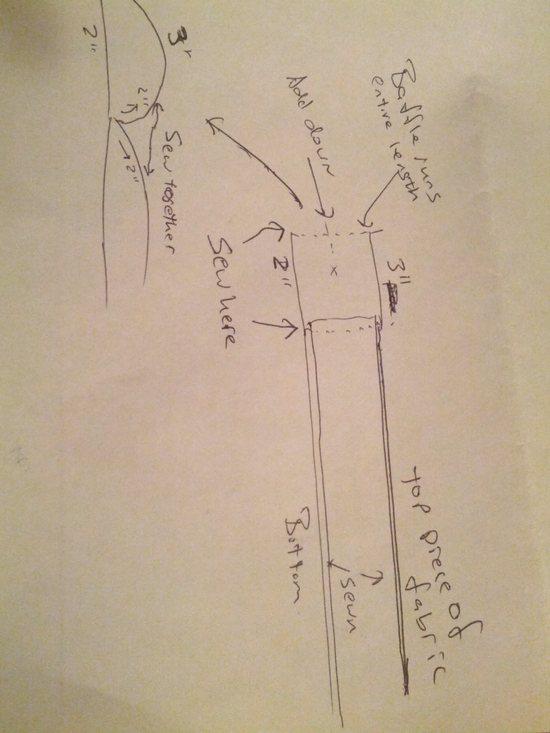
Also when stitching the side seams after capturing the baffles between the two layers of fabric with the first row of stitching is it better to roll the ends of the fabric under opposite each other stich again for a finished edge or just fold the end layers over twice and run another row of final stitching.

I know this isn't the easiest wording to follow but as usual any help is appreciated.

jimmby
PS- any links to very good instructional info/patterns would also help.

PostedAug 5, 2014 at 8:25 pm

I've only made a Karo step baffled quilt, so I'm not 100% sure, but I think most people stop the baffles an inch or two from the side seams and then roll the raw edge and sew. I don't think it's 100% necessary to have the outer short sides of the baffles to be captured by the side seam, as very little down will move through such a small opening.

Aaron Sorensen BPL Member
PostedAug 5, 2014 at 8:46 pm

This is so not necessary and would take so much time for aesthetic purposes only.

If this is a deal breaker and a must, you can just add a full baffle length wise on both sides and sew it to make it so it works the same way.

The "sewn" on the baffle is just to say it's sewn to the top and bottom piece of fabric.

.ed

Depending on baffle height, your measurements will be different.
The 2" should be more like 1" in each way (for a 1" baffle). Add the inches needed for the baffle height you're using.

jimmy b BPL Member
PostedAug 5, 2014 at 8:59 pm

Aaron, definitely not a deal breaker leaving off a side baffle. Thanks for the drawing of how its done though. Still a little unsure if I'm assuming correctly that the end of the baffles must be as I described "laid down" and captured fully in the side seems.

And E said -"I don't think it's 100% necessary to have the outer short sides of the baffles to be captured by the side seam, as very little down will move through such a small opening."

No offense And E, I don't mean to question your judgment, just want to get it right the first time.

jimmyb

PostedAug 5, 2014 at 9:15 pm

No offense taken! I went the easy fill route and made a Karo step, lots more individual baffles to sew, but overall easier since to fill, I just ham fisted all the down in.

What are you using for fabric and down?

Good luck with the quilt!

jimmy b BPL Member
PostedAug 5, 2014 at 9:15 pm

Yes, true, thanks for pointing that out. Too late for a cup of coffee here.

jimmby

jimmy b BPL Member
PostedAug 5, 2014 at 10:24 pm

And E

I was planning on using the Argon .67 from Dutchware gear but still sourcing my down. I think I may shy away from the treated downs and go with some 900 fill from Thru Hiker. Open to suggestions though.

jimmyb

PostedAug 5, 2014 at 11:04 pm

Not sure how much you're looking to buy, but you can buy one pound bulk bag (comes in a big PITA bag ) from

http://www.downlinens.com/products/premium-washed-down

Not sure if this code still works, but it was good for 10% off when I bought it… member10

900 is pricey, but 850 white down is 149 before discount.

You can also buy from

http://www.wildernesslogics.com/DIY-MATERIALS_c28.htm

Probably your cheapest option, but again, "only" 850.

132 for a pound, or 8.75 per ounce packed in individual static free bags.

Ryan Smith BPL Member
PostedAug 6, 2014 at 10:12 am

Jimmy,

On my quilts, I simply run the baffles all the way to the edge, then fold the part that would be in the hem like an accordion, then sew. That part of the quilt will be under you anyway so it doesn't have to be grand.

Ryan

jimmy b BPL Member
PostedAug 6, 2014 at 1:16 pm

Ryan,
thank you, after thinking about it a little longer that makes more sense as laying them down as I had been thinking would shift one side of the exterior fabric.

And E,
Yet another sale price. Good deal man, I just called allied the other day and left a message but it works out that down linens is owned/run by the same folks. Coupon offer is still working. At that price I think it would be best to stick with the 850 and get a pound. I am going to make two, one for the wife too so I will have to pick up around 6 extra ounces. Your second link sells 850 by the ounce so I can get some there and mix them together. Both seem to be equally as reputable.

Thanks again guys, jimmyb

PostedAug 10, 2014 at 11:03 pm

Consider tapering the height of the baffles towards the edge. You might even taper to zero before the edge and thru stitch for the last 6" or so since this area will either be flattened underneath you or off the side of your pad anyway.

For that matter, you might as well consider varying the max baffle height from head to toe. Do your feet get hot or cold at night? Adjust your design accordingly. Insulation is generally more effective on the torso than the legs.

If you do taper the baffle height towards the ends (sides), be aware that this will increase the baffle edge length slightly, and thus the width of the piece of fabric you need for the top or bottom layer. If you taper symmetrically on the top and bottom edge of your baffle, the top and bottom layer of your quilt will remain equal in width. The simplest way to go is just add a couple extra inches in your cut and trim once assembled, before the final edge seam. The difference in length will probably be a fraction of an inch (caveat – I haven't actually tried this) but that's still enough to cause a problem if not accounted for.

Bill Townsend BPL Member
PostedAug 13, 2014 at 4:01 pm

haven't used it myself but-

An excellent tip regarding down-
Portion out the down by weight per baffle.
Dampen it so it's clumpy but not saturated.
Dump it in.

No explosions, vacuum cleaners, or hermetically sealed rooms needed.
You can leave the ends open and hang via clothesline overnight to allow the down to dry before sewing up if this is a concern.

Viewing 14 posts - 1 through 14 (of 14 total)
Loading...