Topic
Light and Easy Water Filtration for the Lazy Backpacker
Forum Posting
A Membership is required to post in the forums. Login or become a member to post in the member forums!
Home › Forums › Gear Forums › Make Your Own Gear › Light and Easy Water Filtration for the Lazy Backpacker
- This topic is empty.
-
AuthorPosts
-
Aug 9, 2007 at 12:27 pm #1224496
Over the years I’ve spent backpacking through the nearby Uwharries and Appalachian Mountains I’ve used a number of methods to insure the purity of my drinking water. A couple of things I have decided. First I don’t like chemicals. Sure they are lightweight but I don’t like the taste. Why in this world would anyone hike to a clear running mountain stream and add chlorine to it? It just ruins the taste. And have you read the wait times on the label? I’m just too impatient to wait thirty minutes to kill what may (or may not) be lurking in my next thirst quenching drink. By the way that does not include the four hours for cryptosporidia.
As for water filters I have problems with them as well. After a long hike who wants to spend time hand pumping water? Certainly not me. All I want to do is drink the water. As for weight the lighter the pump the more pumping is required. Until recently I carried a Kaytadyn Hiker. It delivers about 1 liter a minute. Their new lighter weight model only supplies a ½ liter a minute to safe a whole 3 ounces. That’s a lot of pumping when you are hot and tired and just need to relax.
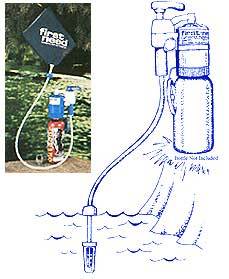
A few weeks ago I came across a possible solution. Kaytadyn markets a gravity filter. A Hiker filter cartridge is mounted in a dry sack. Water is collected in the sack and filtered water is deliverer by a tube for drinking. However just as I was about to order one to try on my next trip I spotted a drawback. It weighs 15.5 ounces. But I did like the concept. I started playing around with some materials and came up with a homemade version that weighs about 8 ounces. While it is still heavier than chemicals it is as light as their lightest filter. I decided to try it out on a week-long trip in the Smokies. Not only did it perform well, it supplied three hikers with all the water we wanted the entire week. The best part is while others were pumping or adding chemicals we were setting back enjoying the scenery and cool mountain water. We were also the object of a lot of attention with questions about our water filter system.
So here is how to make a gravity filter from readily available parts. First the materials.
8 liter waterproof stuff sack* WalMart $ 9.98
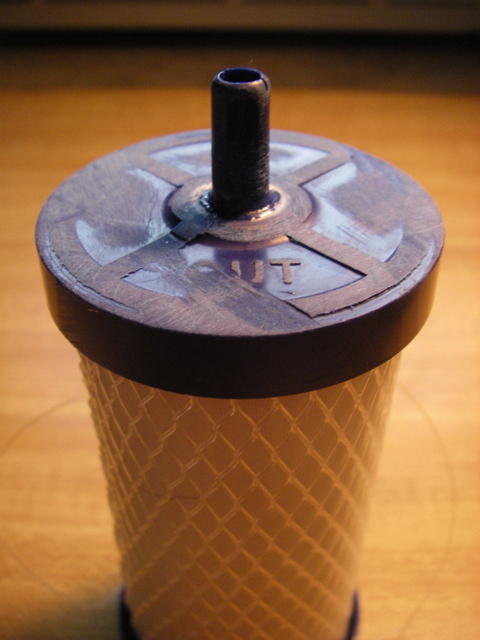
Hiker Pro filter cartridge REI 34.95
32 ounce Nalgene bottle** REI 5.95
48” of ¼” tubing Lowes .89
Total materials $51.77*three bags in the package
**high-density polyethylene bottle
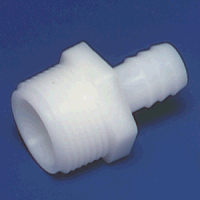
The mouth of the Nalgene bottle is a perfect fit for the filter cartridge. I also added a quick connect adapter to the tubing to attach to my hydration bladder. CamelBak markets a set for $7.00.
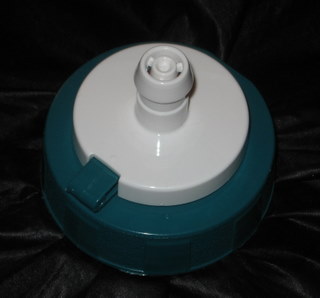
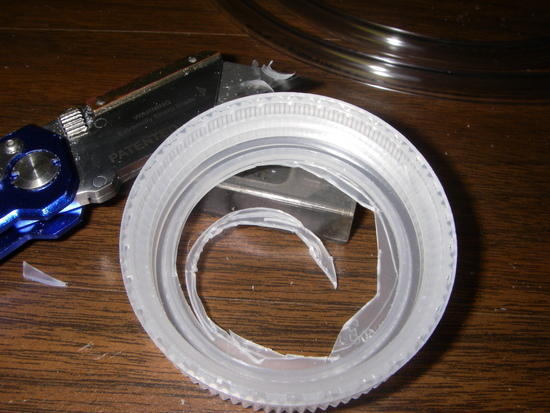
Putting this together is really easy. If you can handle a utility knife without cutting yourself you have all the skills you need. Start by cutting the water bottle below the plastic ring at the screw threads. Make the cuts as smooth as possible to avoid damaging the bag over time. You can smooth this even more with a piece of sandpaper I’ll refer to this part as the bottle neck.
The next step is to cut the water bottle cap to allow the filter to fit through. All that is really needed are the screw threads so don’t be afraid to cut. Use medium grit sandpaper to smooth the inside of the cap ring and to insure the filter cartridge will pass through the cap.
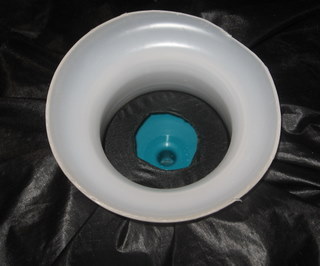
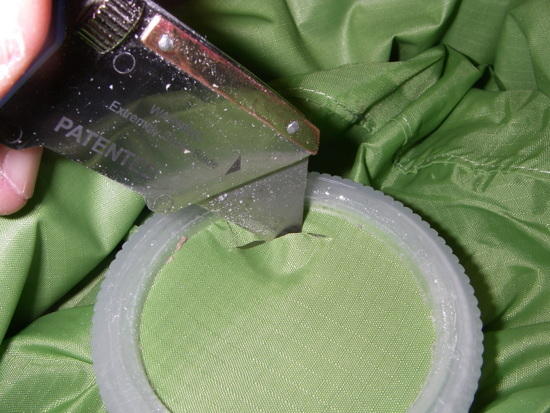
Screw the cap ring onto the water bottle neck and check if the filter cartridge will slide in. The fit should be tight. Once you have the hole the correct size, place the bottle neck inside the water bag with the threads centered on the bottom of the sack. The position is not critical. Now screw the cap ring on the bottle neck over the bag from the outside.
Cut away the cloth inside the ring. Some cloth around the edge may be left.
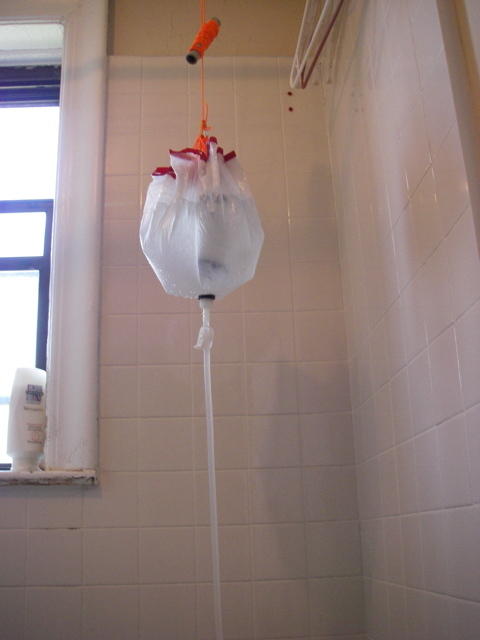
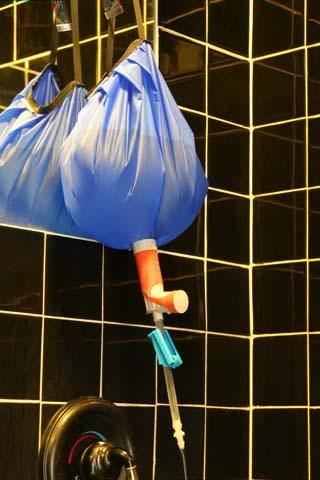
Now spread a small amount of the lubricant that came with the filter around the black O-ring. Slide the filter through the bottom of the bag so that the discharge is on the outside of the bag. Attach the tubing to the filter and fill the bag with water. You will have to prime the filter the first time you use it. Be careful not to suck the carbon into you mouth. It will not hurt you but it’s not a pleasant experience. Allow at least a liter of water to pass through the filter prior to the first use.
As I mentioned earlier I connect the filter to my water bladder to refill it. The higher the filter is above the bladder the faster it will fill. The time to fill the 70 ounce bladder varies but usually it is full in 2-3 minutes. Of course since I’m not pumping I really don’t care if it fills at a rate of less than one liter a minute.
Maintenance on the filter is easy. If the filter clogs in the field, Kaytadyn has a pre-filter sleeve on the cartridge that can be removed and cleaned. Since this is on the pre-filtered side it can be cleaned in untreated water. The filter cartridge itself can be rinsed in untreated water to help clean it. Just keep the discharge opening covered to prevent contamination. Kaytadyn claims about 200 gallons from one filter depending on the water. I never got that much from a pump but without the pressure of the pump I am hoping to come close.
After a trip I remove the cartridge from the bag and wash the bag with clean water. The tubing and cartridge are washed in a 10% bleach solution and allowed to sit in the mixture about 30 minutes. I figure that should kill most anything trapped in the filter. I then allow it to dry over-night prior to storage. Before I use the filter on the next trip I run about a liter of water through the unit to flush out the taste of bleach. This is the same procedure I used for several years with the Hiker pump.
While hiking I keep the hose in a snack size zip lock bag. This helps avoid any contamination. I use the smallest stuff sack that came in the set of three to hold the filter/bag, cleaning sponge and baggy with tubing. It is stored in the top of my pack so I can get to it easily.
After I built mine I discovered you can buy a similar filter from ULA. It’s called the Amigo Pro. With shipping it cost about the same, but if you have an old Nalgene laying around and a spare silnylon sack, build your own.
Aug 9, 2007 at 1:33 pm #1397918For prevention of cross contamination, you may want to use the technique of looping the output hose as in the attached photo.
Great job with the DIY project.
Aug 9, 2007 at 1:45 pm #1397919Cross contamination is not really a problem during fitration. It is only during storage since the hose and water bag are stored together. By placing the hose in a snack size baggie this should prevent the problem.
I really don't worry about it too much since I am very picky about my water source. An article earlier this year titled Sipping the Waters: Techniques for Selecting Untreated Backcountry Water for Drinking
by Michael von Gortler, MD is a great guide to choosing water sources. I pretty much follow the suggestions and still filter to stay on the safe side. There have been a few sources I have decided to trust but it was water running out of cracks in rocks where there were no obvious signs of large mammals.Thanks for the feedback!
Aug 10, 2007 at 12:11 am #1397999I guess I should have called it the "hose" instead of the "output hose", as there is really only one hose in a gravity feed system (from the unfiltered container to the final container).
How do you put water into the green stuff sack?
Aug 10, 2007 at 4:50 am #1398006After attaching the hose to the filter I dip the bag into the water source. Just keep the hose out of the water as much as possible. I usually hold the end of the hose up with the top of the bag and that way water does not start to flow until I have hung the bag.
Aug 10, 2007 at 4:53 am #1398008I dip the open end of the bag into the water source while holding the hose out of the water. As long as the discharge end of the hose stays above the water level no water passes through the filter. If you connect the top of the bag you can use it as a handle to carry water back to where you are camping/cooking. Then connect to your water bottle or bladder and shortly you will have cool clean water to drink.
Aug 10, 2007 at 9:18 am #1398031your setup looks really nice. I had played with the same idea of a dry bag but desided to go with the ray way or ULA style.
The one pictured below weighs in at 6oz and I use my bear bag line to hang it. To save even more weight I've used the hose from my blader As Bill does but I don't always have it in the summer. I've found this setup works well.
I did some searching on this site and found Bills set up however no one had sourced the nylon fittings. I did some searching on the web and found them in a few places.
Joe F
http://www.usplastic.com/catalog/category.asp?catalog%5Fname=USPlastic&category%5Fname=18309&Page=1
Aug 10, 2007 at 10:52 am #1398045We're in the same ballpark on weight. The weight I quoted was after weting the filter. It is almost 2 ounces lighter out of the package.
Which fittings are you using to connect the filter?
Aug 10, 2007 at 11:10 am #1398049I use a Hiker Pro filter cartridge but it's been cut down quite a bit. all the threds and extra weight are cut off as I don't need them.
I'm not really a hudge weight guy as I could use to drop a few pounds over any of my gear. ;-)
I used the Cuben becasue I had it. My weight is with a wet filter as well. I weighed it right after i took it down.
The biggest savings for me was using the bear bag line to hang it, using the blader hose right to it, and cutting the filter down saved about an ounce. I could have dropped a few more if I didn't use the metal rings and made the over all pattern a bit smaller. I used 24" round but I thing bill and a few others have used 21"
Joe F.
Aug 10, 2007 at 8:11 pm #1398094Here's a picture of what my filter looks like after it's been cut down.
Joe F
Aug 10, 2007 at 10:53 pm #1398107Just FYI, Gardenville's project #3 from Sept 2005 on the following site does the same thing, modifying a ULA Amigo to use Cuben and cutting excess plastic off the filter itself:
http://ultraliteskunkworks.blogspot.com/2005/09/cuben-connection.htmlI have a ULA Amigo, and after I saw the above reference I cut off the excess plastic on mine too, using my bandsaw; pretty easy, saved a little weight, not a huge difference but somehow emotionally … satisfying.
Brian Lewis
Aug 11, 2007 at 10:41 am #1398147The final weight of my modified Hiker Pro Water filter was 1.9 ounces. My complete Gravity Water Filter weight was 5.61 ounces.
Aug 12, 2007 at 2:11 pm #1398297Pizzaman,
Thank you for the "step-by-step".
Todd
Aug 13, 2007 at 12:25 am #1398382Where in Walmart are the stuffsacks?
Aug 13, 2007 at 4:22 am #1398387The stuff sacks are in the camping (sports) department. All WalMarts do not have them. There are 3 store near my home and only one has them in stock. All three are Super WalMarts. Go figure!
As suggested by a few of the messages I cut away the threads on the filter (except for the last one needed to prevent it from pushing through the pastic ring on the bag). It lowered the weight about a 1/2 ounce.
Aug 13, 2007 at 5:08 am #1398388Bill-
Do you have any pictures of the finished modified Hiker Pro Water filter? I got mine down to 2.8 with the prefilter mesh it came with. Did you cut away the filter on both ends.
Joe F.
Aug 13, 2007 at 9:13 am #1398416Thank you.
Aug 13, 2007 at 10:04 am #1398423Joe
I only cut away at the end with the threads. If you look at one of the earlier messages it will show all the threads gone. I only cut to the last thread leaving a lip to stop the filter from going all the way through the mounting ring on the bag.
The setup the Amigo Pro and RayWay use puts the entire filter inside the bag so that none of the threads are needed. This is a good design just not the one I picked.
Nov 17, 2007 at 7:41 am #1409357Hi Joe, (or anyone else that may be in the know)
Which fittings and gasket specifically did you buy at
http://www.usplastic.com/catalog/category.asp?catalog%5Fname=USPlastic&category%5Fname=18309&Page=1
And can anyone post some better pics of these parts seperated. Do you need to glue anything together?
Thanks,
TonyNov 21, 2007 at 12:07 pm #1409810Hi Bill, (or anyone who may know)
Can you tell me if the parts to your gravity feed filter look like the pics below?
Can you describe or post a picture of the gasket that goes between them and how you put it together?
Thank you,
Tony
Nov 21, 2007 at 1:02 pm #1409820This is pretty cool. I think I may give it a try.
What holds the filter in place? I read the directions but when you put the filter in does it use friction to stay or do you put it in then screw the top on? Sorry for the noob question
Tommy
Nov 21, 2007 at 1:16 pm #1409821Tommy,
The inside of the neck of the Nalgene bottle is the perfect size to hold the filter in place. Cut the hole in the cap so it is tight when you press the filter into it. That will prevent leaks. The filter slips in after the bag is fully assembled. Once you put it together the filter will pop in and out for easy replacement.
I've been using the one I made back in the spring and it hasn't missed a lick. I have started carrying an extra plastic baggie to dip water out of streams to make sure there is no cross contamination. On the AT the set up works great at any of the springs with water pipes extended out. I'm finding that the filter does not get as dirty since dirt is not forced into it by the pump.
If you have any more questions PM me and I'll post them here.
Nov 21, 2007 at 2:52 pm #1409832Here are a few pictures of another DIY gravity filter bag.
Attach tubing to the spigot and then to an in-line filter. You can put some prefilter material inside the cap as well.
This can be made lighter by using a Platypus top instead of the Nalgene ATB top and by using less silnylon (this one hold 2-1/2 gallons).Apr 18, 2008 at 4:37 pm #1429103I think I have about $30 in this thing.
Just used off the shelf stuff.AntiGravity Gear silnylon 1 gal water bag. Appears to be just like my Brawny water bag.
Aquamira Frontier Pro disposable water filter. BPL has 'em.Marked the bottom of bag and melted a hole about the size of a dime I guess, with a red-hot pocket screwdriver.
Unscrewed the part that holds the pre-filter on the Frontier Pro and screwed it down tight on the bag. Put a 3/4" piece of hose on the filter's nipple (inside the bag) to create a silt settling reservoir. This leaves about an inch or so of water in the bag. Used the small straw/hose piece that came with the filter because it has to fit inside the nipple on the filter, and the 1/4" hose I had was a little small to fit well. Put a cut-down 1/4" hose coupler nipple on the end so I could plug it into my Platypus drinking hose.
Filled up my 2l platy while still in the pack, fairly quickly.
The manufacturer says the filter is only good for 50 gals, but it worked well and it had already been on one weekend trip.
This is a shot of bundle size and weight. Note: this is still wet.
May 6, 2008 at 4:09 pm #1431920Got to try this filter out this weekend.
No problems.
Here it is in use at the Thomas Knob shelter water source at Mt. Rogers. Several other people are squatting and pumping, downhill just out of the shot while they watched me take this picture, and have a handful of dried fruit.Here I have filled my 2 reservoirs, while my friend watches his get partially filled with the leftovers.
Can't wait for the Platypus gravity filter, inline replacement cartridge to arrive. Should have a much longer life span and much higher flow rate for about the same weight!
-
AuthorPosts
- You must be logged in to reply to this topic.
Forum Posting
A Membership is required to post in the forums. Login or become a member to post in the member forums!
Our Community Posts are Moderated
Backpacking Light community posts are moderated and here to foster helpful and positive discussions about lightweight backpacking. Please be mindful of our values and boundaries and review our Community Guidelines prior to posting.
Get the Newsletter
Gear Research & Discovery Tools
- Browse our curated Gear Shop
- See the latest Gear Deals and Sales
- Our Recommendations
- Search for Gear on Sale with the Gear Finder
- Used Gear Swap
- Member Gear Reviews and BPL Gear Review Articles
- Browse by Gear Type or Brand.