Topic

MYOG Pentagon tarp (poor man’s trailstar)

  • This topic is empty.
Viewing 24 posts - 1 through 24 (of 24 total)
PostedMar 20, 2014 at 2:14 pm

Was able to source some 65" width silnylon 1.1 oz on ebay, in order to put together my own trailstar shaped tarp. It is actually a bit smaller, with the side panels measuring 6.5 ft instead of the full 7. Used a 2" cat curve for the diagonal seams, and a 3" on the bottom edges. Double silnylon laminated reinforcement patches on the peak, with nylon webbing for the tie outs. Grossgrain loops with mitten hooks 2.5' from peak on all side panels.

shot 01insideshot03

Anthony Huhn BPL Member
PostedMar 20, 2014 at 4:39 pm

Trailstars belong in the sky.

Looks great…. I have got to get a machine that works so I can sew again.
Looking at a singer on craigslist right now

Anthony

EDIT: Looks like a nice tight pitch. What's that bad boy weigh?

J-L BPL Member
PostedMar 20, 2014 at 4:55 pm

Awesome work – looks like it pitches really well.

PostedMar 20, 2014 at 7:59 pm

Thanks, I am usually less of a luddite, but haven't posted multiple pics on the forums here before. Not sure what I did wrong, and am not sure how to edit or correct them.

PostedMar 20, 2014 at 8:51 pm

Was it difficult to sew the peak together?

PostedMar 21, 2014 at 7:40 am

It came together at the peak without much hassle. I started my seams at the base, and sewed up towards the peak. I used a tailor's tack for four points along the seam (one at base, two at mid points, and one at the peak. I found it best to work from base to peak because if there is going to be shifting of material as you sew, which is pretty much a given when working with sil, its better to have a wee amount of mismatch at the peak than on any of the corners. The peak is reinforced inside and out, and the gathered points are hidden between the two laminated sil reinforcement pentagons. I used liquid nails silicone adhesive to apply the reinforcement patches to the peak, and let them dry 24 hours before sewing them together around the perimeters.

Sam Haraldson BPL Member
PostedMar 22, 2014 at 8:24 am

Beautiful work , George. I've always been curious about sewing a shaped tarp with multiple seams. Did you pattern it first or just measure directly onto the fabric?

Jerry Adams BPL Member
PostedMar 22, 2014 at 3:06 pm

when you enter the pictures, put a blank line between pictures and they will be put vertically rather than horizontally (like Doug did)

PostedMar 22, 2014 at 8:37 pm

I knew there had to be a right answer, just couldn't reach it without a little help. Thanks guys! :)

PostedMar 22, 2014 at 8:49 pm

Sam,
I patterned one triangle, then pinned the whole expanse of material on the wall using a level to make sure everything was square and plumb, Then placed my pattern piece and marked my points all the way down the entire expanse. Used a straight piece of trim to draw my lines with a sharpie, then cut them all out with a rotary cutter on the floor, while moving my mats to make sure my blade didn't touch the floor. I made a catenary curve template using a spreadsheet and marking points of the curve, then connected the dots on a long piece of poster paper from a roll (thank you Staples). I transferred that to mat board and cut out the two templates (one for the bottoms and one for the equal sides, which I stapled and glued to a long piece of trim. I laid the templates on my edges and made my curve cuts on piece at a time. Too slippery to do a few triangles at once, though I was tempted by the shortcut. Wanted them all as close to perfect as possible. After that came a lot of sewing. :)

PostedMar 22, 2014 at 10:17 pm

Really impressive work George. With the cheap kid I am I love stuff like this.

Do you happen to have the pattern you used available somewhere? If you mostly did it freehand that's fine, I can draw something up.

Also can you estimate how many yards you used for the whole setup?

PostedMar 23, 2014 at 7:26 am

I too would love to know how much silnylon you used and any information regarding triangle size would certainly come in handy!

Cheers

PostedMar 23, 2014 at 7:36 am

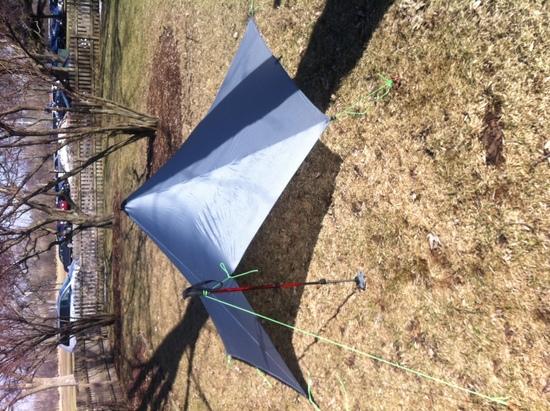
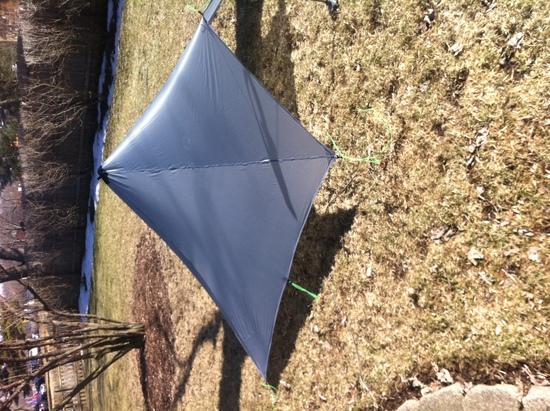
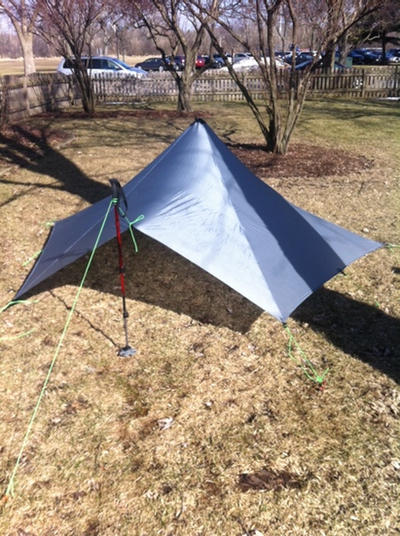
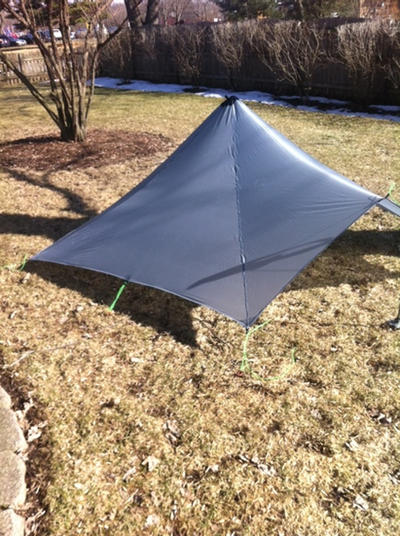
J Mag, I don't have a digitized pattern, but it is really not at all difficult to make something for yourself. You need to start with the dimensions of your Silnylon. I bought mine on Ebay, from this guy: http://www.ebay.com/usr/montanasoftware. He sells by the foot and cuts it from a roll that is 65" wide, which is the widest I could find during my research. Depending on how large you want your Pentagon tarp, you will be visualizing five equilateral triangles out of a rectangle of sil. I wanted the cheapest I could make material wise, while still providing the benefits of a trailstar style tarp. I decided I didn't need the full 7' base dimension of the original trailstar, and opted to do 6.5' to save a bit of money and weight. I bought 20' for around $42.00. 20' divided by 3 = 6 1/2 feet with a tiny extra for incorporating into a seam allowance. You will have two partial triangles left when you are done cutting out your five triangles, which you will use to make laminated corner and edge tie outs, peak reinforcements, a stuff sack for your tarp, and in my case rain mitts to go with my rain poncho, and still have a bit left over for other MYOG ideas. I already had 3/4" grosgrain for midpoint interior loops and peak loops (one outside and one inside the peak reinforcements), and the 1/2" nylon webbing I used for the tie outs (five for the corners, and five for the midpoints along the base). I also had mitten hooks and line locks left from other projects, but you will need five mitten hooks and ten line locks to make my version. You can omit line locks for weight savings of course, but I like to be able to adjust tension from inside the tarp during rainy weather, rather than climbing out and adjusting tension in the rain. I used Gutterman Mara ($3.65 from DIY Gear Supply) for the piece sewing, and Tera for the tie out loops. In all, with shipping, I spent around $50.00 for this project, but to buy everything you need I estimate less than $80.00. You can find the silicone adhesive at Home depot, I used the stuff from liquid nails.

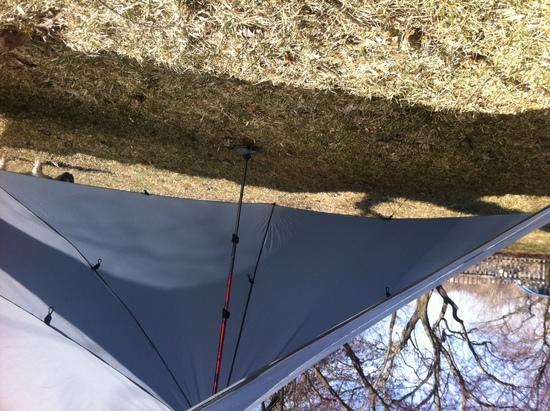
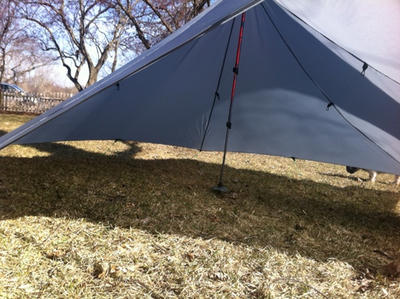
To make the reinforcement patches, I traced the pentagon shape of the peak, made a paper pattern, then cut two pentagon patches from left over sil. If you want it extra strong, you can cut four, and composite two together with the adhesive so you have a double thick patch on the outside, and a double thick patch on the inside. I didn't go that route, I just cut two and used one layer for top and bottom. I used the adhesive to tack on the two patches before sewing them on 24 hrs later. I spread a thin coat on the tarp where the patch would sit, and also on the patch itself, then carefully applied the patches to the tarp, making sure to squeeze out any air bubbles with a wallpaper roller. I used the same method on all the tie out reinforcement areas as well, and there are links on BPL fully describing the process: http://www.backpackinglight.com/cgi-bin/backpackinglight/myog-laminating-silicone-impregnated-fabrics.html#.Uy7xMSij7fs. Makes very secure reinforcements. Make sure that if you want tie loops on the top and under side of your peak for hanging the tarp from above, and a hang point inside, that you apply them to the two reinforcement patches before attaching them to your tarp. It can be very tricky to do a full adhesive lamination on the peak due to the geometry of the tarp when it is not under tension. You have the option of just tacking down 1.5" -2" of the patch border to the tarp, or you can carefully set the tarp up outside, and apply the top reinforcement under tension crossing your fingers that no seams rip at the peak while doing so. I wasn't concerned with perfection, and did it inside, using a 2" line of adhesive along the borders of tarp and patch. It worked well, and when it is done and set up, it looks just fine. Time will tell if it effects the strength, but I double top stitched around the reinforcements through the tarp peak, and I think it will do a fine job of handling the tension. I considered doing the peaks with a heavier material like dyneema grid stop, but opted for the lighter sil.

PostedMar 25, 2014 at 9:33 am

Thanks a lot for the response George. I am going to order up some silnylon soon and get to work.

I think your instructions should be more than clear enough with the included pictures. $80 is a great deal for a tarp like that and I think yours should last a long time since it looks like you put in a lot of thought.

When I finally get around to making it I'll have to bump this thread with some pictures.

Sam Haraldson BPL Member
PostedMar 25, 2014 at 11:59 am

Wonderfully done on the pattern and instruction set here. Most appreciated by those attempting this as well I'm sure!

PostedMar 25, 2014 at 1:13 pm

They are kind of fun to make, but require some time. I look forward to seeing pics from those of you willing to give it a shot! I was more than happy to invest the time for the $150.00 savings.

PostedDec 12, 2014 at 12:49 pm

Hello,

Did you use an equilateral triangle or an isosceles triangle?

If it was an Isosceles Triangle, how long were each of your diagonals if your base was 6'6"?

Also what angle did you use at the top point? 72 degrees?

I want to build a similar model, but figuring out the dimensions/angles of the triangle seem a bit difficult.

Great job on your tarp!!

Jerry Adams BPL Member
PostedDec 12, 2014 at 2:53 pm

from MLD website, trailstar has each of the 5 sides is 7' 2" = 86 inches wide

it says to use trekking pole for center pole. That would be 145 cm = 57 inches.

If you look at one side panel, it's maybe 54 inches from the center pole, horizontally, to the edge? So a side panel length down the center is sqrt (57^2 + 54^2) = 78.5 inches. Then the edge of a side panel is sqrt (78.5^2 + (86/2)^2) = 89.5 inches.

So the side panels are isoceles triangles with two sides that are 89.5 inches and one side that's 86 inches. I might make the 89.5 inch sides catenary curves?

Viewing 24 posts - 1 through 24 (of 24 total)
Loading...