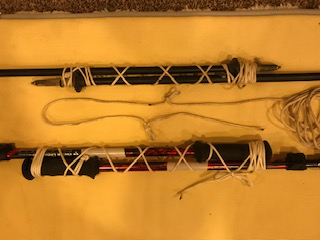
This method connects / lashes 2 trekking poles producing a very strong connection that self-tightens. It can be used tip-to-tip, handle-to-handle, tip-to-handle, and w/ or w/o straps … and only needs 12′ of 550 / paracord. It also works on non-adjustable, muddy or clean, foam or cork, thin or thick poles. Plus, the cord is still multi-use.
- Cut 12′ of 550 cord and melt the ends
- Make pen marks at 12″ and 36″ from one end. Tie a small overhand loop at each mark. Small being that loop is tight on the tip end so that it slides tight a bit before the stop or basket (typically 2″ from the carbide tip. (It will loosen up in time.)
- When using a tip, the end loop will go over a tip. When both tips then both loops. When using straps, the end loop will tie the straps together. When connecting a handle w/o a strap the loop(s) is used to create slip knots around the base of the handle. (Pro-tips for handles: Feed a bight into the loop, not the long end of the cord. Make sure the loop when placed won’t slide in direction of compression.)
- You’ll find the next steps easier when the sections not being tied together are collapsed.
- Self-tightening comes from wrapping the cord tightly around both poles between the loops when they stretched out (i.e. the tips are closer together than in the final state). By adding compression, the wrap pulls the two poles closer together. Typically this is 3-7 wraps depending on basket thickness.
- Resistance to bending comes from tightly wrapping the long end of the cord around the very end of one pole and then also at the very end of the other pole. The cord should continue in the same direction as the previous step so that when the cord is wrapped from one end to the other a diamond pattern is formed. Strength comes from many tight wraps on the ends of the poles, not in the middle.
- The diamond pattern (formed by wraps going opposite directions) also help to self-tighten under compression and keeps it all from untwisting.
- To finish up the lashing, tie the short end to the long end with a square knot or in the case of having only one end, use simply wrap the line around itself a few times and pull hard… no knot required.
- If you have non-adjustable poles but want adjustable heights when tied together, add a few more small loops then experiment to find the resulting double-pole height.
- Depending on your specific poles (2 or 3 sections, section length available, diameter, etc. you might have to shorten the gap between tied loops by 2 or 4 inches. You won’t know this until trying Step 4 in various configurations.
- After you try it on your poles in various configurations, feel free to trim the cord down a bit. (I have 3 different makes of poles. The full 12′ is needed on only the fattest ones.)
- To untie, collapse the poles, untie the knot, stand up, and let the poles spin to unravel the whole thing.
Bonus pro-tip: Wrap a piece of reflective tape near the top of your pole for traffic safety, finding your tarp or trail to the cathole at night, your loose pole in the early morning, and to make it readily different from all the similar poles in your Boy Scout Troop.