Topic

Cut 14″ off my Neo-air xtherm large

Viewing 12 posts - 1 through 12 (of 12 total)
PostedJan 13, 2014 at 5:29 pm

Per this video
http://www.youtube.com/watch?v=kumSl-cbLlY

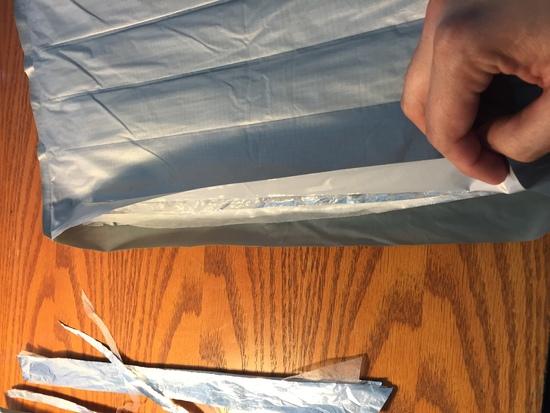
First step was to cut 12" off the foot end and trim back the innards to the first crease.
I then cut another crimped segment off the pad and pulled the innards out of that.
I plugged our iron in and set it at max and let it come up to heat.

First test was on the 2" wide piece to see how the xtherm material would react to that heat setting. The bond was effortless – a little too much so in fact so I took the iron setting down from 7 to 6 and waited 5 minutes.
Having cooled I subjected the 2" piece I'd bonded to a pull test and found that the plastic membrane of the top (silver) layer would in fact delaminate without the heat-bonded adhesive separating.

2nd test was on the 12" section that had made up the radiused foot end of the pad. I c-clamped it to the ironing board per the video.

Here's where I diverged in technique a bit from that shown in the video and for two reasons:
– The xtherm is made with a "sticky" exterior both top and bottom halves (I assume to resist slipping on tent floors and bedding) so the iron showed significant drag
– Even the '6' heat setting is enough to deform the plastic membranes slightly

Given these characteristics I knew I wouldn't be able to slide the hot iron sideways as shown in the video without introducing wrinkles – each with the potential for leaks.
My method then was to place the side of the iron against the clamped straight edge and pull outward, using my left or right hand to tension the material as needed to avoid wrinkles. I worked this way smoothly but rapidly from the middle outward toward each corner.
Note we are still experimenting on the 12" end piece here.
I sealed the cut end all but 1/2" in one corner and loosened the clamps and pulled it out from under the straight edge. I then blew air into the 1/2" opening to inflate this test piece into a pillow and rapidly plopped it down onto the ironing board and sealed up that last 1/2" and let it cool for 2 minutes.

I then place it onto a coffee table and sat on it to watch TV for a few minutes. My form would not be described as svelte so this was an adequate test.

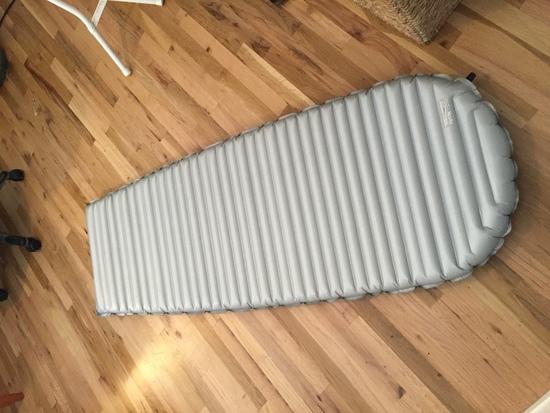
All was well with that so I put the now 63" xtherm under the straight edge and clamped her down and had at it. Easy peasy. Anti climactic even given all the hand wringing in preparation to pull out the scissors and make that first cut.

One caution: do not apply too much heat or you will introduce small bubbles into your heated joint. Something is off-gassing or delaminating or whatever. Test on the other two pieces to find the right heat and travel speed for your iron.
You want the iron hot enough to deform the plastic slightly as that's how the factory joint looks. But too much and you'll get the small bubbles. Use your practice pieces to get the final joint right and you'll see how easy it is.

I'm going to save the small pillow segment I made for something. Maybe nothing. Might come in handy for the outdoor concerts my wife likes to go to.

PostedJan 14, 2014 at 5:25 am

Thanks for the report. I have a large Xtherm on order that I plan to cut down.

PostedJan 14, 2014 at 8:31 am

No problem. I hadn't been able to google up postings of folks cutting the xtherm specifically so wanted to post my experience here for others.

It's very important to start in the middle as seen in the video. I do think it's a mistake to slide the iron along the guide. That is almost certain to result in a wrinkle as seen in each corner in the video.

When the guy in the video (sorry, I'm new here) goes at those wrinkles hard and repeatedly with the nose of the iron I'm fairly certain he's introduced bubbles there.

Place the arced portion of the side of the iron against the guide and pull outward. Using your other hand to manipulate the membrane as you do so and wrinkles won't be a problem.

Roger B BPL Member
PostedMar 5, 2014 at 12:38 am

Thanks for sharing, I have been considering this mod myself. As a matter of interest, what was the final weight?

PostedMar 10, 2015 at 1:13 pm

I just removed the bottom 6 horizontal sections from mine. Reduced weight from 20.7oz down to 18.3oz. I did a test run with just the bottom two, bonded it with my iron and inflated it to test it. Then I repeated the process with 4 more. It is not complicated at all. Cut off the section you desire, trim back the reflective material inside of it, and seal it with an iron (I used a 5 out of 7 heat setting)xtherminside
xtherm

Ryan Smith BPL Member
PostedMar 10, 2015 at 3:48 pm

Nice job. Been thinking about doing that with a Large Xlite, but I just don't know if I can live without that extra length.

Ryan

PostedMar 11, 2015 at 2:42 pm

I felt a little hesitant about trimming it, not only because its an expensive pad, but because it was nice to be able to completely stretch out with my arms above my head and feet extended on it. But the pad is already luxuriously wide and warm, so I had to try to offset the extra weight. I'm 5'11", and usually sleep on my side. With a slight bend at my knees, I comfortably fit on a 66" pad. I'm going to try it this way for a couple nights, and possibly shorten it to even more of a torso length pad. I need to decide if I'm comfortable with the drop-off if I use my backpack under my lower legs.

The width of this pad is just fantastic. I feel silly for even trying to sleep on a 20" wide pad in the past.

PostedMar 11, 2015 at 4:00 pm

I've been considering picking up a Large Xlite and trimming it down to torso length ever since I realized that it would be about the same weight or less than my ridge rest.

Only curious if anyone has ever used one for a whole thru hike before.

PostedMar 11, 2015 at 6:32 pm

I can't answer that, but I will say on both this, and a klymit pad that I trimmed and resealed, the bond was indistinguishable from the factory bond. If you hold it up to a light, through its translucence the bonded seam has the exact same "texture" as the factory bonded seams. Furthermore, you have some control on just how much margin of the pad you can bond, therefore you can make the trimmed edge have a wider bonded edge, which I imagine would prevent it from totally separating as easily.

David R BPL Member
PostedApr 18, 2018 at 9:01 pm

Has anyone trimmed down the Xtherm to torso length and used backpack under legs?  Wondering if this is comfortable with the drop off (pad is 2.5″ tall) and still warm.  My pack is ULA Circuit and already has thin padding.

Viewing 12 posts - 1 through 12 (of 12 total)
Loading...