Topic

Using Jetboil Flash Pot with Alcohol Stove

  • This topic is empty.
Viewing 4 posts - 1 through 4 (of 4 total)
The Quirk BPL Member
PostedDec 14, 2013 at 11:06 am

Your Jetboil system works fine. But you suspect an alcohol-fueled stove might be a lighter, better option. Rather than investing countless investigative hours and dollars putting together your new alcohol stove kit, try this project. A pain-free transition to an alcohol stove with minimum up-front investment, using the Jetboil Pot you already have.

Project Goals:
– Use my Jetboil Flash 1.0 Liter Pot with alcohol stove.
– Cook with the Jetboil neoprene cozy in place and not burn it up.
– Minimum engineering, minimum cost.
– Follow and trust the well-traveled path of design shared by others.(Don't reinvent the wheel).
– Be able to boil 2-cups of water in 5 minutes or so.

Step 1: Make a Penny Stove
Tools and supplies: Exacto knife, Aluminum cans, punch for burner holes.

Jurey Penny Can Stove
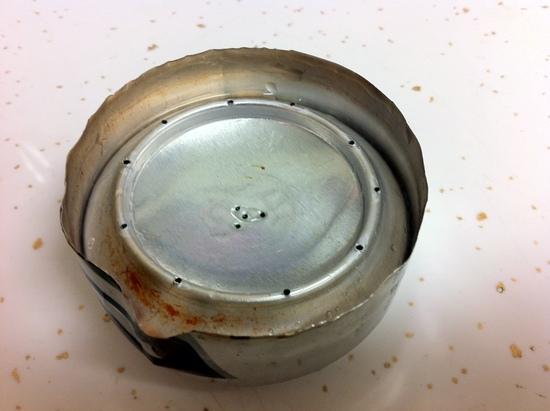
Make a penny can stove. Follow the directions of http://www.jureystudio.com/pennystove/penny2.html .

I modified Jurey's design slightly. I punched the burner holes on the very top of the stove, to try to focus the flame on the narrow-bottom Jetboil Pot, and keep the flames from climbing up the pot sides and burning up the cozy.

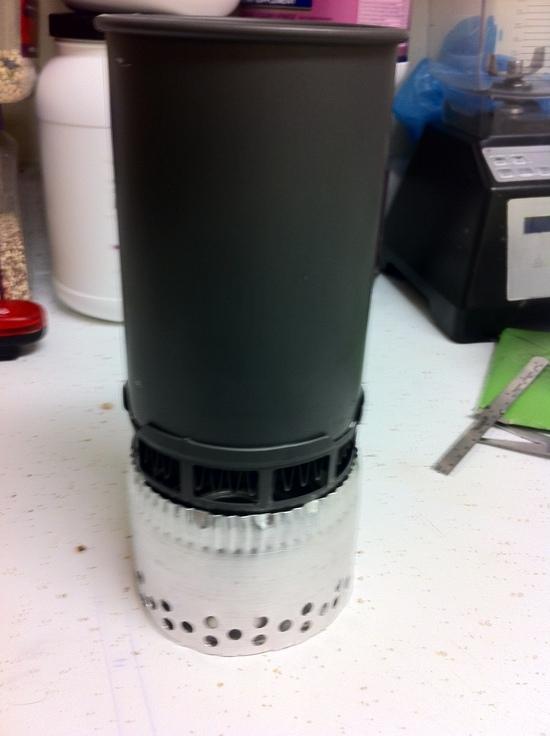
Step 2: Make a Pot Support/Heat Channel
Tools and supplies:
4" Aluminum Dryer duct extender
Hole punch (Office type works)
Scissors will work or use tin snips
Pliers

Pot Support/ Heat Channel
Trim the fatter side of the duct so the total height is about 2.75 inches high. The serrated side should be really close to fitting your Jetboil can. Using a pliers, evenly crimp around the edges bit-by-bit, until your can fits nicely. Then punch a bunch of holes in the bottom for air intake – don't bother getting too scientific about it.

Step 3: Cook
– Light your stove.
– Put your new pot support/heat channel around the stove.
– Put your pot on top.
Jetboil Pot on Homemade Support, Penny Can Stove Inside
Notes:
– You can get 2 cups of water to mild boil in around 5 minutes.
– The 2.74 inch height of the support is about right so you don't burn up your cozy, but still get efficient use of flame
– Do a test run in darkness without your neoprene cozy, make sure your flames don't climb up the side of your pot. If flames do reach up the side, you can start down the slippery slope of trial-and-error engineering between your stove design and pot support height. Or you could just leave the cozy off.
– Stowage/storage. The pot support fits around the pot if the crimped side is at the bottom of the pot. Sorry, the pot support doesn't fit around the pot and cozy, you'll have to take the cozy off.
– Don't cook or test inside. Burning fuel can easily spill and travel, catching your home on fire.
– Never add fuel to your stove while it is burning, the vapor will puff-explode.
– Penny can stove: 0.35 Ounces
– Aluminum Pot Support/Heat Channel: 0.8 ounces
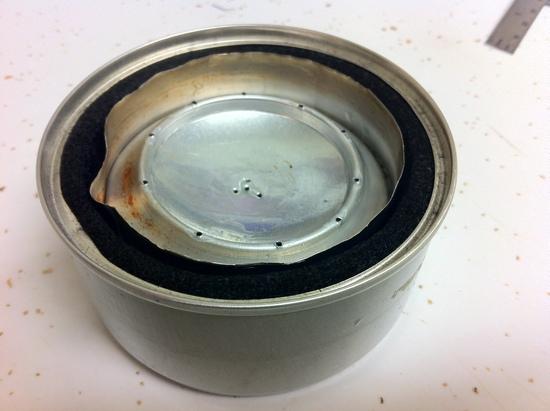
Extra Credit:
I made a insulated base for my penny stove. It's just some welder's cloth lining a catfood can. I put the penny can stove inside. The base weighs 0.65 ounces.
Insulated base for penny can stove

David Thomas BPL Member
PostedDec 14, 2013 at 3:15 pm

Quirk: Very nice little project. Thanks for posting it.

I'm often beating the drum about heat exchangers. If out for more than 5-8 people nights, you'll come out ahead. Even sooner with low-heat-rate stoves like alcohol burners. That's because the longer it takes to boil, the more losses you have to the environment off of the pot. Your project helps that in two ways: shorter boil time AND using the cozy to reduce losses of the pot sides. Plus, of course, you're extracting more heat from the combustion gases.

The Quirk BPL Member
PostedDec 14, 2013 at 4:25 pm

David,
– I agree about the importance of the Jetboil cozy keeping in the heat. At first glance, the cozy seems like a cheapo short cut for a pot handle, but does seem effective in keeping the heat in longer. I'm a eat-straight-out-the-pot kinda guy, so I like the pot insulation. I ate out of a non-insulated MSR reactor pot for 2665 miles once and found it cooled off too quickly. I imagine the Titanium pots are even worse.
– As for the heat exchanger on the bottom of the pot, I wonder if any benefits are more related to the maze of hot air-flow recycling around the surface of the bottom of the pot, rather than heat connectivity transferring from the extra metal to the metal closest to the water.
– My setup focuses the heat pretty efficiently on the pot. There isn't much hot air shooting up or out the side, nor does the support ever get very hot.
– Now that I've gotten past the basics of the penny stove mastered, (fitting the top and bottom snugly without tearing was trying my patience), I'm experimenting with different penny designs. Such as different burner-hole configurations and numbers. I'm getting close to a 0.5 ounce boil in 5 minutes. The insulated base does seem to really help with getting the primer time shorter, and quicker to consistent jet cooking which I'm shooting for.

I think the other variable that can make a big difference in this setup is the pot-to-burner height. I wonder what part of the flame hitting the pot is of optimal efficiency?

Quirk

David Thomas BPL Member
PostedDec 14, 2013 at 5:43 pm

>"As for the heat exchanger on the bottom of the pot, I wonder if any benefits are more related to the maze of hot air-flow recycling around the surface of the bottom of the pot, rather than heat connectivity transferring from the extra metal to the metal closest to the water."

Both stirring up the air flow and conducting heat through the metal fins helps. If you were going to primarily for the first effect, I'd call them "vortex generators" like on airplane wings and position them at an angle to the flow. I've found that to help on the vertical sides of a pot within a tight-fitting chimney/shroud. It would probably also help on the bottom of the pot.

> "I think the other variable that can make a big difference in this setup is the pot-to-burner height. I wonder what part of the flame hitting the pot is of optimal efficiency?"

Experiment with the pot being mostly out of the visible flame. More importantly, keep the HX fins away from the colored, bright part of the flame (let the flame burn and it won't oxidize the HX fins as much). Cold metal will "quench" a flame and that results in unburned hydrocarbons and more CO emissions – both of which are are bad. This is one reason we so often see low-to-moderate flames being more fuel-efficient than large flames.

Compared to most set-ups, I'd go with a little more pot height above the burner and I'd place HX fins near an outer diameter of the pot.

Viewing 4 posts - 1 through 4 (of 4 total)
Loading...