Topic
MYOG Apex quilt finished!
Forum Posting
A Membership is required to post in the forums. Login or become a member to post in the member forums!
Home › Forums › Gear Forums › Make Your Own Gear › MYOG Apex quilt finished!
- This topic is empty.
-
AuthorPosts
-
Aug 23, 2013 at 7:20 am #1306854
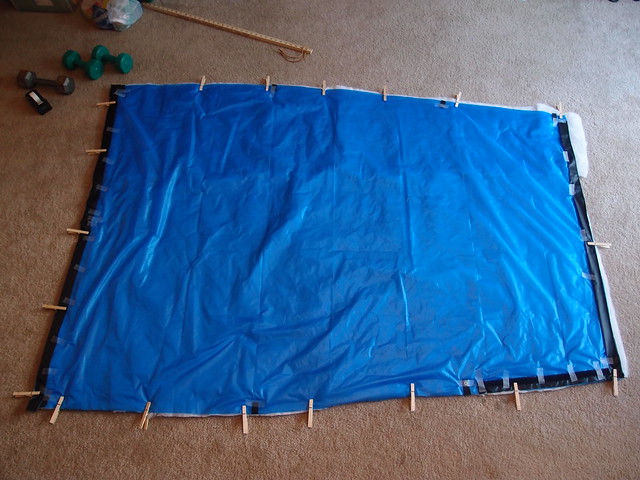
After a failed attempt at making a sleeping bag for my wife I salvaged the insulation and decided to make myself a summer quilt to pair with my recently purchased EE RevX 20*. Salvaging the insulation meant stitching together four smaller pieces to make one sheet that was large enough. After doing that I can say without a doubt I should have just ordered a new sheet of it. Oh well, I think what I have will work it was just more of a hassle than I anticipated.
I used bits and pieces of instructions and threads I found around the internet, particularly the Sin50 instructions and An-D's quilt posted here on BPL. I have made a down quilt and a couple of Thru-hiker kits in the past but am definitely a novice when it comes to sewing so all the advice I found helped a lot.
So, onto the actual quilt. I used 1.1oz ripstop for the liner and shell and 2.5oz Apex insulation. I sewed separate drawcord channels at the head and foot ends because I'm not very good at rolled hems. The foot box uses snag-free velcro and has a snap 1" above the velcro to keep it closed when I roll around. I sewed one side of the velcro straight to the shell and the other is on a flap, ala the Sin50 quilt. The head end also has a snap and uses shockcord that exits in the center of the top seam and uses a 2-hole drawcord. I added one set of grosgrain loops half way between the head end and the top of the velcro in case I want to use a pad strap. I've never used them in the past and since this is only intended for temperatures above 45* I don't think I will. But I added them in case I change my mind later.
Construction was fairly simple. I cut out the liner then laid that over top of the shell material and cut it out and used clothes pins to hold them together. I used clothes pins the whole way through instead of straight pins and they worked great. I then laid that on top of the insulation and cut it to shape and clothes pinned all three together. After that I cut out the drawcord channels and velcro flap from the scraps and hemmed and pressed them. I then pulled the liner off the stack and sewed one strip of the snag-free velcro to it. I sewed the other piece of velcro to the velcro flap. After that I positioned the drawcord channels, grosgrain loops, and velcro flap in place on the shell and used scotch tape to hold them in place. The tape worked awesome, it held all the way through the rest of the process. After all the bits were in place I placed the liner back on top. I then sewed everything together with one line of stitching all the way around the quilt. I sewed with the insulation on top of the stack and used newspaper between the insulation and machine foot to keep it from snagging. This worked great too. I left a 15" section unsewed and flipped the quilt right-side out through the hole. I hand stitched the last 15" closed then installed the drawcords. I tied an overhand knot on the end then slid that to the end of the channel and sewed a few lines of stitching across the channel to capture the knot. I also ran a second line of stitching over all the grosgrain loops. The final step was installing the snaps. I placed these on the grosgrain loops at the head and just above the zipper.
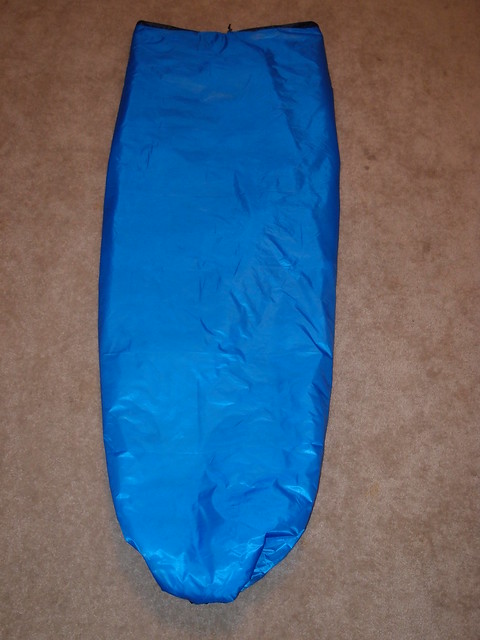
Final size is 52" wide at the head tapering to 42" at the foot over its 74" length. Final weight is 16.23oz and it fits into a 6"x12" stuff sack with a little room to spare. In hindsight I could have done any number of things to shave that last 0.23oz but I'm still happy with the weight. I can't wait to actually use it!
Adam

 Aug 23, 2013 at 7:43 am #2017892
Very nice job! The quilt looks great! I like your color combination, it looks really sharp.
-
AuthorPosts
- You must be logged in to reply to this topic.
Forum Posting
A Membership is required to post in the forums. Login or become a member to post in the member forums!
Our Community Posts are Moderated
Backpacking Light community posts are moderated and here to foster helpful and positive discussions about lightweight backpacking. Please be mindful of our values and boundaries and review our Community Guidelines prior to posting.
Get the Newsletter
Gear Research & Discovery Tools
- Browse our curated Gear Shop
- See the latest Gear Deals and Sales
- Our Recommendations
- Search for Gear on Sale with the Gear Finder
- Used Gear Swap
- Member Gear Reviews and BPL Gear Review Articles
- Browse by Gear Type or Brand.
