I follow the math you are doing with the increase in diameter.
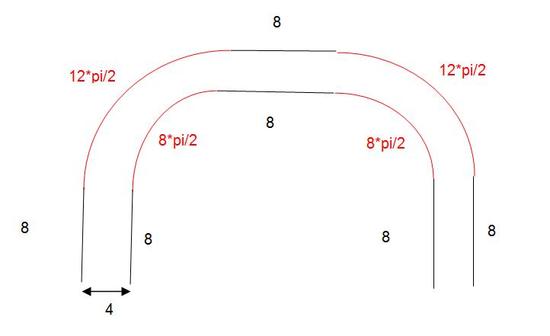
You won't be a circle when you sleep, though. You will be more of an elongated oval. The bit over your chest will be mostly flat and then you will have a curve around each shoulder. The curves around the shoulder will have much smaller radius than if you look at the thing as one large circle. Even those shoulder curves won't be full… The bottom will be flat.
So, I don't think you will need anything like diameter+(2*loft)… I think this will give you a lot of volume to fill with down.
Volume of 50" Circumference = 199 * 72" High = 14,328
Volume of 75" Circumference = 447 * 72" High = 32,184
32k – 14k ~ 18,000 / 850 cui Fill = 21 ounces…
This is before 'overstuffing' around 20% (or whatever amount you like) to make things not so loose.
Maybe think of the bag as a completely flat thing with your baffle height. You pick a point about 1/4 way in from each side and that needs to curve around you. The shell in that area needs to grow and stretch a bit but the top/middle and what wraps around to become the bottom will not need to grow so much…
If you side sleep a lot, it is worth thinking about a bit extra in the middle as the bag curves around the one shoulder there. I have thought about it, anyway.
I don't know any rules about this, myself. So, I can't tell you how much. I will not even tell you how much I have planned to use because I don't know if I am right. I think you will have a lot of extra material and this is the way I rationalize it. I was interested to hear the rule of thumb regarding add baffle height to shell.
I agree 50" is not very big. When I read that, I figured you were making a quilt and just called it a bag. You may have already settled on 50 with reason, but I would also recommend either the sheet idea or looking at store bought bags.
> … it will come out to 62in. Or I could just make it 33in so that it comes out to 58in. total. …
I got a little lost here, but you are coming up with 58" and I think that sounds more better. Think about where the extra girth needs to go, where the curves will be.
– – – – Here. This is a helpful thread I found.
This fellow made a quilt and a pretty detailed pattern is described in the PDF file stored as his 'gear list'.
Here is the thread with pictures: http://www.backpackinglight.com/cgi-bin/backpackinglight/forums/thread_display.html?forum_thread_id=63726
This is for a quilt. He used lengthwise baffles but where the extra girth needs to go can be visualized for crosswise baffles.
He cut the top/bottom in three sections and then sewed them together. This is in place of one great sheet then curved around the body and I think it helps things curve/work better. Since this is a quilt, he had top + 2 sides. You would have a top to sew to a bottom. This uses more material and might not be interesting to you. The graphics are good, though.
Looking at the graphics, it appears he has an extra 40mm (check a PDF for exact measurements) on each side of his shell for a total of 80mm or ~3" girth. But the top is superimposed with the bottom so the extra girth is doubled, I think… I believe this fellow used about an extra 6" girth. As I say, it was a little hard for me to understand, so check my estimate and see what you think. [His baffles are not as high as yours so you might need more girth]
He has a detailed, pattern as a PDF stored as the 'gear list' in his profile. It is of interest just for more precise measurements; the interesting graphics are in the thread.
The pattern is really a grid you create following his measurements and then connect the dots.
Sounds like you have accepted the mission. Good luck.