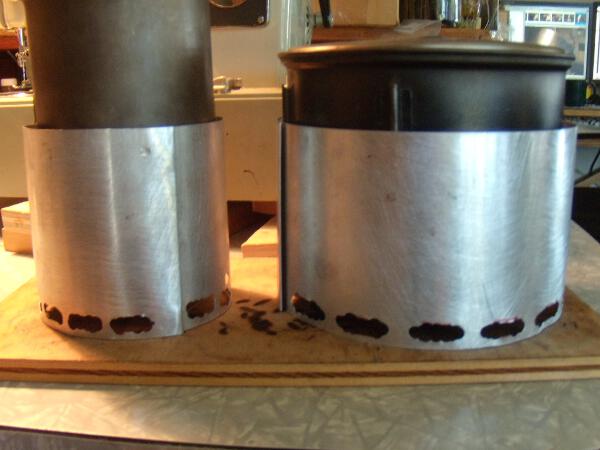
Following some invaluable advice from sgt rock, and using his ION stove as a template, and after much testing and debugging, the final bit worked out during a very well timed hot spell here, which forced some redoing on of the screen, here’s a fairly easy to make 1/2 ounce slx narrow pot stove/screen setup
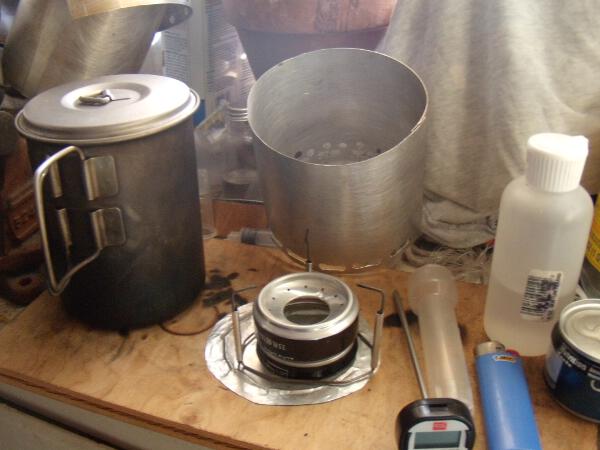 .
.
I had a bunch of wishlist items from using my stoves over the last few years, and also from seeing that sgt rock was able to achieve a wide pot 12ml boil using only SLX fuel, so I used that as my bar to aim towards, but with a narrow pot setup, I like narrow pots, they hold heat better when you eat, and you can fill them more without overflowing, and they pack up super nice, nothing against wide .9 or 1.3 liter pots, in fact I will do the next round of testing on a 1.3 l evernew wide, but this is about narrow pots and getting good efficiency without a lot of tricks.
My goals were basic:
1. at worst, 15 ml to boil 2 cups of water, using a narrow pot, period. My last versions not only got there, they did it in 14ml, but I’m not as confident that number will be consistent, so I’m calling it 15ml to be on the safe side.
2. SLX as fuel, ie, this setup does not depend for its efficiency on using high ethanol fuels like everclear or kleanstrip green.
3. No weird or hard to pack wind screens, like cones or whatever else. Screen should fit inside my pot, that is, without taking up much room. Screen should also not need any unusual ways of connecting the two ends. I use a flat felled joint, so to speak, ie, 1/2″ of both ends folded over carefully then inserted into each other, that works very well and is basically idiot proof. It’s also a big improvement over my previous screens, which I used 2 bolts/wing nuts to hold together.
4. stove needs no priming prior to placing pot over it, ie, light, put put on, and that’s that. The ion stove is perfect for this, my previous testing stove was a modified inpointing penny stove, which is harder to light and has parts you can lose. I like the penny, it’s fast, but it’s not as efficient as the ion stove/screen setup.
5. As a subset of 1, an 8 ounce bottle, thin and light, carries 8 days worth of fuel, which means you have a very comfortable margin for 7 day trip. I wanted a slim bottle both because it’s much stronger than a regular 12oz water bottle, and because I made a slight miscalculation when laying out the pockets for my myog pack, and they are just a touch too narrow, making holding a normal 32 oz bottle and a 12 to 16 oz fuel bottle a bit tight. 8 oz bottles are either very thin or very narrow in general, and are very strong since they don’t have a big surface area compared to the volume.
The key area, as noted by sgt ock, is the screen, and particularly, the actual area of the bottom inlets, it needs to be about 2.5 square inches by my current rough calculations to get the stove cool enough to not over-vaporize the fuel, which is always teh cause of inefficient burns, at least so far in my tests.
Besides sgt rock, who designed this basic stove, though his focus and testing were all on the wide .9 l evernew, which is significantly different in terms of the stove / screen combination, and who deserves most of the credit for his very good testing initially, a few key comments let slip during other stove conversations, particularly jon fong, who noted that he did not smell any slx when testing his flat cat gear stoves, which are by the way also efficient, though their screen didn’t meet my design specs, but I do admit to testing on a few copies of those during htis process. Anyway, that casual comment finally clicked in my head, and I realized that two things always happen when you fail to get efficient burns:
1. The fuel vaporizes more quickly than it can fully combust as a gas, this results in unburned or partially burned fuel gases, which results in an acrid, eye burning sensation, and a strong smell. So that smell/eye burn, besides being really bad for you, means the stove is not efficient. Jon, I believe, had not noted this smell issue because his stoves/screen setups are very efficient, which it took me a while to connect the dots re the core point.
2. This one is a bit more subtle, and I only noticed it while holding a digital testing thermoter in the various configurations as I tested them, and is almost counterintuitive, until you think about it more: an inefficient stove can result in a much hotter outflow of air rising from the screen and stove / pot setup. This is I believe because the fuel keeps igniting as it rises, but that ignition results in very little actual heating of the pot because it’s happening after the gas starts to rise around the edge of the pot.
It took a fair amount of testing to finally connect these two things, and I think it was only because air temp rose to the low 80s during my last weeks of testing, which makes these problems much more visible and much worse, that I finally connected these last dots, and figure out how to work around it.
I don’t have a screen how to made yet, which is probably for the best since I tested so many hole patterns before finally getting to the goal of max 15ml slx to boil 2 cups 70F water.
I was particularly struck by sgt rock’s use of slx in reaching his 12ml boils, because it has a signfificantly lower energy content than high ethanol alcohols like kleanstrip green, which means his efficiency is even crazier than the average test that people report here using high ethanol fuels. I was also previously using the m ore expensive and harder to find klean strip green fuel to get to the 20 to 17.5 ml efficiency with a penny stove, so the increase in efficiency using the ion / screen method is really quite large.
All measurements are via digital thermometer, home made and well calibrated graduated cylinder for fuel measuring. I’ve logged most of them, having forgotten only what proved to be the true key, air temp around stove, outside air that is. Wish I’d logged that as well, I’d have even better data, I did use barometric pressure and humidity but saw no real pattern there, I believe the actual air temp is the key, at least that’s my current working assumption.
The design here can be further optimized by at least 10% to maybe 15% because when I tested the screen prior to adding the slot holes I got stunningly good results by lifting it with paper clips up 3/16″ all around, so I know there is further room for improvement. That boiled to a full 212.3 in about 8 minutes, maybe 9, and boiled for at least 2 minutes, maybe more, using 15ml. But that design is not real world practical so I decided to just use what I have now while still working on it now and then. I believe all further work will focus on the screen. SLX is also a lot cheaper, and you can buy it in gallons, and reflects very well the fuel you could expect to actually locate if you need to buy it somewhere, or at a trail town, so I think it’s a very good source. Higher ethanol fuels will just be a bit more efficient, along with a bit of sooting. Pure methanol like yellow heet should probably require about 1ml more fuel, give or take, you’d have to test it to see.
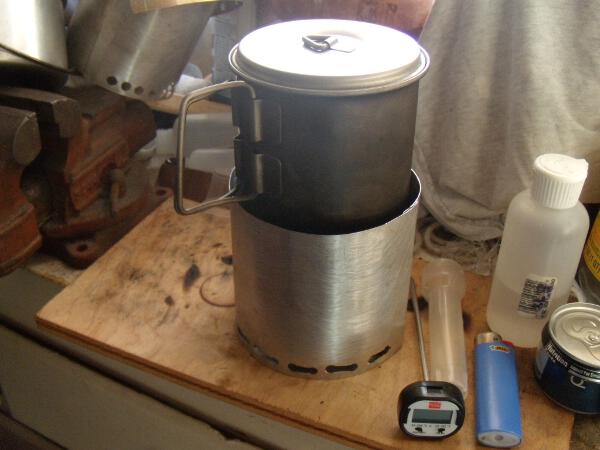
As to why I found it a good idea to do this much testing etc, well, sometimes in life circumstances out of our control keep us from spending as much time hiking/backpacking as we’d like, this past year unfortunately was one such time for me. Besides, playing with stoves is fun, I’ve learned all about alcohol ethanol/methanol efficiency in this process as well.
This stove/screen is ridiculously easy to use, fill, light, and setup, it’s really almost absurd, in terms of fiddle factor, I made it 4x easier than my earlier penny stove versions. My hats off again to sgt rock, he did all the heavy lifting on this in terms of serious testing, if there is ‘an answer’ to the question, I’d say the ion is it, more or less. Because it’s easy to use and make, hopefully we can use the 1/2 slx as a base amount of fuel when comparing other fuel and stove types, in the past people have used as much as one ounce of fuel when comparing alcohol to other fuel types, which is not fair since it’s not accurate in terms of what efficiency you can actually get without a lot of work. And 1 oz alcohol weighs .8 oz, remember, also a key factor in comparing fuels and stoves.
Do of course heed all regional fire warnings and stove restrictions, as being talked about in another thread, unfortunately, the prediction I made a few years back here re alcohol stoves and them getting banned in fire season due to bad practices and bad designs has proved to be sadly true, which is another reason by the way I did not want a stove that does not use a pot stand, just another spot for someone not too aware to fail and start the next fire.
Weight of stand, screen, and stove, heat reflector disk, 44 grams, I almost forgot. That’s for a snowpeak 900 ml setup. I’ve tested this a few times on a 600 ml 10cm pot I have, steel, very light, lighter than ti in fact, and it is not quite as efficient, but does boil at 15ml fairly comfortably. I don’t know about narrower pots, I’m guessing they won’t work super well, but they might, you’d just lose efficiency is my guess.
Thanks to all the stove people here, I read the threads though I don’t usually comment on them, so I’ve learned a lot over the years seeing how other people do it, and also in seeing how I want it to turn out re screen/stove/stand. This is about as neat, clean, and simple as I can get it, everything is very durable, nothing flimsy or awkward to use or store or carry, everything fits in the pot, along with all your other kitchen stuff, small cup, spoon, tea spices etc.
The space of the 900ml tall pot packed is why I didn’t want to go with a wide pot, plus it holds the food heat so well in the cold, having a smaller top surface area to radiate heat out while the body is surrounded by the cozy as I eat, so I really wanted to see if I could get a good easy to do narrow pot setup that equals or betters most of the stuff out there.
I’m putting this in gear forum because I think this kind of stove thing involves a lot of general interest areas, re efficiency, methods, screen types, stove types, etc.
Happy trails, I’ll have the rest of the how tos done in a while, one for a very well constructed cozy, one for the screen, and maybe one more for another pot stand using the ace hardware materials. All materials here by the way come from Ace Hardware, 4″ aluminum flashing, 0.055″ music wire, aluminum tubes, drill bits for the holes, plus the two 7.5″ soda cans.
By the way, if you see on the wood, those black rings? those are from stoves that burn openly without using a base, that’s how hot it gets under the stove, for example a tea light candle stove, or any stove that burns the fuel basically openly in the stove. That is why you should always use a stove base, and include it in the design of the system, along with the bottom heat reflector of course.