Topic

Quilt Without Cold Spots


Forum Posting

A Membership is required to post in the forums. Login or become a member to post in the member forums!

Home Forums Gear Forums Make Your Own Gear Quilt Without Cold Spots

  • This topic is empty.
Viewing 20 posts - 1 through 20 (of 20 total)
  • Author
    Posts
  • #1304324
    Andy Duncan
    BPL Member

    @bluewater

    Locale: SoCal

    There is nothing worse than being woken up in the middle of the night by the cold because the down in my quilt has migrated to the sides.

    After making an "ultimate" winter quilt last season I thought everything would be fine, until I woke up with freezing toes in October. I couldn't believe it. My "ultimate" quilt had 15 ozs of 900 f/p down and I was still cold!

    When I got home I tried adding additional vertical baffles to the footbox. . . and by March I was sleeping through the night while cowboy camping on the snow.

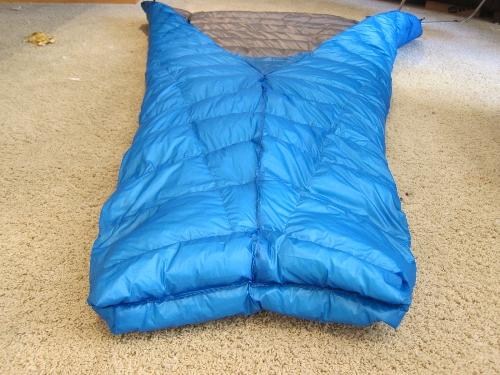
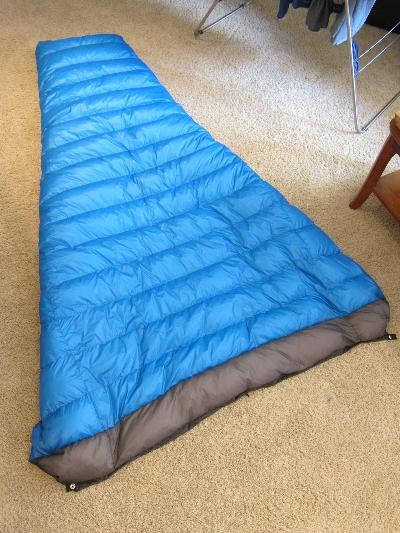
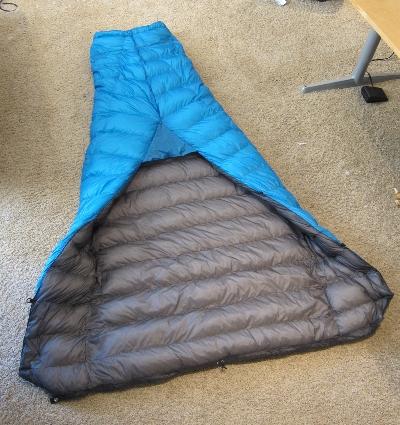
    For this season in the Sierras I set out to make a lightweight 3 season quilt with no cold spots. I added horizontal and vertical baffles throughout and there are NO sewn through seams. I am 6' 195 lbs so I made it 6'8" long and 57" wide at the shoulders and hips. The last 5 baffles gradually narrow to the 40" foot girth".

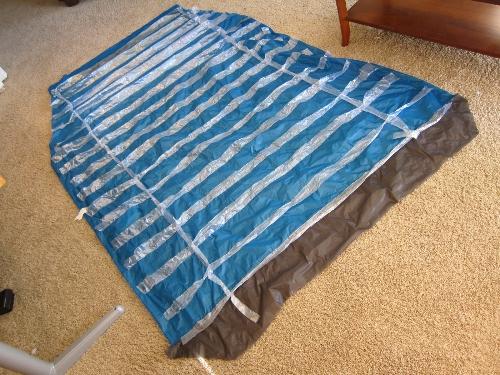
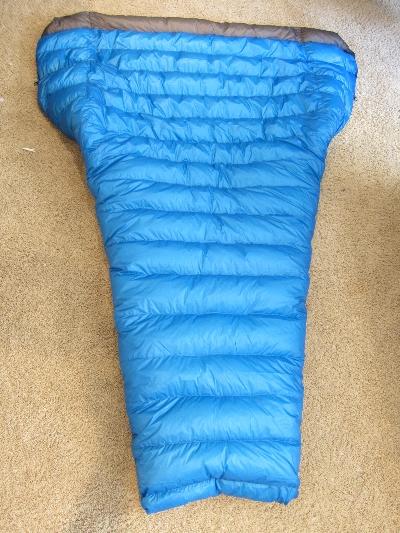
    I decided to use blue M50 for the shell and grey NoBul 1 for the liner. Although M50 has a good DWR it has a plastic feel so I used NoBul 1 for the shell and liner on the top baffle. The baffles are 0.34 oz/sqyd cuben.

    Also, considering the Zpacks and Katabatic 30 degree quilts w/ similar dimensions are between 16.4 ozs and 20.1 ozs I figured a weight in the 16.5 to 17.5 oz range was reasonable.

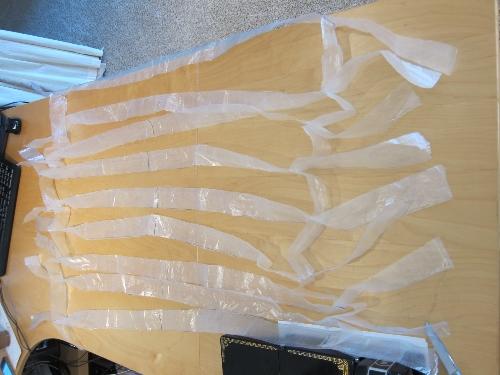
    Making the horizontal and vertical baffle 'matrix' was more work than I had imagined. After experimenting I realized that it was best to just attach the horizontal and vertical baffles first, then attach the whole thing to the shell.

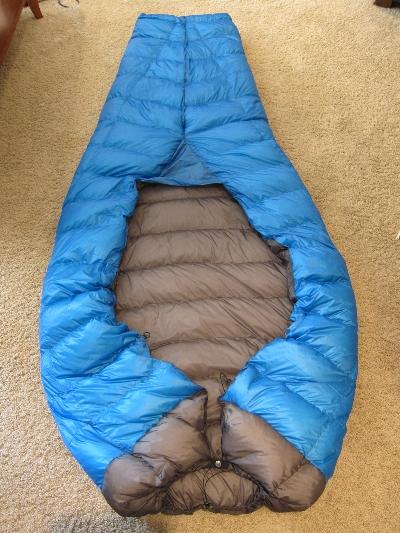
    I used 17 baffles total. The first 11 are 57" x 5" x 1.75". The next 5 diminish in width from 55" to 40" (also 5" x 1.75"). The last one is made up of two baffles, each is 20" x 1.75" x 1.75". This final double baffle is used to cover the seam of the interior of last baffle on the liner.

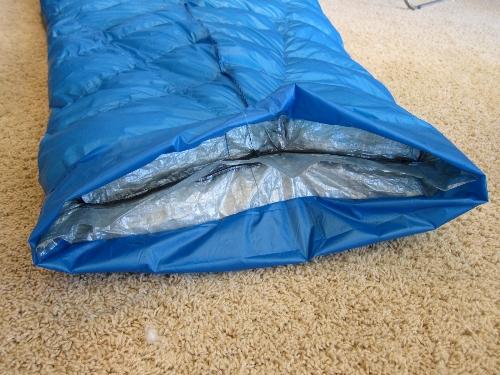
    The middle 37" of each horizontal baffle is completely sealed by vertical baffles. The idea is to keep the down in this middle baffle over the body (and not migrate to the sides). The remaining sides of each horizontal baffle are also sealed.

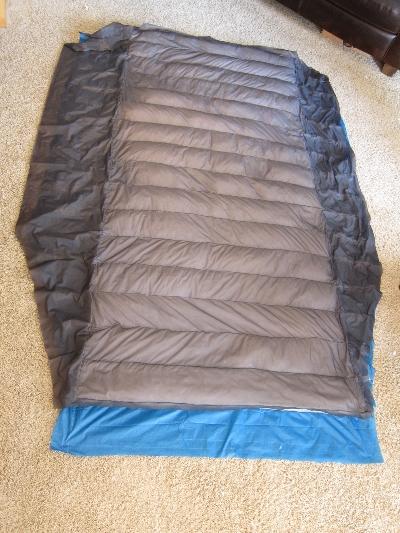
    The center of the bottom of the footbox is made up of 5 baffles that diminish in size as they reach the foot end. Each of these is continuous and none of the seams are sewn through.

    To complicate things each baffle had to be stuffed and sealed individually before moving on to the next.

    I calculated the weight of the down to be 11.48 ozs before starting. This is based on 30% over-stuff using 900 f/p down.

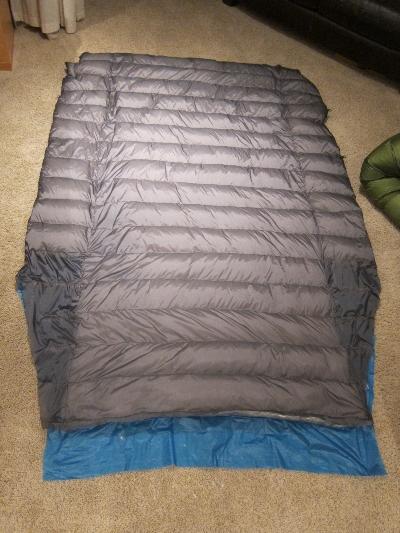
    The final weight for the completed quilt turned out to be 17.53 ozs.

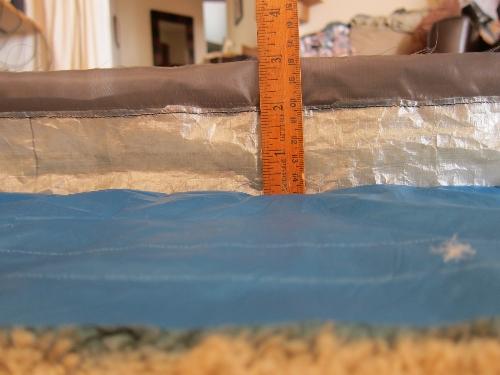
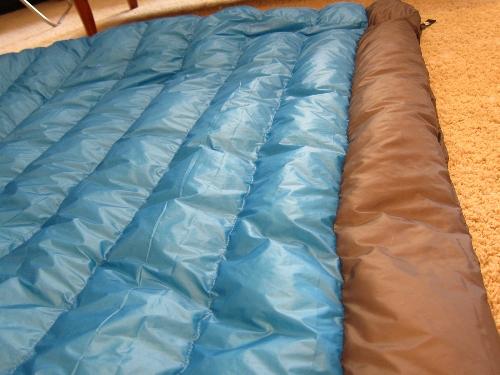
    Although the baffles are only 1.75" deep the single layer loft is around 2.5" between baffles (about 5" double layer loft). 2.5" of single layer loft should be warm to 20 degrees. This is about 10 degrees warmer than I had anticipated.

    00

    01

    02

    03

    04

    05

    06

    07

    08

    09

    010

    0101

    011

    012

    013

    014

    #1997625
    J C
    BPL Member

    @joomy

    Wow! This is super impressive. Makes me feel a little guilty for ordering a quilt made by someone else! I will have to try my hand at a making one one day…

    Can't believe your final weight. What temps have you tested it to?

    #1997631
    Greg Mihalik
    Spectator

    @greg23

    Locale: Colorado

    +1

    Very Sweet Indeed.

    #1997649
    Jerry Adams
    BPL Member

    @retiredjerry

    Locale: Oregon and Washington

    Nice! and really nice pictures!

    I have M50 and Nobul1. I was going to make an Apex quilt, but with down it's so much lighter.

    Do the M50 or Nobul1 leak any down?

    Is there any condensation? A little hard to know because it's inside where you can't see it.

    #1997651
    Andy Duncan
    BPL Member

    @bluewater

    Locale: SoCal

    Thanks Jeremy and Greg. I finished it just in time to leave for the SHR this Saturday, so i dont have experience in the mountains yet. When trying it at home it quickly gets uncomfortably hot. I think it should be warm down to the low 20's. The Thru-Hiker kit uses a similar amount of down and is rated to 20 degrees. The Zpacks and Katabatic 20 degree quilts with similar dimensions use slightly more down.

    #1997680
    Daniel Saunders
    Spectator

    @boulderman

    Locale: Front Range

    Looks great! How did you stuff the down into the middle chambers? Did you seal up the two long sides and a short side, stuff to the end of that chamber, then sew up the remaining short side?

    #1997685
    Michael Geoghegan
    BPL Member

    @gogetter

    Locale: SoCal

    Great job Andy. I can't wait to hear how it performs in the field. Enjoy the SHR!

    Michael

    #1997695
    Ryan Smith
    BPL Member

    @violentgreen

    Locale: East TN

    Nice job Andy. I've made a few quilts so I can appreciate how much work that must have been.

    Ryan

    #1997710
    Andy Duncan
    BPL Member

    @bluewater

    Locale: SoCal

    Thanks for your comments everyone!

    @ Jerry, I haven't noticed down leakage or condensation with the M50 quilts I've made before. I used a summer quilt made with M50 for the shell and liner last season, I don't remember having problems with condensation. Do you mean condensation inside the down chambers? A small amount of down has made it's way through a pair of booties I made using NoBul 1, although they probably get more abuse than a quilt.

    @ Daniel, for the middle chambers I first sewed the entire baffle system to the shell. Then I sewed all of the baffles to the liner except the horizontal and vertical baffles on one side. Next, I started by filling each of the large middle baffles one by one then sewing the corresponding vertical baffle at the end to seal it and the first side horizontal baffle. This way I could more easily access the next vertical and horizontal side baffles after filling the next large middle baffle. In other words, what you said. . .

    @ Michael, after staring at a sewing machine for too long I can't wait to get back out on the SHR!

    @ Ryan, thanks, I had no idea what I was getting into w/ this one. It probably took 4 times longer than usual due to all of the starting and stopping.

    #1997717
    Jerry Adams
    BPL Member

    @retiredjerry

    Locale: Oregon and Washington

    There's another thread where someone switched from eVent bivy to M50 and started getting condensation inside from body perspiration.

    #1997728
    Andy Duncan
    BPL Member

    @bluewater

    Locale: SoCal

    Thanks for clarifying. I have had similar problems using M55 (the previous version of M50) for a bivy, especially when sleeping near water. I thought you were referring to condensation when using M50 for the shell material of a quilt.

    #1997791
    Sam Farrington
    BPL Member

    @scfhome

    Locale: Chocorua NH, USA

    Andy,
    Remarkable job, and more evidence that baffles are key, even though they are a PITA and we try to avoid them.
    Bought some 17 gram netting from Extrem Textil suggested on an earlier thread, and that might also work well for baffles. Unless the internal vapor barrier created by the Cuben is somehow important for reasons unknown. Also purchased some very sheer panty-hose material, but it is pretty fragile stuff, even considering it would be protected inside a shell.

    Am thinking seriously about using Thinsulate LiteLoft (a mixture of fine Olefin and coarser polyester fibers to produce a puffy batt that also has very small air pockets like conventional Thinsulate). Less baffles would be required for the synthetic, it would be free to reach its full loft, and it resists moisture much better than down. All just theory at this point.

    Empathize totally with how the project developed into a major undertaking, as has happened to me also. Yet you stuck with it and created a super warm and super light piece of gear. Congratulations. Hope it serves you well.

    #1997889
    Scott Nelson
    BPL Member

    @nlsscott

    Locale: Southern California and Sierras

    I just made a sleeping bag using Karo baffles. I think it will have better down control to prevent down shifting to the sides. Have not taken out yet.

    #1997985
    Jeff McWilliams
    BPL Member

    @jjmcwill

    Locale: Midwest

    Very impressive, and great pics. Looks professionally done.

    I don't have near your sewing skills, so nice to see how well some of these projects turn out.

    #1998093
    Andy Duncan
    BPL Member

    @bluewater

    Locale: SoCal

    Thanks Samuel and Jeff. I'm looking forward to some comfortable nights in the mountains next week. Scott I hope your Karo quilt works out this summer. Maybe I'll try one of those next time.

    #1998259
    Amy Lauterbach
    BPL Member

    @drongobird

    Locale: San Francisco Bay Area

    Holy Moly. It takes enough hours to put baffles in one direction. Amazing piece of work.

    #1998745
    Peter Nash
    Member

    @nash-pattbi-com

    Locale: West Michigan

    Very impressive baffles Andy. I hate to think how much work it must have been to construct such an intricate design. Looks way warm.

    #1999028
    Aaron Sorensen
    BPL Member

    @awsorensen

    Locale: South of Forester Pass

    Andy,
    This quilt design is perfect.
    I will be making one last quilt with almost the same specs. I am skinny so I will taper a little higher and will use 12 ounces of down. I will also just use the M50 fabric for baffles.
    It should be right at 18 ounces.

    I will be doing the top the same as you, only add more fabric to the bottom of area under the head so it is flush with the top.

    The only things I do different that make the quilts much easier to do are to have the baffles just run a little past the 40" width and just make a sewn-thru line strait down (where you did your vertical baffles) . The seam tucks underneath you anyway so there are no colds spots from it.
    Then I just run a sewn-thru vertical line on each of the sides, just cutting the excess width in half for the measured width. In your case 57-40÷2 for the two 4 1/4" vertical chambers on each side. The swen-thru chambers also only get about 70% of the down as the rest of the bag. Again, since it is under you the 70% stuff is adequate.

    These 2 steps are very effective and cut the time for making the quilt a lot more than full baffles all the way across.

    I also like to sew my foot-box up instead of horizontal. When you are skinny it gives you a lot more room for the feet.

    #1999810
    Andy Duncan
    BPL Member

    @bluewater

    Locale: SoCal

    Thanks Amy, Peter and Aaron.

    Amy I was impressed with the Love Bird double quilt you made last summer. The attachment system was great, now if I could only convince my wife to give up her mummy bag. . .

    Aaron I wish I had thought of your idea when making my summer quilt last year. What a time saving technique! Although I will definitely try that next time I still like the box type baffles for the sides, especially in the possible shoulder season 15-20 degree nights. I have found that the full side baffles create a semi rectangular cocoon type fit. I think this will be my 'one last quilt' for a while!

    #1999854
    Jason G
    BPL Member

    @jasong

    Locale: iceberg lake

    lookin good andy..

    Based on your post above.. shouldn't you be on the SHR right now?

Viewing 20 posts - 1 through 20 (of 20 total)
  • You must be logged in to reply to this topic.
Forum Posting

A Membership is required to post in the forums. Login or become a member to post in the member forums!

Get the Newsletter

Get our free Handbook and Receive our weekly newsletter to see what's new at Backpacking Light!

Gear Research & Discovery Tools


Loading...