 Tested this tent recently in a torrential downpour. Found a number of issues, looking for suggestions.
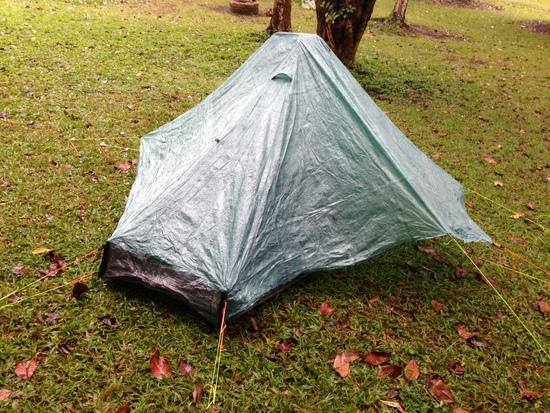
1) Unable to get the side with the larger awning and optional pole taut, therefore, it was touching the screened in section. Do you need to use the awning pole to achieve ultimate tension?
2) Water pooled at the top of tent (part farthest from zipper openings) , thinking my guylines were not tight enough and slight leaning in caused water to enter tent and puddle?
3) any suggestions for how to get the middle PVC pipe centered, noticed I have issues with this every time!
4) When using the tent poles that came with the product, the tip that connects with the PVC pipe at top of tent is missing, do I need to replace it?
5) If I had used the TYVEK flooring, would this have helped keep the water from coming in?
6) Overall having issues getting the tension right, usually one section is sagging, any suggestions?
Thanks!
Topic
LightHeart SoLong 6 – Cuben
Become a member to post in the forums.
- This topic is empty.
Chase,
Where do I start? You've got a bit of a mess. First of all, I'm not sure why you have lengthened the corner tie-outs with the yellow cord. This should be removed. Try to start with just the lower corner tie-outs; stake out the four corners making sure the floor is squared-up. The inside of the floor should be smooth with no ripples. Just leave the upper corner tie-outs off for now.
I'm not sure what you mean by the top of the pole is missing; there is no additional tip. The top approx. 1 inch of the pole inserts into the plastic ridge pole and it is stopped by the small flange near the end of the pole. Insert the end of one pole into the ridge pole and then into the corner pocket of the tent while holding the ridge pole up to the top of the tent. Then insert the second pole and slide the bottom of the pole into it's corner pocket. Now extend each pole using the twist lock on the bottom section of the pole centering the ridge pole and making the side walls of the tent taut. From your picture, I don't think you are extending the poles at all. They are intended to mimic adjustable hiking poles.
Once the poles are extended and ridge pole is in the center of the tent, go back out and put the top corner tie-outs over the same corner stake you used for the bottom tie-out. Tighten these top tie-outs using the line-locs. The body of the tent should now be taut.
Now the awning; remove the yellow tie-out cord from the two tie-out loops on the side of the awning. Insert the awning pole into the pocket at the end of the awning as described in the instructions. Angle the pole back toward the tent and stake out the tie-out cord at the tip of the awning and tighten using the line-loc until the awning is taut. It angles slightly down from the top of the tent. See the pictures on our website. The two other tie-outs on the side of the awning are only used to put the awning into storm mode using the mini-carabiner supplied with your tent and explained in the instructions. Stake out the rear fly until the rear fly is taut. The side body tie-outs are usually not used but can be added in the case of really high wind periods.
Try these techniques and see if you can get a taut pitch. Please contact me at marc at lightheartgear dot com and we can go over any other issues you are having.
Looking forward to you having more success with the tent,
Marc Penansky
LightHeart Gear
edited for typos/ MP
Chase,
EDIT: Marc beat me to it as I was typing, but here is my answer below:
I used a LHG cuben solo w/ awning on a thru-hike. Its slightly different than the So-Long, but similar in the basics. I set it up virtually every night and I loved it. It did however take me a while to learn to get a proper pitch, which I think is pretty typical of most non-freestanding shelters. Each design has its own character and ultimately practice makes perfect.
Most of my early problems boiled down to getting the tent "squared" with the placement of the first stakes before anything went up. (BTW just to be certain we are on the same page, you have to stake out the tent body before you place the poles or touch the fly.) I would guess "Squaring" is very likely the beginning of your issue with getting a tight pitch. Properly pitched you can drop that awning pole in the middle of the night, and go right into storm-mode set-up tight as a drum.
For #1 you have 2 options: Storm mode or awning mode. In awning mode you need the awning pole or a properly sized stick to get the pitch tight. In storm mode you need to connect the three fairly close tie-outs on the awning together; no stick required. Your picture shows awning mode with no pole. Connect those three tie outs with a small carabiner and your good to go. (That is what those tie outs are there for … I cannot tell if you added guy-lines but only the center one on the awning needs it.)
Not certain what you mean on #2, but for #3 you just need to balance the length of your poles … in your picture one pole is set longer than the other. (Those poles are adjustable length BTW, in case that hadn't been made clear) You shouldnt need to "jam" them up into the peak, to get the pitch tight … again that comes down to the original placement of the end stakes … Just adjust the length of the poles to take the wrinkles out of the center of the inner tent side-wall.
For #4 I assume you just mean that little plastic end-cap thing, in which case the cap should not matter as long as you keep the missing end up in the plastic/PVC ridge piece … you don't want to poke a hole in your floor with an exposed end of pole.
For #5 I'm a little unclear what you mean. What I can say is if you have the cuben floor, it's going to leak eventually. I have the heavy weight CT5K.18 cuben floor, and even it is just too prone to getting holes poked into it. SilNylon has its drawbacks in particular applications, but the advantage of a SilNylon floor is that it will close up on itself a bit when it is poked. My opinions on Cuben-Fiber and its proper applications drastically evolved during my thru-hike. Hindsight is 20/20, but in light of this fact you should use the tyvek to protect and extend the life of the floor IMHO and be ready to periodically patch pin-holes.
For #6 … Back to #1. Practice.
Hendrik did a pretty good job demonstrating a proper pitch for the solo … a lot of the basic principals still apply to the So-Long: http://www.youtube.com/watch?v=4ZsbeJsibRo
Here is another one that focuses on the awning in storm mode: http://www.youtube.com/watch?v=b_d3g93itIw
Hope that helps some?
(Here is a pic of a pitch on a really blustery ridge. I have had great success in all kinds of weather including a wind-storm outside Mojave that stripped the roof off the local Motel-6 and 10 inches of wet snow outside Teton NP. You'll get it eventually.)

Thank you Mark & Christopher,
Really appreciate the info and great feedback. I will implement your suggestions and hope to create a better shelter! Indeed practice, practice practice! Also the links looks useful as well. 
It sounds like after I square the tent up, that will help. I took a look at the poles and realized they have not been fully extended and noticed an issue of height difference when I use my hiking pole too. So it was good to learn that they are extendable. I will include a photo of the missing tip, but hope that it will not affect things too much?
thanks again, will update with more questions if needed especially since your replies were so useful!
I just used my LH SoLong 6 Cuben tent for an overnighter and loved it.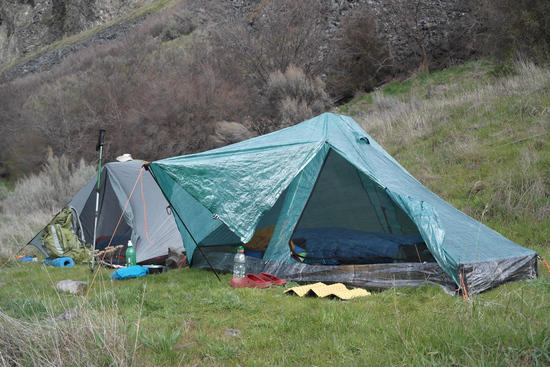
Chase – this is Judy from LIghtHeart Gear,
Can you please email me privately? info@lightheartgear.com
Thanks
Betsy, did you get rid of your Hexamid? I remember you had some minor rain issues on the JMT last year from the lower screen part of the tent, was this part of the reason you switched? Otherwise it looked like a great tent.
I'm looking at doing the JMT again next year (just me and Matt this time) and am looking at Cuben fiber tents.
Tom – I have not sold my Hexamid Solo Plus yet, but because of the rain/mud splashing in the shelter on the JMT last year, I decided it wasn't the perfect tent for me. I also found I had to crawl in and out of it which was tough on my knees. (I'm not a youngster anymore!) So I bit the bullet and bought the LightHeart SoLong 6 – Cuben and have been enjoying the heck out of it. So easy for entrance/exit, love the storm mode, the 8 inch vertical floor walls, and the light weight. It's also very easy to set up/take down.
I am also considering "redoing" the JMT in 2014. I have regretted getting off the trail at Bishop. If I do go, I will be taking my SoLong 6 Cuben tent!
If you still have my phone number, send me a text and maybe we can connect in 2014!
Betsy
Become a member to post in the forums.
 Pro-Grade Water RepellencyPolypropylene face fabrics: see the future of raingear.