Topic
Ultralight Kelly / Storm / Volcano Kettle
Forum Posting
A Membership is required to post in the forums. Login or become a member to post in the member forums!
Home › Forums › Gear Forums › Make Your Own Gear › Ultralight Kelly / Storm / Volcano Kettle
- This topic is empty.
-
AuthorPosts
-
Dec 18, 2008 at 10:25 am #1465169
Roger – I think it's going to be quite some time before I have the cojones to try titanium, but that's very cool, even with small parts.
Hi Tony – It's very encouraging to have garnered the attention of you and Roger, two of the MYO greats! I think I saw your pictures of that pot somewhere around here. With your know-how and equipment, I'm quite sure you could make your own pot to whatever specs you like and then spot-weld on some shim stock for less than the price of a cannibalized jet-boil pot. I don't know how available the proper tools are in your neck of the woods, but I found the pre-made tools to be hard to find and very expensive. Like I wrote earlier, I leaned how to make mine from a video I rented, but if you PM me, I'd be glad to send you pictures of mine along with a diagram and brief instructions that would probably be enough to go on. I think my combination tool and trimmer together cost about $80 to make, but it would have been over $200 to buy them both.
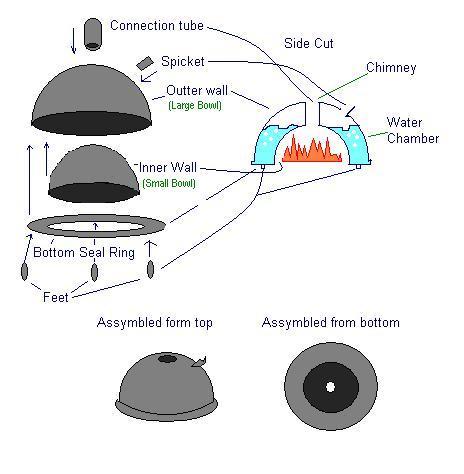
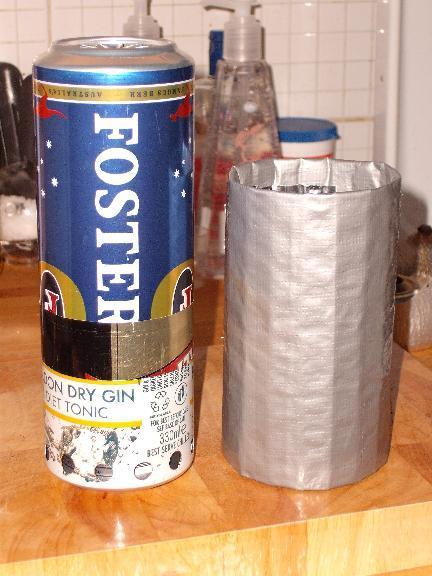
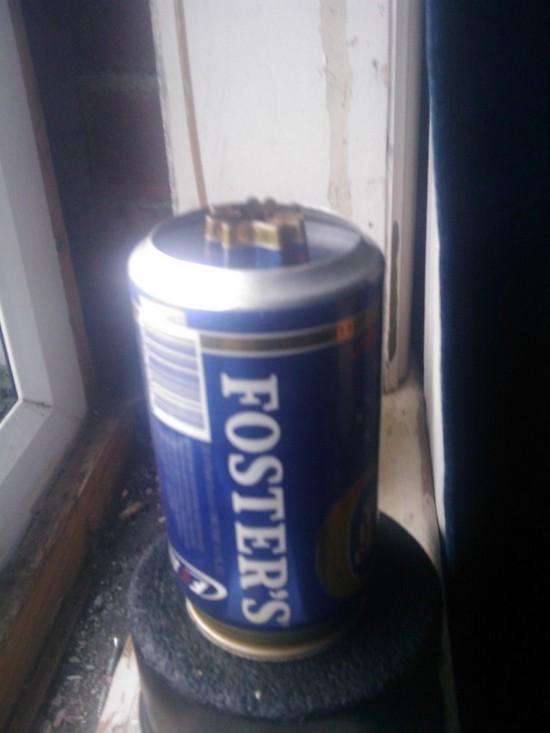
Jan – that looks like just the kind of container I was looking for when I was aiming to make this out of off-the-shelf parts – I could only find aluminum bottles that were skinnier and taller than I really wanted. By all means, you should give that a shot. I'm just so far down the rabbit hole at this point that I can't turn back!
Thanks all!
Dec 18, 2008 at 1:40 pm #1465216Hi Jan
VERY smart!
You could try a high temperature epoxy for the joins: the metal should not get much over 100 C because of the water on the inside. Well – it would let you experiment anyhow.For the bottom – maybe you could use the existing metal bottom?
For the core: maybe some Al tubing? It might not need to be really sealed at the top at first?
Cheers
Dec 19, 2008 at 10:52 am #1465407I had this idea in my head. Hope this drawing makes sense.
I am by no stretch of the imagination a metal fabricator and have no real tools. I was thinking that you could use some aluminum or Ti bowls. The kettle would be more squat like a traditional tea kettle. This is a crude sketch. I guess it may need handles as well.
Dec 19, 2008 at 1:20 pm #1465453Hi Daniel
Dunno, but I suspect not enough chimney height.
Cheers
Jan 7, 2009 at 9:40 am #1468487I've almost finished new mandrels for the kettle. Over the holidays, I cut up some wood billets at my father-in-law's, and laminated them together for new mandrels that shouldn't warp. I also got my wife's permission to temporarily "close in" our balcony to stay warm. I've finished rough turning them, and I'm going to work on getting all the tolerances right after lunch (I'm on winter break from grad school). I've also adapted my metal spinning tool rest for the new lathe, so if all goes as planned, I should be able to start spinning the kettle tomorrow! (knock on wood)
Feb 4, 2009 at 8:24 am #1475327Update: Well, I guess I didn't knock hard enough…
I was able to spin the fire cup (the smallest part) the next day, and got a pretty good piece on my first try.
The outer wall and chimney were a different story. Without getting into it too much, the fact that they're longer and that their faces (the part that clamps the metal circle against the follower block) are narrower asks a lot more of the lathe setup. In this case, it was just too much for the wood-turning live center, and when I would apply pressure, both the mandrel and follower block would deflect making it impossible to shape the metal.
The only fix was a more rigid lathe and a true metal spinning live center. Luckily, I was able to find a Karle Spinmaster lathe, complete with live center, online (they don't make hobbyist size metal spinning lathes anymore, so this one was rare and an antique). It should be on its way to me as we speak, so once I get it all set up, I'll be able to make another attempt at those larger parts. What time I would have saved myself by starting with the right tools!
May 20, 2009 at 12:42 am #1502375There are some products out there that allow brazing very thin AL. I haven't tried them personally but I would expect you could simply roll your chimney and outer shell and braze the seam to form a cylinder. Then braze that to the top and bottom sections that you spin.
With tight tolerances and narrow overlaps added weight would be negligible. Overlaps at the joints would stiffen the assembly significantly allowing you to use thinner metal for the sides for some more weight savings.
May 20, 2009 at 12:50 am #1502378I bought an alloy brazing kit off ebay. More properly, it's a solder, brazing refers to temperatures beyond the melting point of aluminium, but it solders at around 450C so plenty good enough for a kelly kettle.
I tried soldering beer can material, but it's tricky to keep the heat even and avoid blowing holes in the material. I'm looking at setting up a rotating table and a pedal operated flame direction changer so my hands are free to manipulate the solder rod and flux.
I'm sure the makers of the original Kelly Kettle have tried too, and they still make them at the thickness and weight they do because of the difficulties.
Hat's off to Devin for his efforts.
Jun 25, 2009 at 12:35 pm #1510408Sorry for shouting, but after 2 years, four lathes, and more money than I care to think about, I've successfully made an ultralight storm kettle! Here are the specs:
weight: 6.0 oz
dimensions: appox. 4" wide by 7.5" tall when collapsed
boiling capacity: 20 oz
projected time to boil 20 oz (based mock-up trials): 6 minPicture:
Collapsed, sitting on the lathe:
* you may notice some tooling marks, the bottom bead is wider than it should be, and the spout hole is a bit screwy, but the thing will hold water, and proves that I can actually make it. My technique needs some work, but at least I have the right tools, and the basics down. I'll update when I'm able to test fire it, and make a more refined prototype.
Oh, and thanks Rog!
Jun 25, 2009 at 12:41 pm #1510411Devin, well done! Looks very good indeed, and 6oz is a tremendous achievement.
How did you do the jointing between the chimney and outer skin in the end? Just rolled and pressed? Or soldered?
Jun 25, 2009 at 12:50 pm #1510415Thanks!
Yep, it's just rolled over – I have some water sitting in it right now, and there don't seem to be any leaks. I'll see how things go when I have a chance to boil with it.
Jun 25, 2009 at 1:49 pm #1510427Very well done!
This is one heck of an achievement!
A measure of the difficulties involved may be appreciated by the fact that the Kelly Kettles, Eydon Storm Kettles and Ghillie Kettles are all manufactured by the one metal spinning company which has decades of experience, and a fully equipped engineering workshop/manufacturing facility!
Jun 25, 2009 at 3:38 pm #1510443Hi Devon,
Some great work, well done, I look forward to seeing some more work.
Tony
PS: I know what it is like to be addicted to stove making, I have also spent more money that I would like to care about.
Jun 25, 2009 at 4:43 pm #1510462BLIMEY!!!!
Have you thought about writing it up?
Cheers
Jun 25, 2009 at 6:26 pm #1510489I had a quick look at those commercial versions, the closest is the Small Kelly Kettle , 570ml so possibly 1 fl oz less , and that is 17oz, almost 3 times heavier !
I used a much bigger and heavier NZ made version (car camping) and I liked the relatively contained fire, it worked in the wind (and rain !!!) and no pot to clean up , it was also very fast and not that fussed about what kind of wood was used in it .
For the ones that only boil water it seems to me a better alternative to the BushBuddy and co (?)
BTW, Devin, try if you can , a tea light type alcohol stove in it , could be a dual fuel solution…
When do we place orders for this one ? (time to get some money back)
FrancoJun 26, 2009 at 6:52 am #1510558Thanks guys! It's much more gratifying to share this here than to simply shout in excitement from my balcony. It also seems less crazy. :)
Callahan
>Kelly Kettles, Eydon Storm Kettles and Ghillie Kettles are all manufactured by the one metal spinning companyThat's surprising, and sure raises the question of why there are three companies all selling the same kettle made at the same place…
Tony
>I know what it is like to be addicted to stove making, I have also spent more money that I would like to care about.It is like some kind of rabbit hole, that one just falls farther and farther down. I tried to go into this with both eyes open, made a budget for materials and equipment… but there always seems to be another tool that is needed, or the original one doesn't work quite right. Or something breaks. I just about doubled what I planned on spending.
Roger – I'd love to write it up at some point! Right now my mind is just racing with ways to refine my manufacturing process…
Franco – you've hit on a lot of the reasons that I became so excited about this project. The key advantages to the internal chimney are speed and protection, but existing kettles were too large and heavy to fit into an ultralight load. For about the same boiled volume, not only does mine weigh so much less, but it also takes up a less than half of the pack space (approx 95 ci compared to approx 250 ci). Given the weight and volume of my design combined with the inherit advantages of an internal chimney, wood burning boiler – and I think it's great!
Alcohol adaptation – certainly on the to-do list. Placing orders – I would love to disseminate my creation, and look forward to getting it to a stage where I can do that. Again, that's going to take some refinement in the finishing of the boiler and a smoother mfg process, but BPLers will be the first to know!
Jun 26, 2009 at 7:21 am #1510560Amazing, simply amazing …
I spite of my strong MYOG interests I've made just one simple working alcy stove followed by a couple flat out failures.
I hold you stove makers in awe.
Jun 26, 2009 at 7:31 am #1510562Hello,
Having first read a post on an outdoor forum last year, that the three Kettles were made by the same company, and wanting to be absolutely certain of my facts, I emailed the company which makes all three for confirmation.
I received confirmation within minutes, from the man whom has been spinning Kettles for the last 25+ years!
Prior to making this post, I checked the original email confirmation, which is dated 24/11/2008.
That manufacture should be contracted to one specialized engineering company should not be too surprising, given the nature and complexity of the Kettles (from the perspective of diverse, volume production).
And the name of the company is……… (o:
Jun 26, 2009 at 7:45 am #1510566>That manufacture should be contracted to one specialized engineering company should not be too surprising, given the nature and complexity of the Kettles.
That's true – most of the metal spinning places in the US that I contacted would only make the constituent parts, but wouldn't do the final assembly.
Jun 26, 2009 at 7:50 am #1510568Well done mate!
It's good to see someone persevering and succeeding with an idea. Brilliant!
Jun 26, 2009 at 8:13 am #1510572WOW, what a journey! That thing looks beautiful! Simply fantastic work my friend. I for one would love to see a MYOG article on this.
I'm not sure how much information you want to share on this (seeing as you may end up selling it) but I'm interested in what the original and final spun material thickness ended up being? What size of sheet did you start with to make the shapes? Any chance you took step by step pictures…or are you guys saving them for the article?Again, awesome work.
Jun 26, 2009 at 8:38 am #1510576I've been playing with making a modified Kelly kettle out of beer cans.
I wondered about adding a heat exchanger to the chimney to encourage heat transfer, and ended up using the side wall of a one pint beer can, folded with vanes.
The folding is a pain in the butt, and requires some better means of securing than JB Weld (I'm unhappy with the use of epoxy for foodstuffs…).
There are plenty of opportunities for improvements, but the basic idea seems to work. I need to find a more compatible burner than the chimney-style that I've got here; it's a bit too fierce on fuel, and unburnt fuel comes out of the top (and can be re-lit!).
The finished kettle & burner weighs 40g, with another 15g for the cosy. It only holds about 250ml, though (it's a 440ml can). Good for a brew or water for a dehydrated meal.
Jun 26, 2009 at 8:42 am #1510579> Sorry for shouting, but after 2 years, four lathes, and more money than I care to think about
LOL! Looks great, though. Fantastic dedication.
I stick to beer cans, craft knife, Bic pen and glue; it's a lot cheaper… ;-)
Jun 26, 2009 at 10:23 am #1510596> I wondered about adding a heat exchanger to the chimney to encourage heat transfer, and ended up using the side wall of a one pint beer can, folded with vanes.
Kevin, I found what worked best was to form the vanes into the chimney itself. This has the advantage of increasing the surface area in contact with the water.
Jun 26, 2009 at 11:46 am #1510607Very nicely done Devin.
Question: is the final product durable enough to be stored inside a backpack, or is the metal thin enough to require that you nest it inside a pot to protect it (e.g. like the Bush Buddy?)
-
AuthorPosts
- You must be logged in to reply to this topic.
Forum Posting
A Membership is required to post in the forums. Login or become a member to post in the member forums!
Our Community Posts are Moderated
Backpacking Light community posts are moderated and here to foster helpful and positive discussions about lightweight backpacking. Please be mindful of our values and boundaries and review our Community Guidelines prior to posting.
Get the Newsletter
Gear Research & Discovery Tools
- Browse our curated Gear Shop
- See the latest Gear Deals and Sales
- Our Recommendations
- Search for Gear on Sale with the Gear Finder
- Used Gear Swap
- Member Gear Reviews and BPL Gear Review Articles
- Browse by Gear Type or Brand.