Topic

Shangri-La 2 Owners/Tarp Owners

  • This topic is empty.
Viewing 21 posts - 1 through 21 (of 21 total)
PostedJan 14, 2013 at 10:32 pm

Forum friends, I have a question for you! How do you get the tautest pitch with your Shangi-2, and how do you stake it all the way to the ground? I had a nightmare experience this weekend with my shelter. I did a local overnighter with some friends and well, the guys I was with insisted on pitching in the middle of an alpine meadow in 19 degree weather, so it was moist and my tarp had condensation and hence, ice crystals covering the inside and outside. I played a very fun paranoid game of "don't let your quilt touch the icy walls of your saggy tarp" all night, backpacker prison.

I've read every post on here about the SL2 and tips to pitch it, even practiced them in my backyard.

1) I tried to get it tight this weekend, even used almost all the guy points, but the middle panels at the ridgeline just seemed to sag like crazy, which drastically reduced the livable space.

2) When I read people on here say "staked to the ground" I think "no space between the tarp and the ground". but in my class, the closes I was able to come was 3/4 of an inch, it was drafty!

I stake out the corners, put up the trekking poles, stake out the middles (straight up this time, not Dondo style), and guyed out the side panels at the middle. Do I need to guy out every point? Even the guy points at the bottom of the middle panels?

Grrr. Frustration. Rambling. Help please!

PostedJan 14, 2013 at 10:40 pm

Your sequence – stake corners, put in poles, then stake sides – is what I do with my MSR Twin Peaks, which is very similar. The final step is to jack up the poles until things are tight. But that won't get it really tight to the ground for me, there's always some gap due to the nature of the tie-outs. It does get very tight, though.

PostedJan 15, 2013 at 6:54 am

Are you pegging each corner while the tarp is in a perfect rectangle? You need to peg it so that each side panel is very tight to the ground but if it isn't in a perfect rectangle, you will produce slack. Then crawl in and put up the poles. Then you need to peg out the bottom sides. You are always going to get some height here for ventilation but it shouldn't be significant unless you want it. I also pegged out the front and back upper guy lines (you will have to add them here) for a very taut pitch.

As Miguel indicated…pics?

Nico . BPL Member
PostedJan 15, 2013 at 7:06 am

It's possible to pitch the SL2 all the way down flush to the ground, but you can't do it with the webbing guyout straps that come on the shelter. I cut them off mine and replaced them with 2mm cord and tensioners. I tied the cord to the little webbing loops that the original guyouts connected to with a girth hitch. There's enough room left over in the loop of the girth hitch to fit a MSR Groundhog stake through. The excess guyline cord and tensioners are only used when having to bury deadman stakes.

So, to pitch it using this method, I stake out the four corners first. I make sure to really pull the four corners very taut (the tent material has a little stretch, take advantage of it). Then I go inside and erect the two trekking poles. Ideally, I try to angle the poles slightly pointing toward the two ends of the tarp (away from each other) so that it helps to maintain tension across the center ridgeline. Then I go outside and stake out the two middle guyouts. Since I mostly use this shelter for snowy trips, I do use some of the other exterior midpanel and even peak guyouts to help add more tension and stability to the shelter.

Inevitably, I will still get some slight sag as temps change, snow accumulates and/or the tent material stretches. You can take out some of it by restaking the middle guyouts and/or tensioning some of the extra midpanel or peak guyouts. You can also take out some of the slack by re-adjusting the trekking poles to go a tiny bit higher and take up the slack. I don't ever re-adjust the four corners though.

Now, with staking to the ground, especially in the cold weather, you're going to get bad condensation inside. When it's cold though, the condensation freezes to the tent walls so it's no big deal. Personally, I find the SL2 to have plenty of space inside to let me stay away from the frozen condensation on the tent walls for the most part anyway, but I use the shelter as a solo shelter. I don't find it big enough to comfortably fit two, especially once snow starts to pile up against the shelter.

Hope that helps. Curious to hear what others have to say.

Ben Wortman BPL Member
PostedJan 15, 2013 at 9:28 am

I have found that if you angle the poles from closer together on the ground to pointing outward (front and back) at the peaks, this will tighten the top ridge. It essentially spreads the top ridge out tight.

David Chenault BPL Member
PostedJan 15, 2013 at 9:40 am

What they said: replace the four corner buckles and straps with cord loops and stake them tight. With the poles inserted you should have a good curve towards the bottom of those seams.

To truly avoid the frost issue you'll need a double wall tent.

PostedJan 15, 2013 at 10:03 am

Thank you all!

I don't have any pictures, didn't think about it at the time, sorry. But I will practice these tips. I am definitely making a rectangle before erecting the poles, but I think my main problem seems to be the sagging in the middle panels around the ridgeline, so I will try seeing if angling the poles outward will help.

For the staking, thank you all for the tip on replacing the standard straps with simple cord loops. I'll try that.

Also, is it essential to use the guy out points on each end of the ridgeline to keep ridgeline taut?

I'll practice and then post some pics.

Slightly off topic…does anyone find it necessary use a bivy with this shelter? And in what conditions? I use this as a solo shelter and use a EE Revelation X, for reference.

David Chenault BPL Member
PostedJan 15, 2013 at 12:38 pm

"Also, is it essential to use the guy out points on each end of the ridgeline to keep ridgeline taut?"

When I had an SL2 I never, ever used them. Should be dead easy to get a taught ridgline without.

With any floorless shelter that doesn't have a sod skirt (or available snow) you'll have some air circulation under the edges with strong enough winds. If you are pushing your sleep system under these circumstances, a bivy will help.

PostedJan 15, 2013 at 12:46 pm

If you are talking about just the fly without the inner net tent, a bivy, bug bivy or net inner will protect against bugs, but will also basically make it a double wall tent.

This will help keep the ice or water off your bag and will add some warmth by reducing convection cooling.

Pitching too tight to the ground could increase the condensation/ice on the inside, unless you keep the door partially open.

One way I found to get around the straps when you want to pitch tight to the ground is to lay a large rock on top of the extended strap between the tent and the stake.

Replacing the straps with line saves a lot of weight. So I recommend that as well.

PostedJan 16, 2013 at 3:18 pm

Nick,

Do you have a picture of your modified stakeout points after your replaced the stock webbing?

Thanks!

PostedJan 16, 2013 at 6:35 pm

I just got my shangri la 2 and haven't had a chance to pitch it. Another option i was thinking of was replacing the four coner tie out points with an MLD style line-loc system. Anyone had a chance to do this or have any thoughts?

PostedJan 16, 2013 at 7:00 pm

This strikes fear into my heart.

As a Hennessy Hammock owner, the hammock really manages itself. My rain fly hangs with two guylines. I was considering doing a tarp + bivy at some point, but the picture I had in my head was an impossible dream where you can never get a taut pitch, and you're just frustrated. "Backpacker prison" is a good way to put it. The last thing I need on a camping trip is stress.

This thread fills me with dread. Any great tarps that are consistently simple?

Nico . BPL Member
PostedJan 16, 2013 at 7:18 pm

Hi Justin,

See below for a couple of pics. I didn't set up the shelter but hopefully this will give you an idea of my set-up.

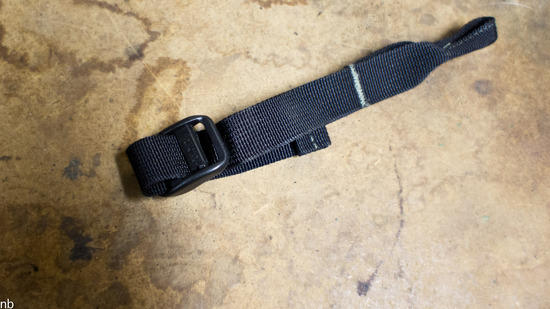
Here's the original webbing guyouts I cut off. I removed them by carefully cutting the black plastic ladderlocs (you want to make sure you don't cut the small webbing loop that is attached to the shelter as you still need these).
SL2-1

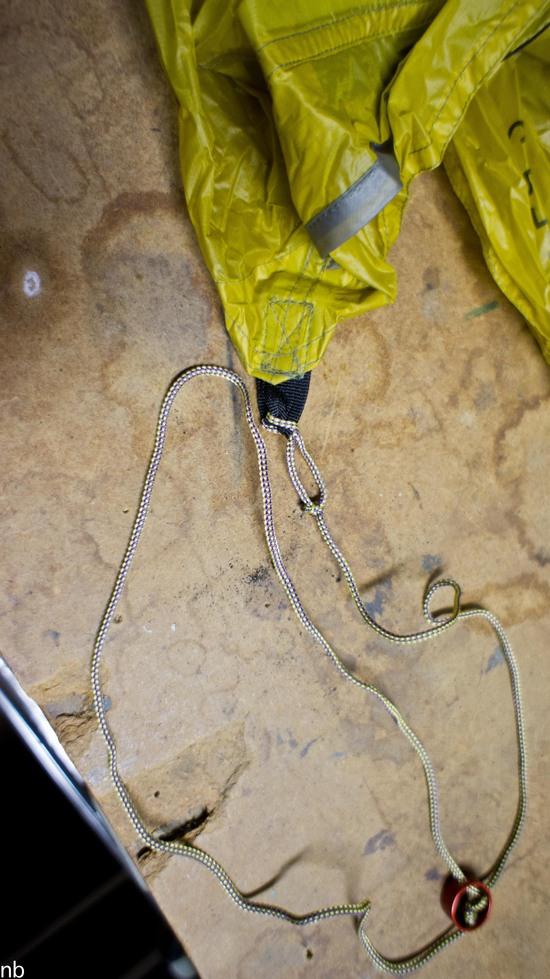
Next I tied some 2mm guyline to the small webbing loops attached to the shelter. Basically, you can just tie a bowline, thread it through the webbing loop attached to the tent and then thread the rest of the guyline through your bowline. Super easy. Make sure to tie a large enough bowline to leave room for your chosen stake(s) to fit through. Like I said in my previous email, the rest of the cord and the metal MSR tensioner rings are for when I do a deadman set-up. I use this cord setup on the four corners and the center guyout on each side.
SL2-2

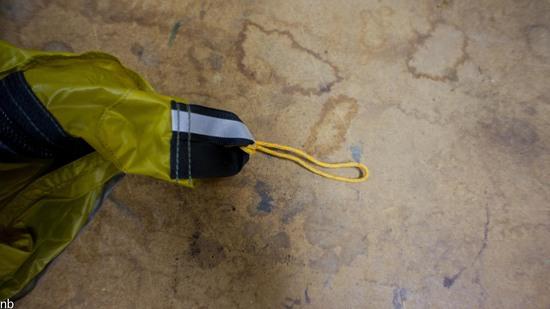
On the other perimeter guyouts, I added just a small loop of cord that can be used for staking. In the field, I think I have yet to use these. You could simply do this set-up for all of your tieouts if you always want a flush to the ground pitch.
SL2-3

@ Max: Honestly this "tent" is super easy to set up. Stake out the four corners in tight rectangle, then raise up the center poles until you have the desired tightness. A cat cut tarp in spinnaker or cuben is also really easy and will pitch taut every time with very little practice.

PostedJan 17, 2013 at 6:50 am

I would caution against being too hasty in removing the tie-outs (unless to replace them with a lighter line-loc system).
The key to getting a good pitch with the SL2 is to get good 90 degree corners on the rectangle, as others have pointed out above. If you end up camping on stony ground or similar, where you can't guarantee you can get a stake in wherever you want, you'll find you want the adjustabilty of the ladderlock to get the square corners. If you want to stake the fly closer to the ground, I'd suggest adding the cord loops as suggested above, but keep the original tie-outs as well, at least until you're sure you're never going to need them.
The original tie-outs also make it possible to raise the fly high off the ground in the morning if you're trying to dry out condensation, or on warm still days when you want to maximise ventilation.
Incidentally, I've found it's usually preferable to try to block breezes with spare gear (empty pack etc), rather than closing down the fly and increasing condensation.

PostedJan 17, 2013 at 11:32 am

"Hi Justin,

See below for a couple of pics. I didn't set up the shelter but hopefully this will give you an idea of my set-up."

How well do those MSR guyline adjusters work?

Nico . BPL Member
PostedJan 17, 2013 at 12:55 pm

The MSR cam ring tensioners work really well. You have to make sure you set them up correctly, but otherwise, they're a piece of cake.

They hold tight and are really easy to adjust, even with gloves and/or mittens on.

If I had the sewing skills, I would've instead added LineLoc 3s to the shelter (like those found on MLD tarps) but alas, since I lack that ability, I had to look at the other available guyline tensioning options. The cam rings seemed the easiest to work with in winter conditions when wearing gloves.

The one thing to keep in mind with these types of tensioners (this includes micro line locs like the ones Zpacks sells) is that you can only use the tensioner to cinch up the guyline to half its total length (because it effectively creates a loop). If you need to shorten the line up more, you need to tie a new stopper knot further up the line which effectively shortens the usable length of the guyline.

So for example, in my above photo, I've got about 4' of guyline on there. The shortest that I can make the guyline with the tensioner and cord as is, is about 2'. If I need to get down to something more like a 1' guyline length (loop), I need to move the stopper knot down the guyline closer to the shelter.

Hopefully that makes sense.

PostedJan 17, 2013 at 1:22 pm

I have owned a few variations of this kind of shelter, in silnylon, spinnaker and cuben.

It may take a little practice, but I find them to be some of the easiest and fastest style shelters to attain a tight weatherproof setup.

Nick's advice is spot on.
A common mistake is to make the mid/side tie-outs too tight. The ridge should be tight and the corners not quite as tight and at around 45 degree angles.
The side tie-outs should be just tight enough to take the slack out of the line.

Also, it is important that the ridge tie-outs be solidly anchored in conditions. The ridge lines take a high percentage of the force of the wind, the corners are important, but the ridge ties are critical.

The side and other tie-outs are only important to reduce flapping and in most of these style shelters are not that critical.

I tend to carry an assortment of stake to match, 2 long beefy stakes for the ridge lines, 4 not mid-sized stakes for the corners, and lightest stakes for everything else.
I consider this to be the best compromise for weight and weather resistance.

I also find I supplement my stakes with found objects if the wind is going to be real strong.

PostedJan 17, 2013 at 8:13 pm

"If I had the sewing skills, I would've instead added LineLoc 3s to the shelter (like those found on MLD tarps) but alas, since I lack that ability…"
If I've understood you correctly, wouldn't the LineLok 3s with loops that ZPacks sells solve your problem? Attach to the SL2 webbing loop with a lark's foot?

Nico . BPL Member
PostedJan 17, 2013 at 8:26 pm

Ha! Yes, those would have totally worked. Somehow I completely missed those!

Thanks! Might keep those in mind for an eventual replacement.

PostedJan 17, 2013 at 9:39 pm

Nick,

these pics are brilliant, thanks.

as far as adjusting the tension in the lines goes, I used the method Skurka advocates, and it worked incredibly well.

William,

Thanks for the advice. I won't break out the scissors just yet!

Thanks everyone on the general consensus that the most critical points are the corners, that's probably where I messed up the most.

I bet with a little practice I will adore this shelter on my next trip as much as everyone else on here does.

Viewing 21 posts - 1 through 21 (of 21 total)
Loading...