Topic
Modifying a Trail Designs 12-10 alcohol stove ?
Forum Posting
A Membership is required to post in the forums. Login or become a member to post in the member forums!
Home › Forums › Gear Forums › Gear (General) › Modifying a Trail Designs 12-10 alcohol stove ?
- This topic is empty.
-
AuthorPosts
-
Jan 14, 2013 at 1:15 pm #1943733
Modified StarLyte burners are now available:
Jan 14, 2013 at 1:19 pm #1943736My theory on air holes (with no testing to support it) – is that in real world conditions you get more airflow into the cone than you do in the "lab" because:
1) Uneven ground means that some air can sneak under the cone
2) Even light winds seem to push a little more air through the holes than perfectly calm indoor testing.
3) Outdoor air temps in the morning/evening when I'm cooking breakfast/dinner are typically colder than my 70F house. And colder air is more dense/oxygen rich.Accordingly, you may not need all of that calculated area. Additionally, the air gap under your cone is arbitrary and it could in fact be too radical (or not radical enough). Ideally testing would be done with this variable to find the sweet amount, and then that could be replicated through additional lower perimeter holes instead.
As well, air flow is complicated stuff and it's not as simple as just area I believe. I believe one big hole won't flow the same volume of air as two smaller holes with the same total area. Velocity plays a factor, where in some cases smaller holes are good because the chimney effect sucks in air at higher velocities etc.
So airflow is complicated stuff, but my experience is that adding one hole punch between each existing hole (shown) seems to work quite well. You could easily add more, but I'd start to get worried about how it would fair in windy conditions as it may get vulnerable.

Regarding the pot shape, this is an interesting dynamic. It's widely believed that a wide pot is more efficient than a tall narrow one. I believe this is mostly because (1) less flame gets around the pot / more heat is transferred before the air escapes, but you also have the advantage that (2) all your pot is inside the cone, whereas mine is only half cone-submerged (about 400ml).

Your "sweet spot" regarding pot height is around 4 of my shims- just when my boil times start to go to hell.
Keep in mind that at 1.8" pot height (equivalent to your 4 shims I believe) my boil times (9.5min) have deteriorated somewhat (vs. 2.0" = 8.5min) and 2.3" is actually my "sweet spot" for speed (~8.2min), which is basically what you found (0 shims). Direct numerical results aren't directly comparable between our tests since pot size, start temp, finish temp, elevation, water volume and maybe fuel all vary.The real difference between our testing is the fuel economy. My graph shows a clear degradation as I raise my pot, while your graph is a bit more funky. I think pot height really affects how well air can mix in with the fuel/flame, so if yours had more air flow you might need less height to mix that in, whereas maybe I have more airflow so I can get away with a lower pot? Hard to really say.
We can see in your fuel vs height graph that -1 or 0 shims seems to be the worst, and 4 shims is actually the best if we disregard the 2 shim result as anomalous. It would be interesting to see your stats on a 5 shim test to see if you could would get a ~9.5min boil with 0.35oz fuel usage. Obviously this won't be the sweet spot, but testing over a larger range would make trends easier to spot – especially if they are somewhat linear. My lowest pot height test was 1.4", which is about 7-8 shims in your setup, and that was my best fuel economy result.
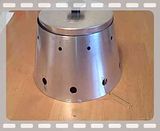
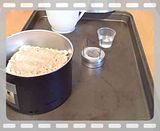
Jan 14, 2013 at 2:16 pm #1943760This video was made a few years ago. It shows the modified StarLyte stove that has the burner with reduced surface area. I now have those modified burners available. I'm confident that burner will work with Caldera Cone efficiently. Time permitting, I'll try the burner with my Caldera Keg. One thing I noticed about my caldera cone is it does not sit flat on the ground which lets lots of additional air under it's base. I have not used the cone yet, got it to experiment with.
<center>

</center>Jan 14, 2013 at 2:52 pm #1943780Dan must be a serious experimenter. Nobody except a serious experimenter would use a Variac so obviously.
I'm not complaining. I had one also, but that was thirty years ago. I was a tiny child.
–B.G.–
Jan 14, 2013 at 3:22 pm #1943786That's my small one. I have 2 more, 20 amp and 30 for when I get serious.
I'm still a chld that's likes to play. I modified my windscreen to have a mica window so I could see inside. I was able to watch the flame pattern with ease as I made my hole adjustments. I guess you can say I'm a serious experimenter. haha, I never shoot from the hip.
Jan 15, 2013 at 7:09 am #1943978Here are 2 videos that show how I used the burner inside a windscreen:
<center>
</center> -
AuthorPosts


- You must be logged in to reply to this topic.
Forum Posting
A Membership is required to post in the forums. Login or become a member to post in the member forums!
Our Community Posts are Moderated
Backpacking Light community posts are moderated and here to foster helpful and positive discussions about lightweight backpacking. Please be mindful of our values and boundaries and review our Community Guidelines prior to posting.
Get the Newsletter
Gear Research & Discovery Tools
- Browse our curated Gear Shop
- See the latest Gear Deals and Sales
- Our Recommendations
- Search for Gear on Sale with the Gear Finder
- Used Gear Swap
- Member Gear Reviews and BPL Gear Review Articles
- Browse by Gear Type or Brand.
