So this isnt really a review since I have limited experience with using the bags…it is more of a design review +"out of the box"+ used for a few nights.
I put this here cause for some reason there isn't enough data out there about Nunatak (although IMO Tom has been doing this for quite longer than some of the others) and I figured that someone might appreciate the extra info.
The backdrop story:
I somehow stumbled upon Nunatak in 2005 and ended up ordering a custom Alpinist to replace a WM Verdsalite i had left for a friend in China when I hiked there. What i liked about the Alpinist it was that it was a traditional mummy bag but with what looked like a more efficient hood design + center zip.
It was custom in as much as it had taller baffles (3" instead of 2.5) and overfilled with 4oz (to make it 16oz fill total). It also had a Raku style opening in the footbox (see their website) so I could ostensibly walk with it to pee etc. Quantum outer and Teffeta inner…and full length center zip.
Long story short i was happy and used it for a few trips……fast forward to a couple of years later I decided I want another lighter circa 30F bag….and ended up ordering a custom sub alpinist.
The design mandate was lightest materials available, ~30F, shave weight where I can, full mummy. I was willing to compromise on comfort insofar as width (i'm a bulky guy – 210#@ 5'10" 50",43", 33" shoulder,waist, foot) and be delicate with the bag.
I used the knowledge form friends here (namely R Nisley with the down compression issue that allowed for lower baffles and narrower trim as i was less concerned with compression in the baffles and from the inside, Dan D with help on sizing, temp rating and down weight etc).
What I that ended up with was very slim bag (59",50",36"), 6'1" long (I'm 5'10"but needed a bit more so i can sit in it), 7D fabric in and out, 12.5oz 950FP down, 21" center zip, 1.75" baffle height. Baffle material is 0.7osy netting (more on this at the end) and baffle spacing is standard 5 inch. Total weight 19.7oz!!!
As a continuation I sent in my old bag and had it redone with very similarly..so normal footbox, 21"center zip but added some 875FP down to top it up at22oz. Girth is 61",50",38".
I have used the new bag just for one trip and it was great to sleep in. didnt manage to challenge the temp..but IMO should be good to 25~28ish.
so here come the details:
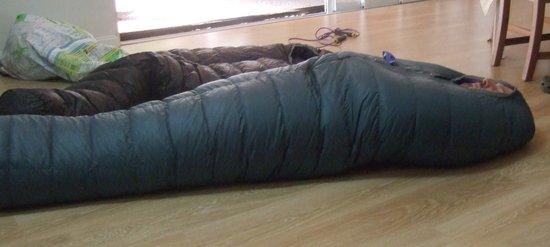
Below is a photo of the two bags. It looks like the black (lighter subalpinist) is much shorter..but it is the same length..just the angle of the camera. Note center zip
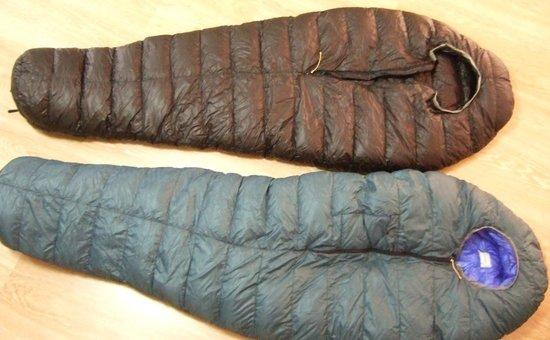
Here they are one on top of the other..a bit hard to see but note the top one is significantly narrower. Still i can reasonably lay in it even with something like an MB UL down inner…The black bag is all 7D (thanks for Josh@rutalocura who helped out with sourcing this and sending to Tom) while the green is Quantum0.8 with Epic just at the bottom.

Here you can seethe footbox bottom. Note the black is smaller (36" vs 38") and you can see the hang loops we added to both

Here is a closeup of hood detail. I speced a spectra cord (as opposed to shockcord) for longevity, abrasion resistance and weight. The translucent material comprising the cord channel is silnyl to resist humidity. You cannot actually see the cordlock here..the string is the zip pull.

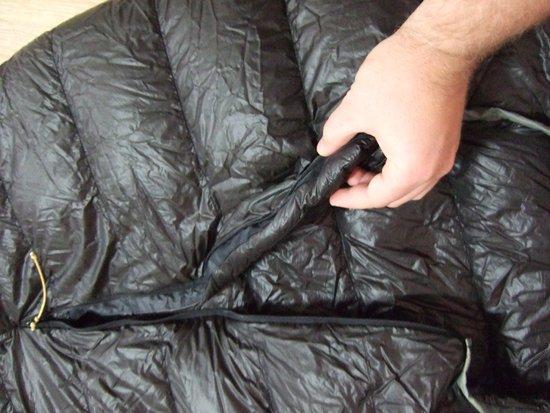
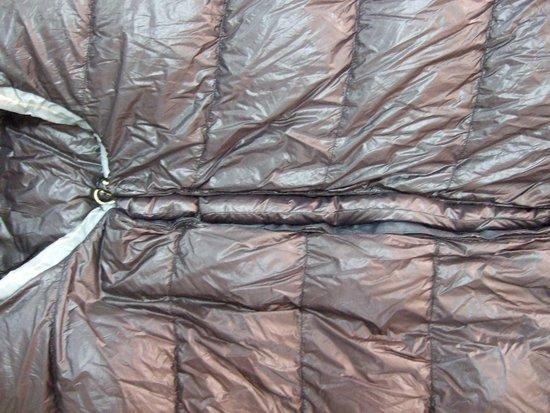
Now a view with open zip. Its a YKK2.5 single pull one sided locking..again small to save weight. Length is 21" which is minimal but enough for ingress/egress and to sit in. Note skinny zip tape. the draft tube is behind it.

Here you can see the slim draft tube behind the zip. As this was a mild weather bag and the zip is so short we kept this to a minimum. The baffles obviously have zero height at the zipper and taper from 1.75" to zero towards the zip…but for these temps should be ok. Note that face cinch cord (although you cant see it here ) is anchored at the far side and cinched from the near side.
On the warmer (green) bag I went with a different draft tube design. I could of course make a huge draft tube or interlocking etc…but wanted something smarter/lighter…so the horizontal main baffles, instead of tapering towards zero at the zip end in a "wall" so baffle height is maintained as near as possible to the zip (as can be seen below my finger in the photo). The draft tube was only slightly bigger than on the black bag. You can also see here the anchored edge of the cinch cord..
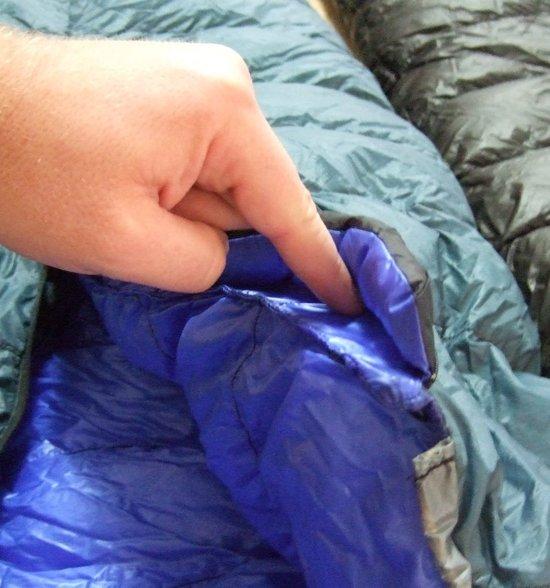
Here is the opposite side of the same zipper. Note thin backing tape and baffle "wall". You can also see the anchored cordlock that cinches the hood.
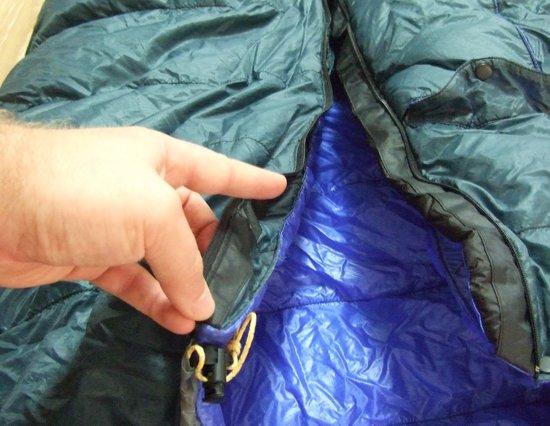
Now although I didnt test these to lower limits (which i guesstimate to be 25~28F for the black and 7~10F for the green) the changes to the baffle design helped the seal. See here below the black bag – i TURNED IT INSIDE OUT and closed it nicely. One can see it seals nice…but not as nicely as…
…what you see on the green bag (again inside out) see how the "wall"allowed the baffle to drape all over the zipper, and the fact that the baffle height remains high until the very end means down is present at that point to create the heat barrier you need at lower temps.

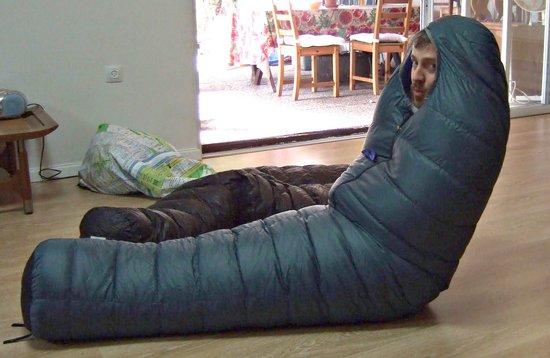
Now some "action" photos.Excuse the quality of these..my 7.5Y/O girl took them SLOWLY as daddy was BAKING inside the bags with 85F ambient temps :)
Here I am closing the zip. I'll admit ingress with such a short zip was a learned skill….but IMO the wiggling is worth the weight saved and decrease in cold spot potential.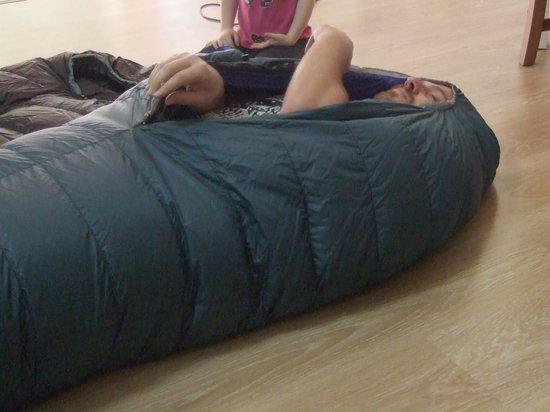
Here I am inside the bag.
Closeup of torso. Note hood is not cinched…I just couldn't bear the heat and was already sweating profusely. That thing on top that looks like a pocket…is a pocket…its the remnants of the old design and I don't really use it. Would be more useful inside for chapstick, flashlight and whatnot
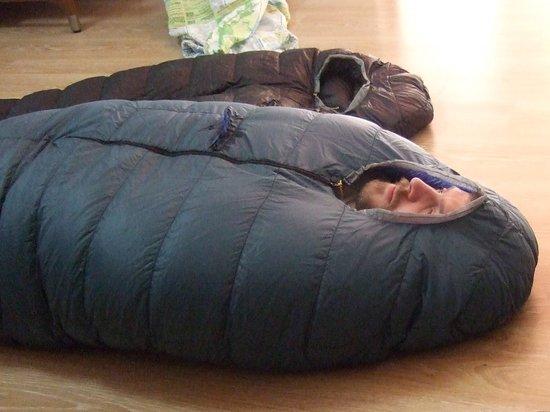
And up close on the hood – as this was taken i was shouting "take the god damn photo you little…"..Note little button next to zip used to be snap closure back in the old design where the zip was non locking…no use for it now.

Here I am sitting up in the bag.. I looked stressed out but its actually easy to sit up.
And here with zip open and hands out. It is a short zip but just enough to do stuff like go through your bag, eat and cook (of course being REALLY careful with the fire.

I dont have the finished weight of the green bag (will update later – I guess circa 33oz). I'm very happy with the bags (of course lacking enough experience to talk about temp rating etc). I think this design is effective for a mummy..I feel very confident about the ability to comfortably sleep in a tight space – at least for the type of trips I do in which I rarely sleep in the tent/tarp more than 4 nights in a row before hitting a village+hostel. its basically deigned such that in the narrow one i can use UL puffy clothes and in the larger one I can use medium stuff which sort of makes sense if you think about the gear you would bring on trips with night temps in the relevant range. RE venting – that would probably be the Achilles heel – but I can say with confidence that at least with the lighter bag that is not a real issue…worst case i sleep with zip open and arms/head out using my small puffy and hat. I have yet to try the heavier bag in mid range temps (say 20F).
Note that I opted NOT to have a draft collar. Rational was that I will always have a puffy garment and can use it (either on me or around). had these been negative F bags…well that might be different.
A word about baffles: These bags are as I mentioned baffled with 0.7osy netting.
There is a trend to baffle bags with 0.33osy cuben (eg Joe etc) – I have a jacket made for me by Ben@goosefeet with such baffles and I think one thing that is not mentioned when we talk about this is that indeed weight saving can be made – but they are probably very small savings as most of these bags DO NOT have so many baffles (as opposed say to a arctic expedition Valandre bag with 100chambers etc) BUT what I have noticed is that compressing the cuben baffled items was MUCH MUCH harder to do since air only flows through the seams while with netting it can flow freely. This sounds trivial but in reality is quite a bummer, especially with such light shell materials where you need to be careful with pressing hard.
Another issue – which I am not sure how it affects the bag – is that airflow inside the bag is reduced – this could mean that its harder for the bag to loft and warm air from around your core doesnt flow as easily to your toes etc…
Tom has great skill and it shows. He is however NOT super fast (as opposed to say Ben@goosefeet or stuff I hear about Joe and others). I did give him hell with insisting on 7D that he did not have at hand and sourcing spectra cord specially for me etc. I probably sent 60 emails back and forth and shared numerous google docs…and he took it like a champ.
Anyway – I hope this helps/interests someone. Feel free to ask me to add stuff.
Disclaimer: I have no affiliation with Nunatak and Tom…I bought all this stuff with my hard earned cash :)
Mike

