Topic

16 oz. Beverage Bottles


Forum Posting

A Membership is required to post in the forums. Login or become a member to post in the member forums!

Home Forums Gear Forums Gear (General) 16 oz. Beverage Bottles

  • This topic is empty.
Viewing 9 posts - 1 through 9 (of 9 total)
  • Author
    Posts
  • #1294635
    Simon Wurster
    BPL Member

    @einstein

    Locale: Big Apple

    I took a look at some screw-top 16 oz beverage bottles to use as an alternative to a large mug for boiling water, and was quite surprised at the performance of these. I would describe them as a whole new category, since these can be dual use cookpot and water bottle. There are some compromises that you should be aware of, so like most dual-use items, you should weigh the shortcomings against the advantages before deciding if these are for you.

    Four bottles: Vitamin C, Coors Light, Vuka Energy, Green Tea Beverage

    There is quite a variety of these in stores with varying weights, from the sub-ounce beer bottles, to the two ounce, beefier energy drink bottles. Two of the four I tested were from a Japanese grocery store (a 0.8 oz. Gatorade-like vitamin C drink and a 0.9 oz. awful green tea drink). The other two are a 1.0 oz. Coors Light bottle, and a 2.2 oz. Vuka energy drink bottle.

    Good News
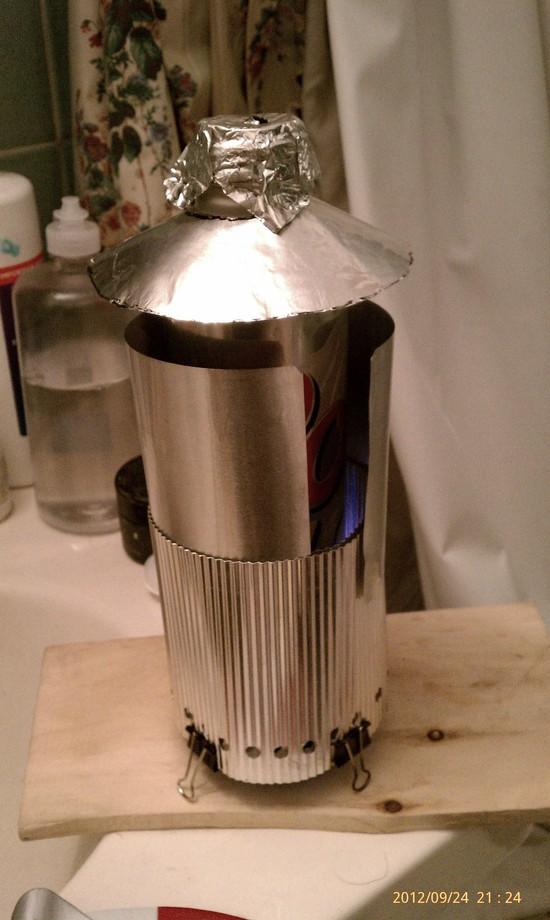
    The four bottles I tested had amazing boil times when coupled with a Zelph Budlyte stove: ~4:30 on average for 16 fl. oz. on 15 ml denatured alcohol. I couldn't get the same performance with my Zelph Starlyte, so I imagine only stoves of a certain design work well with these bottles. To fit the narrower bottoms of these bottles, I inserted a 1/2" extension tube in the Budlyte. On the bottle that didn't need the extension tube (Vitamin C), as well as some other pots I tested, the performance was much better with the extension tube than without it, which suggests that the Budlyte stove can be optimized by increasing the pot stand height.

    When considering these as dual-use cookpot and water bottle, the performance as a water bottle can't be overlooked. For several days I used the Coors Light and Vuka bottles as part of my daily commuting and office routine, and couldn't get them to fail. These samples were also used to heat water at least a dozen times each, so I would say they're certainly durable for at least a weekend: there was no visible "aging" with either the walls, the neck, or the cap's seal. I also judged the bottles for funkyness, which is a scientific term for a water bottle's inability to ward off saliva-induced bacteria growth. Of course, the heat from use as a cookpot certainly helps remove any funkyness.

    One water bottle workflow I didn't try was using it inside a sleeping bag. Imagine taking the bottle off the stove, replacing the cap, and putting it inside the bag. I suppose this is possible, just don't heat the water too much!

    Weight Benefit
    These bottles can save weight. Let's look at my old setup:

    BPL 500 (handle-less), 1.8
    Foster's, 0.9
    Gatorade (2), 3.4
    Total 6.1 oz.

    Now swap that Foster's with a Coors Light, and swap those Gatorade bottles with a (fictitious) 1.5 liter, 2.0 oz. water bottle:

    Coors Light, 1.0
    BPL 500 (handle-less), 1.8
    Gatorade 1.5L, 2.0
    Total, 4.8 oz.

    Woo-hoo! 1.3 oz. savings in weight, not counting the savings in fuel (12 ml vs. 15 ml per boil).

    Compromises

    • When boiling water, it's hard to judge water volumes less than 16 oz. The narrow opening and opaque walls are the culprits, so if you need to boil less you'll need a separate measuring cup. Likewise, as a water bottle you can't see how much water you have left.
    • The bottles are boil-only, so that limits these to freezer-bag meals or to use with a separate pot.
    • They all have a tendency to boil-over, but this can be managed.
    • Although I could use my small MSR pot lifter on the bottles without damaging the threads, this is an awkward position to pour from as the steam rises directly towards my hand. I suppose a fiberglass wrap would solve this, but I don't know how to make one. Use a glove.
    • Most bottles have very thin walls like a beer can. The cautions with handling fragile beer cans applies, and may affect their use as a water bottle, since those are usually stored in outside pockets.
    • You can't fit your stove or pretty-much anything else inside the cookpot, so your stove will have to stored elsewhere.
    • As a water bottle you'll have to make up for the 1/2 liter shortfall on volume. I don't recommend carrying two of these as the extra ounce or so would be better used for a plastic bottle that holds a liter. I want to couple one of these aluminum bottles with a larger plastic bottle (say 1.5 liters at 1.2 oz.) so I can have my standard 2 liters, but I haven't found one yet.
    • I assume the bottles are lined with plastic similar to beer cans. Whether this is dangerous or benign I can't say, so do your own homework if this is a concern. I'm still alive…
    • The cap's seal may wear out over time.
    • The cap's edge is somewhat sharp, but you can sand the edge down, or just be careful.
    • None of the bottles are suitable for use with a Steri-Pen Adventurer, but perhaps the Classic and Journey models will fit the wider-mouthed bottles.

    Bad News (and Recommendations)
    Most of the bottles I tested have a normal capacity of 16 fl. oz. (the smaller one is 14 fl. oz.). When this amount of water is boiled, it invariably boils-over resulting in a somewhat dangerous condition. I tried all sorts of gizmos and what-not to prevent boil-overs, but found the best solution was to use slightly less fuel so the water temperature would max out at > 200F and < 212F. Among all the bottles, 12 ml of denatured alcohol provided the same ~205F performance. In some cases, the temperature reached 211F, but this was long after the stove's output had subsided. Certainly, if you're boiling treated water, even 190F would be good enough, so I'm content using 12 ml of fuel.

    These bottles make for a tall cookpot, with approx 10" of stove and bottle to protect from the wind. Windscreens this tall are awkward and hard to pack, but here are my recommendations:

    • The windscreen only has to be about 8" tall. Shorter screens increased boil times, and taller ones didn't help. 8" is also about the height of the bottle's widest part, so the simplest windscreen could be stored by wrapping it around the bottle and holding it in place with a rubber band or Velcro strip. This does detract from water bottle use as the screen adds edges to the bottle which could snag on pocket netting, and bottle has a tendency to slip right out of the windscreen.
    • Another idea is to pack the windscreen inside the water bottle. At the right height it shouldn't interfere with drinking or insertion/removal. I decided this wasn't for me as windscreens tend to get slimy and dirty over time.
    • At first I didn't have an 8" tall windscreen, so I placed one short one inside the other, kind of like a telescoping antenna, and that worked OK. However, this does require a double-wall bottom to create enough friction to hold the upper in-place.
    • I found 1/2" clearance around the bottle worked well.
    • I like having a separate mug for drinking, and I like to be able to throw this mug on the stove to efficiently heat smaller amounts of water. We're used to packing cookpots and stoves together, but this isn't possible with these bottles. The mug provides an easy solution, and if you pick the right mug, the two-piece windscreen will fit inside the mug too. I found I could fit the Budlyte stove (with extension tube), windscreen, lid, lighter, scrub pad, Dr. Bonner's soap, and firesteel in a Snow Peak 450 mug. Likewise, I could fit the same items in a BPL 500 mug (placing the stove on its side).

    I don't use the bottle cap as a lid. I noticed that whether it was on or off, I got just about the same boil times, so I just leave it off when boiling water. And for all the lawyers out there, let me say now that incorrectly mounting any lid, including the original bottle cap, could result in a catastrophic failure of the bottle if the water is allowed to get hotter than 100F.

    Specific Bottle Variations
    The lightest 16 fl. oz. bottle is the Vitamin C bottle at 0.8 oz. with (and without) the cap. This bottle is also unique because it has a pop-top bottom, minus the pull-tab (think upside-down soda can). I'm not sure why the bottle has this design, but I was worried that heat would cause separation of the bottom. Fortunately, this didn't happen after several boils, and I would think it would take a lot more heat to cause a failure. Because there is a raised rim, this is the only bottle that completely raises the bottom off the ground–if that's of interest to you. This bottle was also the most difficult to fill because of its narrow opening, and even judging the 16 fl. oz. mark was harder than the others.

    The lightest bottle is the green tea bottle, but its capcacity is only 14 fl oz. It doesn't have silk-screened graphics but instead a shrink-wrap label that you might see on a plastic bottle. However, once this is removed, it reveals an unadulterated and attractive aluminum surface. I was wondering if this would be better for shorter trips or simply for day use, but although 12-14 fl. oz. might be fine for boiling water, it starts to be less effective as a water bottle.

    The sturdiest bottle is the Vuka, but it does weigh 2.2 oz. However, you get a fairly durable bottle compared to the others; I doubt this bottle would be damaged by springing branches and thorns. (Most likely, your mesh pocket would get far more damage.) It's also the only bottle with a plastic insert for the threads, which I feared would melt easily. I was happy to see that insert didn't melt, and after several boils, there is no deformation or delamination from the bottle at all (I tried removing them when the bottle was hot with a pair of Vise-Grips, but they didn't budge). Its extra thickness didn't really affect boil times at all, so if I had to choose one bottle for a week or more, this is the one for me. As a bonus, these bottles come in several exciting colors.

    Future
    I see these bottles as part of a minimalist cookset, where boil-only is the norm, and using a 16 fl. oz water bottle (combined with 1 or more plastic bottles) is manageable. For the price, they're easy to try out–just keep in mind the compromises listed above, and that your stove may not work well with them. I will bring one with me on my next trip and see if I like it in the field.

    I'm sure these bottles will catch-on among some in the Community, and perhaps we'll see stoves designed for them in the near future. I guess a Caldera Cone is possible, and that may eek out a few more joules from the fuel. I would like to see a "Coorslyte" stove that fits these bottles, as well as a Starlyte potstand accessory to retrofit existing Starlyte stoves (may need a different height to perform well). One thing's for sure: if you want to try these bottles out, get them while you can; as we learned from Heneiken there's no guarantee they will make them forever…

    Database
    Coors Light
    ~$10 for a 9-pack
    1.0 oz. with cap
    17.5 fl. oz max.
    1.2" opening

    Vitamin C
    $2.50 in Japanese supermarket
    0.8 oz. with cap
    18.75 fl. oz. max
    0.78" opening

    Green Tea Beverage
    $2.50 in Japanese supermarket
    0.9 oz. with cap
    15.5 fl. oz. max
    1.2" opening

    Vuka Energy Drink
    $2.50 in supermarket
    2.2 oz. with cap
    17 fl. oz. max.
    1.2" opening

    #1917495
    todd
    BPL Member

    @funnymo

    Locale: SE USA

    Nice writeup Simon! These bottles are cool. I use the Miller Lite version (just like the Coors Light.

    Can you post a pic of your stove's "extension tube"? I can't visualize it.

    Thank you!

    #1917501
    Christopher Zimmer
    BPL Member

    @czimmer

    Locale: Ohio

    Great job on the writeup Simon.

    My only question not related to weight or performance would be are there any health concerns with boiling water in these cans? Are the insides of the bottles lined or treated with anything that could contaminate the water when boiled? I have always thought of trying a bottle setup like this for boiling, but have not tried it because I was unsure if there are any health related drawbacks. Are the inside of aluminum bottles treated with anything or is it just bare aluminum?

    #1917508
    Jerry Adams
    BPL Member

    @retiredjerry

    Locale: Oregon and Washington

    Most cans in the U.S. are coated with BPA

    If you heat them up, the BPA will disolve into the liquid

    Some studies say even small amounts of BPA can be dangerous – it mimics Estrogen

    #1917532
    Simon Wurster
    BPL Member

    @einstein

    Locale: Big Apple

    Thanks, guys!

    I just wish BPL Forums supported ALL basic html tags; the back-and-forth was driving me crazy, I must have edited it a dozen times!


    @Todd
    : Here's a better picture of the extension screen. (It was taken when I was trying to redirect the water that boiled-over–thus the "hat" on the bottle's neck.)

    Telescoping Windscreen

    The bottom part is a Zelph windscreen; its length allows it, for this small diameter, to be overlapped twice, creating a double-wall. The top part is just a rectangular piece of lasagna tray that I had laying around. It is slipped in between the double walls and curled around. The corrugation of the lower screen provides plenty of friction to hold the top screen in place.


    @Chris
    & Jerry: It seems they're all lined, but I can't tell with the Vitamin C bottle (but something is making an 18.75 fl. oz. bottle 0.2 oz. lighter than all the others…). I would guess it's the same stuff in beer cans, but I make no claim to its origin or safety. See other threads at BPL that argue this back and forth (and back and forth and back and…) :-)

    #1917561
    David Thomas
    BPL Member

    @davidinkenai

    Locale: North Woods. Far North.

    Simon:

    Nice wrap up and ideas. Thanks!

    A few thoughts: If you find a set-up you like, buy a case (some beer consumption may be required). I predict some of the sturdier aluminum screw-top bottles, if they stay on the market, will be "optimized" with thinner walls and then much thinner walls and eventually, you won't trust it for a long trip due to the risk of it dimpling and developing pin-hole leaks. Think of the BPLers who search for old-style Heiny cans. Or my inability to find the old-style, wide-mouth Evain water bottles – the new, narrow caps allows for thinner material.

    Also, an extra screw top weighs almost nothing but could be SO important if you lose one. Stash some in your suppy box and pack an extra in your kit for a long trip.

    Some of these, you can find for free dumpster diving at the recycle station or in the trash cans anywhere GenYers and naughts hang out drinking energy drinks.

    #1917588
    todd
    BPL Member

    @funnymo

    Locale: SE USA

    +1 to stocking up.

    I do that with shoes, gear, fishing lures, whatever. I've had too many great products "new & improved". :(

    #1917621
    David Thomas
    BPL Member

    @davidinkenai

    Locale: North Woods. Far North.

    From the aluminum bottles I've tried and played with, while the 24-ounce bottles offered more cooking and water-carrying capacity, I just wasn't comfortable with the very thin walls. So I lean towards the thicker 16-ounce options.

    And then, if you need a new "pot", you walk into town and buy a beer.

    #1933201
    Simon Wurster
    BPL Member

    @einstein

    Locale: Big Apple

    OK, glad to see BPL has resolved the spam issue, and I'm glad to able to post again. I wrote the post below at the end of October but the information is still pertinent. For some reason, I can't upload images anymore, but that could be reserved for the Annual and Lifetime members.

    So I finally got to go a trip to test out these bottles, albeit for only two days (my heel spurs are driving me nuts). I also did to do some more fiddling, and did learn some new things about these bottles.

    First let me say that I had two errors in my original post: "8 [inches] is also about the height of the bottle's widest part…" is incorrect. 5" is the height of the bottle's widest part, which means that mono-piece windscreens (wrapped around the bottle) will be only 5" tall. How high the windscreen relative to the bottle depends on your stove's height. With the Zelph BudLyte, a 5" windscreen is about 3" shorter than the bottle's height. Also, "12 ml" of denatured alcohol should read "13 ml." The markings on my fuel syringe wore off, and I forgot to consider the first tic mark as 1 ml instead of 0 ml. All other fuel measurements are shown correctly.

    Before my trip, I tried everything I could to get the thin-walled bottles (Coors Light, Vitamin C) to fail. I stuffed them in my daily-use backpack, threw them around, dropped them (2' height, half-full of water, onto carpeted floor), continued to heat water in them, and occasionally squeezed them repeatedly to simulate trail abuse, and they held up fine. These _are_ fragile bottles, but they should be fine for at least 7-10 trail days–your mileage will vary.

    1. The plastic cap liner can melt when exposed to near-boiling water which will affect its use as a hot water bottle. I heated water to 200F, screwed the cap on, and left it for an hour. (My intent was to follow-up on the observation that as the water cooled inside the capped bottle, the reduction in air volume from cooling created a vacuum that deformed the bottle. It does, but only temporarily, and you can always let the air back in as the bottle creaks.) When I checked the cap liner, it was deformed. Not wanting to waste another cap to be sure, I concluded that when the cap is used with hot water, the temperature should be no greater than 180F (which is difficult to judge in the field). The hot water from a coffee machine at work was not hot enough to melt the cap.

    2. Related to Item 1, I noticed that all the caps are interchangeable between the Coors Light, Vuka, and Green Tea bottles. As someone pointed out, bringing an extra cap along is a good safety net for something that can easily fail.

    3. I was flummoxed by my inability to pack everything into a neat package. In my pre-Coors bottle iterations, I could fit everything inside my cut Foster's can, then use the BPL 500 as a cap to mostly hold everything together. With the cook pot now riding separately, I was left trying to shoehorn everything in the BPL 500, and could not find a place for the small MSR pot gripper… Since I was using a work glove to handle the hot bottle in my tests, I wondered if there was something like a pot holder that I could use instead. I remembered I had a couple of jar lid grippers, a simple 4" circle of something silicone-like that is supposed to provide extra grip when opening jars. After a couple of tests grabbing the bottle by its neck, I knew I could leave the MSR pot gripper at home and use this lid gripper instead. I figured I had about 7 seconds to move the bottle before heat of the bottle passed thru the gripper, which is a long time when you think about it. Combined with the lid gripper is the Coleman soda can insulator, made from neoprene. Using this as a caddy, I lift the bottle from the stove with the lid gripper, then place it inside the Coleman insulator, and have a nice bottle grip that insulates the bottle as well. After several uses, there is no burning plasticky smell from the Coleman insulator, so I'm pretty sure it won't melt.

    4. I couldn't figure out a way to fit the extension tube neatly in my BPL 500 mug (too tall), so I swapped it for a SP 450 mug. As I said in my original post, I like to have a second pot for coffee/tea, but made from metal so I can use it on the stove for small amounts of hot water. When used with the bottle, it also serves as a backup cookpot should the bottle fail on a trip, which is possible given its thin walls. But I just "retired" my MSR pot gripper from my kit, and if I were to use the BPL 500 as a cookpot I'd need a way to grip it… I've had a medium-sized binder clip on my desk for months and as I was thinking about ways to grip a SP 450 with boiling water in it, I suddenly realized I could use it as a pot gripper! But really? As I cautiously attached the binder clip to the rim and lifted it bare-handed and poured the boiling water out slowly, I uttered "YES!" For a lid, I resurected an old lid I made about a year ago, and will substitute it with one of these
    in the future.

    So with the changes above, I can fit the windscreen, Budlyte stove with extension tube, scrub pad, Bonner's soap, Bic lighter, silicone pot gripper, binder clip pot gripper, and flimsy lid inside a SP 450, with the reflextix cozy placed upside-down to act as a cap to hold the contents in. My cookset nirvana…

    5. A Steri-Pen Classic (and I suppose Journey too) will fit and operate with a Coors Light and Vuka bottles without too much spillover. But because the bottle is opaque, the reassuring glow of the light is missing, so you'll have to trust the smiley face (Journey) or blinking light (Classic). The Adventurer model does not fit well enough to provide a reliable immersion of the contacts.

    OK, so how did all this work out? Very well, indeed. I used one 1 liter Snapple bottle on the left pocket, and two Coors Light bottles on the right. (I could easily fit three Coors light bottles in the vast pockets of my SMD Starlyte pack.) As I finished one bottle, I switched to the next. There was no crushing or bruising of the bottles in the pack, although I never abuse my pack or contents anyway. But the real treat was taking one Coors Light bottle and placing it on top of my Budlyte stove, heating up water, grabbing it with the lid gripper and placing it in the Coleman soda can insulator, then pouring it into my SP 450 for mint tea and my dehydrated meal (Mary Jane Farms Curry in a Hurry). I could then hold the bottle in my hands to warm them up, and even placed it inside my jacket (after it cooled a bit) to warm up my torso. It worked exactly as expected–very cool…

Viewing 9 posts - 1 through 9 (of 9 total)
  • You must be logged in to reply to this topic.
Forum Posting

A Membership is required to post in the forums. Login or become a member to post in the member forums!

Get the Newsletter

Get our free Handbook and Receive our weekly newsletter to see what's new at Backpacking Light!

Gear Research & Discovery Tools


Loading...