Topic

Modular Waterproof Solar Panel System


Forum Posting

A Membership is required to post in the forums. Login or become a member to post in the member forums!

Home Forums Gear Forums Make Your Own Gear Modular Waterproof Solar Panel System

  • This topic is empty.
Viewing 25 posts - 1 through 25 (of 34 total)
  • Author
    Posts
  • #1290394
    Matthew Naylor
    Member

    @mrnlegato

    Locale: Mid-Atlantic

    Hello BPL! I've been secretly bouncing around the boards for several months, but this is my first post.
    My wife and I are hoping to complete a PCT thru hike in 2013 (but our backup plan is the JMT)

    For this reason (and general interest in "preparedness" and DIY projects), I became interested in a solar panel system that would fit the following requirements
    — charges 1+ smartphones
    — charges AA/AAA batteries
    — internal backup battery
    — minimal weight
    — waterproof (at least resistant)
    — durable-ish
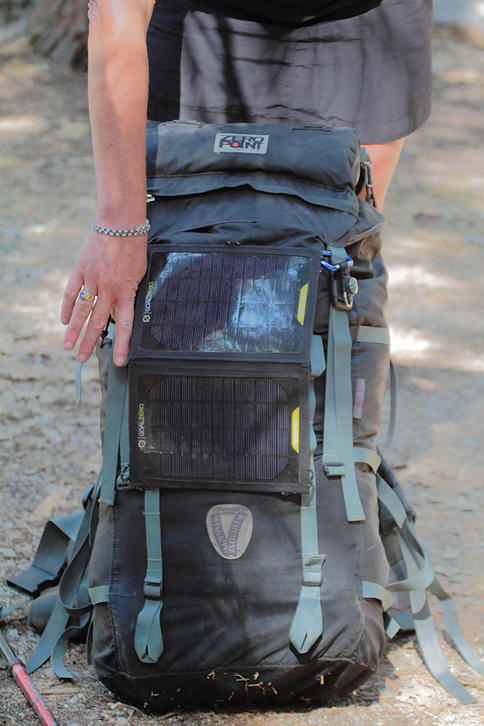
    — modular (fewer panels for light-weight hiking, more panels for more intensive electronics use or low light scenarios… whatever inspires)
    — repairable
    — easily attached to a backpack

    I've experimented with a few commercial systems, but nothing made me confident enough to take it on a long brutal adventure (either due to high weight, low power, or awkward form factor). Those reviews are appropriate for another thread, but the point is I decided to make something myself. The challenge and pleasure of DIY alone would make the project worthwhile!

    If you haven't looked into it yourself, the state of the market for solar smartphone charging seems to be that solar panels are not efficient enough to actively provide amperage to keep a smartphone running and charging; most systems reply upon an attached battery pack that receives a low current from the solar panels, and then provide a high current for the smartphone when charged in.

    Electronics:
    http://www.bootstrapsolar.com/products/solar-li-ion-li-poly-charger $25
    http://www.bootstrapsolar.com/products/usb-charger-circuit $25
    http://www.bootstrapsolar.com/collections/frontpage/products/spare-battery $25
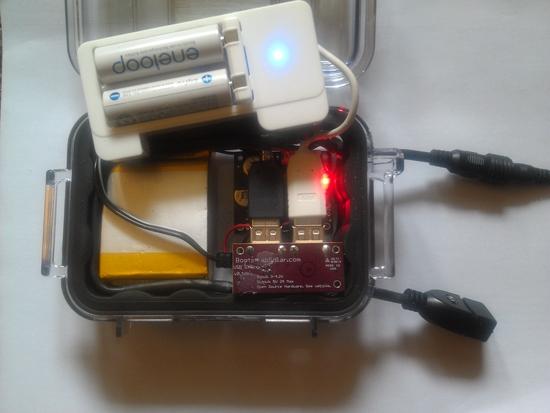
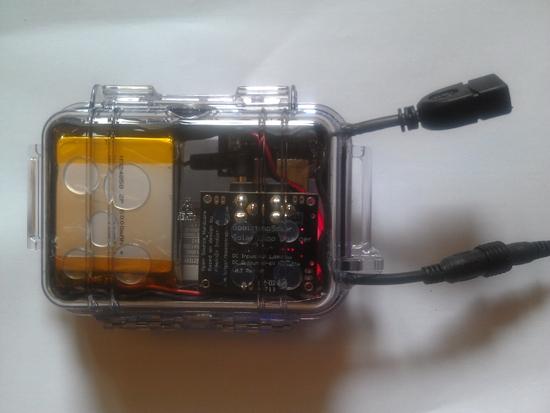
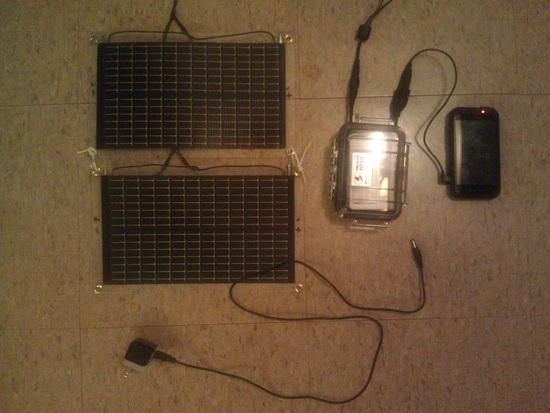
    The guts of the system are the electronics package from bootstrapsolar.com. His components are completely open source and based on the Arduino development system. In theory I could have designed them myself and saved lots of cash, but the energy barrier to learning electronics (not my field) was too great at this point in my life. This system is awesome since it actively regulates the power coming in (solar panel, battery, wall outlet) into the power sinks (2 USB outlets, battery) keeping everything regulated and under control, with LEDs to tell you the charging state. You can even convert the dual USB charger circuit into a mono 1.5A for certain devices. The battery is capacious, and adds a bit of weight, but is small.
    http://www.amazon.com/Sanyo-eneloop-Pre-Charged-Rechargeable-Batteries/dp/B004UAG776/ref=sr_1_1?ie=UTF8&qid=1338174722&sr=8-1 $15
    Small and light USB-powered 2xAA / 2xAAA charger.

    Case:
    http://www.amazon.com/Pelican-1010-025-100-Micro-Case-Clear-Carabineer/dp/B001CCZF6E/ref=sr_1_2?ie=UTF8&qid=1338174780&sr=8-2 $14
    Instead of using the pretty Bootstrap Solar bamboo case, I decided to use a hard-shell waterproof Pelican 1010 Micro Case (the OtterBox 1000 was too small). This adds 6.5 ounces of non-functional weight, and some bulk, but I consider it worth the penalty for the protection of the electronics in severe environments. I had to trim some of the cables, rubber case lining, and USB connector housings to get everything to fit, but once done everything fits snugly with very little shaking. I drilled holes to fit the DC and USB cables.

    Solar Panels:
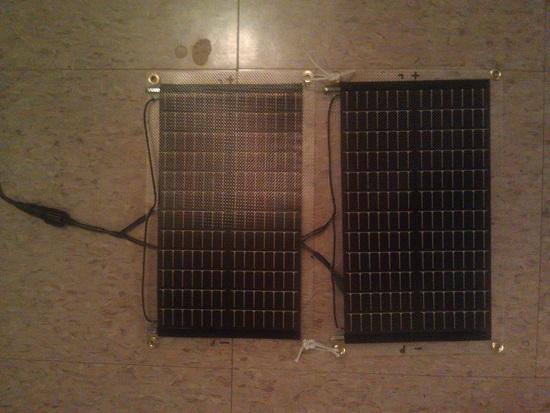
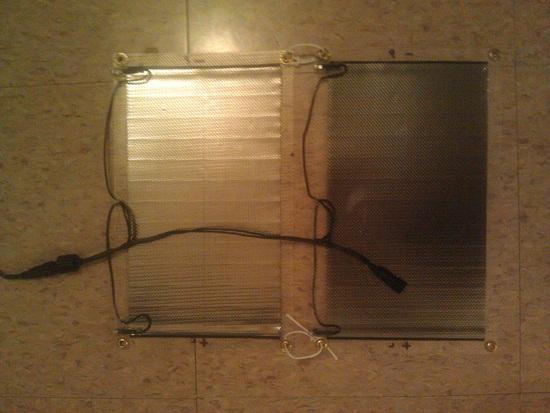
    http://www.powerfilmsolar.com/oem-components/weatherpro-series.php 2x$50
    http://www.powerfilmsolar.com/downloads/pdf/IV-Curves/P7.2-150-IV-Curve.pdf
    I also skipped the Bootstrap Solar panel; even though it has much higher amperage, crystalline panels are fragile and hard to attach to a backpack. The only other product out there that was DIY friendly is the Powerfilm Weatherpro 7.2V 200mA panels. These come in lighter non-Weatherpro versions, but the extra plastic coating makes them much more durable, and a service rep told me that the non-Weatherpro versions only last a few months in constant exposure to the elements. I hooked up these up in parallel to increase the peak amperage to 400mA. I hope to not have to upgrade to 4 panels; must test first.

    Connectors:
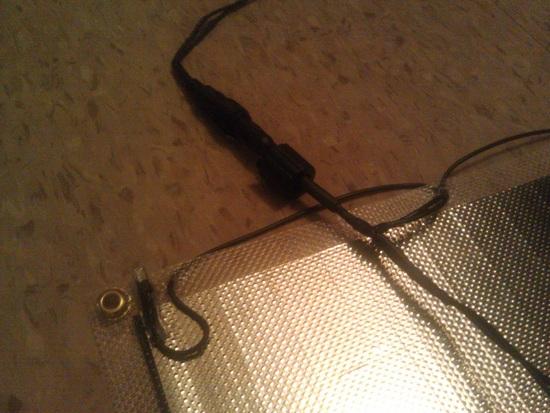
    http://www.adafruit.com/products/743 severalx$2.50
    To keep everything absolutely waterproof I used these connectors on my cables. They connect with normal non-waterproof fittings as well.
    I did not find any small, low-weight solutions for USB connections, but these are not necessarily going to be exposed to the elements.
    I made a ~4ft waterproof connector cable to extend from the solar panels to the electronics case.

    Miscellany:
    DAP Marine Silicon sealant for the cable ports in the Pelican case
    Liquid electrical tape for waterproofing wire splices
    Heat-shrink tubing for cleanliness and durability at wire splices
    Hot glue for attaching components to the Pelican case
    Size 00 grommets to provide linking and mounting ports for the solar panels

    Weights:
    Case+electronics, no batteries: 11 5/8
    AA/AAA charger: 1 4/8
    Dual solar panel (no extension cable): 4 oz
    Extension cable: 1 1/8 oz
    TOTAL: 18 1/4 oz
    This weight total is much higher than I had envisioned at the start. But most of the weight is due to the large battery (greater charging security during extended bad weather) and the waterproof case (greater shock and water security for the electronics), so I've rationalized the weight cost to myself.

    I have not had an opportunity to test the kit yet, but will update this when I do. (No current estimates for the next opportunity)

    Photos will come tomorrow

    #1881634
    Nathan Hays
    Member

    @oroambulant

    Locale: San Francisco

    A couple of items to look at are found at jameco.com:

    http://www.jameco.com/webapp/wcs/stores/servlet/Product_10001_10001_2110414_-1
    Sparkle Power SPU5W1AS. This is a 1500mAh, 50g, 5V in, 5V out USB charger. I think the 1500mAh refers to the Li-Ion inside which would be at 3.7v so a total of 5.6 watt hours. That's an energy density of 112 mW-h/gram.

    The Eneloop AA's are NiMH 1.2V 27g 1900mAh. That's 2.3 watt-hours or 84 mW-h/gram.
    Note that the Sparkle Power unit includes some of the electronics of your kit.

    Another product is from powerfilm,
    http://www.jameco.com/webapp/wcs/stores/servlet/Product_10001_10001_2097133_-1
    This has everything that your kit does: solar panels, dual Eneloop AA and charger, USB 5V output to charge devices. Note that some of the specs on the website are for a different product. I have one and it works.

    One problem with the Eneloops is the 1.2V output. This won't work with all devices, so perhaps an alkaline rechargeable chemistry would be more universal although not nearly as energy dense.

    I am working on a hack of the powerfilm charger to add panels and a Li-Ion cell. I bought a Tenergy 18650 based 3-cell unit: 3.7v 155g 6600mAh for 24.4 watt-hours and density of 150 mW-h/gram.

    The powerfilm charger has a heavy case as well (175g for everything with 2 Enerloop AAs)

    Also from jameco I bought some powerfilm 6V 100mA panels ($19/ea). They aren't the UV protected ones which was a mistake. Now I have to find some film or perhaps just apply sunscreen…

    Like you, I've not been happy with the offerings. Look forward to your pix.

    #1881654
    Matthew Naylor
    Member

    @mrnlegato

    Locale: Mid-Atlantic

    The Powerfilm USB+AA was the first solar product I tried, and yeah the 1.2V charging would not work with my phone. It goes into the rapid charge/discharge cycle that you read about frequently for solar chargers that aren't sufficiently powerful. Even then, the capacity of 2 AA batteries was not nearly enough for recharging a smartphone to full capacity (especially after a day of poor solar weather).

    One solution as you mentioned would be to plug in a 3rd party backup battery. I've used the NewTrent iTorch and iRover (old version) happily for urban travel:
    http://www.amazon.com/New-Trent-IMP52D-Thunderbolt-Blackberry/dp/B0013G8PTS/ref=sr_1_8?ie=UTF8&qid=1338206234&sr=8-8
    http://www.amazon.com/New-Trent-IMP60D-Thunderbolt-Blackberry/dp/B003690Q42/ref=pd_sim_e_10
    And it would be easy to plug these into the USB+AA and it should do the trick. I elected for the homemade option for a few reasons
    — better performance during poor weather
    — less fiddling in plugging/unplugging things
    — ability to have everything plugged in at once while mobile (solar + backup battery + AA/AAA charger + smartphone)
    — modular (expand the solar capacity)
    — waterproofing (the USB+AA and backup batteries are not)
    — robustness (the USB+AA does not seem to have UV protection – panel lifetime?)
    — minimal extraneous weight (the USB+AA is mounted on a synthetic canvas; my design has no mounting at all)
    — more educational and fun!

    #1881656
    Matthew Naylor
    Member

    @mrnlegato

    Locale: Mid-Atlantic

    Case:
    top down battery pack
    top down battery pack, open
    Ignore the extraneous hot glue spots; I was originally going to glue down the USB charger, but its easier to pack tightly in the system when it's free floating.
    top down battery pack, splayed
    The Pelican case comes with a full rubber insert that also forms the waterproof seal; I trimmed the bottom but left the sides for shock protection and to glue things to the shell.
    top down battery pack, splayed, side

    bottom up battery pack

    Since those spots are just hot glue, I should be able to pry out the battery if I ever want to replace it.

    Panels:
    panels top down both
    panels underside both
    Note that I've set up the DC connectors to make parallel expansion easy; just plug in another set and tie them together by the grommets. I could have saved some weight by not bringing the wires in to the center on each panel, but this makes more logical sense in my head. I originally planned on having DC connectors between both panels (to make it truly modular down to 1 panel each) but I decided the extra weight and fiddlyness of soldering, waterproofing, and more connectors was too much.
    solar panel connector
    The Weatherpro panels have little tabs extending from the panel. I folded these back, soldered on the wire, covered them with liquid electrical tape, than covered everything with the DAP silicone sealant. One of the tabs has unstuck from the solar panel plastic (not a big deal), so I may need to use epoxy to keep them rigid.

    Complete:
    everything
    That's a Griffin Powerblock Micro btw

    #1881773
    Nathan Hays
    Member

    @oroambulant

    Locale: San Francisco

    Nice packing job. The pelican seems just right for the fit. You could make it smaller by removing connectors, hard wiring, etc.., but that's a lot of work for not much better.

    I like the USB-AA's folding solution, particularly the way the wiring isn't exposed. I'm sure you'd like yours more tidy before you're satisfied. I like the modularity.

    I'm thinking of using some tubular nylon ribbon running the + and – edges and carrying the wires. I'd use something lighter for the backing, only because the solar sheets I have are fragile and they need something.

    Looking at your panels, I wonder if a simple plastic laminate would work. Could solve the UV problem too. (I could test the plastic for UV protection by making some gauntlets and hanging out at the beach … nah)

    BTW, hooking up panels in parallel is OK, but serial stacking has a problem if one of the panels is in the dark. If the potential on a panel is reversed, it will conduct, heating up and burning out. A protection diode is needed, but the voltage drop of standard diodes is too great – wastes power. Look up an LX2400 from microsemi (digikey.com) if you end up doing serial.

    I look forward to hearing some field testing results. There's always the practicality of keeping the panels working while hiking – no control over keeping them pointed at the sun. That's one of the reasons I'm doing this – need a LOT more best-case wattage to get reasonable results under real conditions.

    #1881947
    Matthew Naylor
    Member

    @mrnlegato

    Locale: Mid-Atlantic

    I'd love to see how you're approaching the USB+AA modifications with photos at some point! A plastic laminate would work, but I suppose you would need to do some research on a formula that is stable to heat+sun, and has the proper UV resistance. A few months ago when I was researching which solar panels to purchase, I found some information about products that people use on large scale for home solar systems, but I don't remember the product.

    I haven't yet decided what to do with the floppy wires on the solar panels. I like the minimal weight, but it also increases wear and snag potential…. I would have kept the case cables shorter, but I did the splices before figuring out how everything would fit in the case; I didn't want to make things too short. I may fix that at some point.

    After some more testing and tinkering, I've discovered that the DAP silicone compound is not very adherent; although it sticks to itself well and makes a nice sealed ball environment, all of the tabs have released from the plastic. I may need to reevaluate that waterproofing / glue method (including for sealing the drilled case holes). In contrast, the liquid electrical tape seems very robust, especially when applied in multiple coats.

    And last, a question; does anyone have experience troubleshooting solar panel problems? After my intial post (where the solar panels were visible charging the electronics) something seems to have changed and I cannot detect any power out of the solar panels, even in direct sunlight, even when linked directly through only a flashlight bulb. The electronics case seems OK; all functions perform fine without the solar panels (including wall charging).

    #1882001
    Bob Gross
    BPL Member

    @b-g-2-2

    Locale: Silicon Valley

    "And last, a question; does anyone have experience troubleshooting solar panel problems?"

    Do you have an accurate schematic diagram of the system?

    Do you have a multimeter?

    –B.G.–

    #1882014
    Matthew Naylor
    Member

    @mrnlegato

    Locale: Mid-Atlantic

    Yes I have a multimeter.
    Hopefully this schematic is sufficient; let me know if it's not:panel schematic
    My only idea is to tear off all my wiring and check if some of the liquid electric tape was insufficient, allowing the positive and negative wires to touch. That would be a lot of work and materials wasted though… any other troubleshooting methods would be appreciated first!

    #1882053
    Nathan Hays
    Member

    @oroambulant

    Locale: San Francisco

    The way you have it set up there is no protection for one panel discharging into the other if it is dark. Solar panels should not be subjected to reverse polarity. They heat up and get damaged. You need a diode in series with each panel individually:

    —PanelA'+'—>|—
    —PanelB'+'—>|—

    The solar charger board has a protection diode input to prevent the battery from disharging into a single panel, but no provision for one panel into the other.

    Separate the panels and test them individually. You may have one blown and the other OK. If you don't see 7.2V under good sunlight with no load, then the panel is damaged.

    Note that individual 'cells' of the panels can be burned if it is under partial exposure. This may result in less than 7.2V output. Without being able to probe individual 'cells' it is hard to tell.

    I don't know if the powerfilm units have diode protection for every 'cell'. They may have assumed the whole panel is either in light or dark, not partial shade.

    The best diode I've found is LX2400 from microsemi (<50mV drop), but they are pricey at the moment. There must be high demand 'cause I paid a few dollars each a couple months ago and they are now at $14 at digikey.com

    Hope there is some other problem besides blown panels!

    #1882080
    Bob Gross
    BPL Member

    @b-g-2-2

    Locale: Silicon Valley

    1. The LX2400 Schottky diode is nice, but it might be overkill for this project. It is sure nice to have some kind of protector with multiple solar panels.

    2. Take the whole thing apart, and get rid of the liquid electrical tape.

    3. Take individual solar panels into the sun, and test to see if you get something like the rated power on the terminals.

    –B.G.–

    #1882083
    Bob Gross
    BPL Member

    @b-g-2-2

    Locale: Silicon Valley

    Although I do not backpack with any solar charger, myself, I was watching one last week. It was a Goal Zero Guide 10 Plus. One gal had purchased it during the recent REI sale, so she was testing it out before departure on a long trip starting next month. It seemed to work reliably, and she did not have too much trouble leaning one way or the other way to keep it pointed toward the sun. I suppose if the DIY systems don't work out, a commercial product may be one idea.

    solar charger

    In order to make any such system work practically, you really have to have a good estimate of how much solar power the thing is _really_ going to produce, and how that will keep the internal battery charged, and then how that is going to keep your electronic devices charged.

    Frankly, I find it more practical to carry a spare battery while on the trail, and that's all.

    –B.G.–

    #1882092
    Nathan Hays
    Member

    @oroambulant

    Locale: San Francisco

    Another temptation is to put multiple Li-Ion cells in parallel to beef up the capacity. This could be very bad since the charge profile requires different modes as the battery fills. If one cell is past the charge mode transition while the other is not, one could overheat. Multiple cell packs have a pcb for individual protection and that would have to be duplicated or at least engineered to be safe.

    The reason I like the LX2400 is the tiny voltage drop rather than the usual 500mV. That's just wasted heat. I haven't looked recently for other solutions.

    #1882201
    Tony Fischer
    Spectator

    @adfischer

    I have played with solar panels for camping / backpacking and just have not been able to make them work for me. Too much power needed vs. what i get from the panels. Probably has a lot to do with living in the SE where we have a lot of shade!

    My strategy is to go with a high capacity battery and conserve power as much as possible. I am going to be trying out the NewTrent icarrier on the trail (http://www.newtrent.com/store/iphone-external-battery/icarrier.html) It has approximately 10x the capacity as the iPhone battery. I expect I can get at least 2 weeks charge on the iPhone if I keep my usage limited and conserve power. At 10 oz its heavy, but less so than many solar options.

    i have been using it for business travel for a while and I can get 4-5 days of charges with very heavy use, so I dont think 2 weeks is out of the questions on the trail. Maybe even longer.

    your solar setup is interesting. looking forward to hearing how it works for you.

    #1882257
    Matthew Naylor
    Member

    @mrnlegato

    Locale: Mid-Atlantic

    It was too overcast this morning to get a proper reading from the panels, but one gave 5.9V, the other 3.9V; I suppose that's a sign that one of them is damaged. I'm going to wait for full sun to make sure that the 5.9V panel isn't damaged too before ordering a replacement. Well, $50 penalties are one of the best ways to learn lessons… whoops.

    Considering that my panels are already higher (full sun) voltage than I need, would my project work ok with a cheaper diode with a larger voltage drop? I ordered two of the LX2400 diodes, but would like to know if there's something cheaper for the future–if I ever expand the number of panels.

    #1882264
    Matthew Naylor
    Member

    @mrnlegato

    Locale: Mid-Atlantic

    Yeah, the Goal Zero systems seem to be the first highly portable systems that do most everything right (although I haven't used them myself). Bootstrap Solar has a nice comparison chart, and Goal Zero is the next best solution after his kit (depending upon what you want):
    http://www.bootstrapsolar.com/pages/solar-battery-charger-comparison
    Again, I'm attracted to the learning process of my own system, and a few of the other advantages that I mentioned above. At this point, though, I've clearly paid way more money than a Goal Zero Guide 10 system costs!

    I haven't tested my Droid Incredible with endurance battery life (airplane mode OR NoBars, JuiceDefender, powering off @ night) and outdoorsy use (primary camera, GPS software, MP3s on the tough days, misc), but my Droid Pro could barely get through a day of such use. So just a backup phone battery won't cut it for me. I do like the NewTrent batteries, and true, that may end up being a more affordable and lightweight option in the end.

    I'm also curious about having the extra power to charge multiple devices in the field someday (not necessarily for the purposes of light backpacking)

    #1882295
    Nathan Hays
    Member

    @oroambulant

    Locale: San Francisco

    The charger circuit from bootstrap is linear, not switched. That means it burns power dropping the voltage to the battery's ~4.2V. I believe it needs 5.5V to work right, not sure. So the voltage drop in the blocking diodes you add is not so important if the output is still above the charger's input requirement.

    Where it is important is in low light conditions where the panel's output drops to near the threshold. Depending on the cells, there could be a narrow or a larger range of light level where the low drop LX2400s will still work while a cheaper 300mV or 500mV diode won't.

    Which reminds me, if you have blocking diodes on both panels, you don't need the blocking diode on the charger circuit board. That just adds another drop without additional benefit (expect maybe sharing the heat dissipation with the panel diodes). In threshold light conditions you will want that drop back. Solder a jumper across the diode – don't remove it in case you want it later.

    [Edit: HOWEVER, there is a maximum voltage the charger circuit takes. The chip is spec'd for 7V absolute maximum input voltage. Verify your panels' output is 7V or less. It may turn out you need the extra diode drop on board]

    I've been thinking about energy harvesting solutions where the power available can be very small. The circuitry builds up a charge slowly on a capacitor and then when there is plenty of potential it charges a deeper battery for a moment. Solar panels in sketchy light conditions are like energy harvester transducers. An example of such a transducer is a piezo that gets flexed by periodic motion such as walking. Tiny voltage spikes are created (like in a piezo lighter) without much current to them. Those energy bumps need to be accumulated to useful levels.

    Like self-winding watches, a self-charging phone would be pretty cool.

    #1882544
    Nick Gatel
    BPL Member

    @ngatel

    Locale: Southern California

    My wife gave me a Goal Zero set-up last year. It works well under perfect conditions at home. I haven't taken it backpacking, because I don't bring anything that needs to be charged. The problem is getting optimal sunlight, i.e. perfect orientation while hiking. Now if you stop for two or three hours each day in the heat of the day and perfect weather, they will work. The Goal Zero battery pack works great for re-charging an iPhone. I bring the battery pack on business trips just in case my phone battery gets low and I don't have access to shore power.

    My tent trailer has solar and we are self-contained with it, so I have experience with solar out in the boondocks. I just don't see a feasible solution for the typical backpacker, but the Goal Zero is probably the best commercial solution I have seen. Plus the panels are quality, but somewhat heavy.

    #1882635
    Matthew Naylor
    Member

    @mrnlegato

    Locale: Mid-Atlantic

    This morning's sunlight gave a reading of 9.5 and 9.7 volts on the panels; that seems peculiar?

    #1882654
    Matthew Naylor
    Member

    @mrnlegato

    Locale: Mid-Atlantic

    Aha! I did connectivity tests on my cables disconnected from the panels, and my positive cables are somehow connecting to negative. I think my liquid electrical tape may have not been sufficient.

    Does anyone have any favorite techniques for creating well insulated, waterproof connections? My method so far has been twist, solder, liquid electrical tape, heatshrink tubing (where possible)… I may just need to do more thorough coats of liquid tape…

    #1882750
    Bob Gross
    BPL Member

    @b-g-2-2

    Locale: Silicon Valley

    Solder and then heatshrink.

    If you do a good job with the solder, the connection will be smooth, and the heatshrink tubing can be shrunk down over it nicely. If the connection is poor, you might get a cold soldered joint, which gives you major electrical problems, and if the connection is rough or pointy, then the heatshrink will shrink down over it to leave a point exposed (and short out).

    I quit using liquid electrical tape about thirty years ago.

    –B.G.–

    #1882760
    Matthew Naylor
    Member

    @mrnlegato

    Locale: Mid-Atlantic

    Is there a special technique for applying heatshrink on T-shaped (3-way) splices?

    What don't you like about the liquid electrical tape (said as a complete novice)? I've certainly noticed the messiness, difficulty of removal, and apparent difficulty in providing complete insulation.

    #1882769
    Bob Gross
    BPL Member

    @b-g-2-2

    Locale: Silicon Valley

    Twist the three wire ends together, solder, and then apply the heatshrink over the single end.

    Liquid electrical tape isn't much good except for the case where you can barely reach the spot with one hand, so you just paint the stuff on as best you reach. For any normal project on a work bench, there are many better electrical insulators like heatshrink, tape, and fish paper.

    –B.G.–

    #1884538
    Matthew Naylor
    Member

    @mrnlegato

    Locale: Mid-Atlantic

    I have the two LX2400s, and will be installing them in the next few days. I fixed my wiring, and the panels seem to be OK (despite fearing shorting them with bad wiring, or burning one of them out without the diodes…), although /i haven't seen them produce the peak 400mA total; they're at something like 340mA in full sun.

    I do have a question though; if I wanted to experiment with the cheaper Schottkey diodes–this is after all just a big experiment–which kind should I get? These?:
    BAT54: 30 V Schottky Diode
    http://www.onsemi.com/PowerSolutions/product.do?id=BAT54
    NSR0230: 30 V, 0.2 A Low VF Schottky Diode
    http://www.onsemi.com/PowerSolutions/product.do?id=NSR0230

    Thanks

    #1884539
    Matthew Naylor
    Member

    @mrnlegato

    Locale: Mid-Atlantic

    Another product (Suntastics sCharger-5) I noticed on a PCT blog this year seems to have decent power output with low weight. I would add a backup battery to their system even though it apparently has enough current to charge a smartphone. I wonder the performance after a few cloudy/overcast days…
    Product:
    http://www.suntactics.com/USBSolarChargerMoreDetails.html
    Blog:
    http://mexicotocanada.com/2012/06/05/day-42-45-renewing-energy/

    #1884542
    Bob Gross
    BPL Member

    @b-g-2-2

    Locale: Silicon Valley

    BAT54: 30 V Schottky Diode

    NSR0230: 30 V, 0.2 A Low VF Schottky Diode

    These two have very similar forward voltage drop ratings.

    –B.G.–

Viewing 25 posts - 1 through 25 (of 34 total)
  • You must be logged in to reply to this topic.
Forum Posting

A Membership is required to post in the forums. Login or become a member to post in the member forums!

Get the Newsletter

Get our free Handbook and Receive our weekly newsletter to see what's new at Backpacking Light!

Gear Research & Discovery Tools


Loading...