Topic
MYOG Dyneema Pack
Forum Posting
A Membership is required to post in the forums. Login or become a member to post in the member forums!
Home › Forums › Gear Forums › Make Your Own Gear › MYOG Dyneema Pack
- This topic is empty.
-
AuthorPosts
-
Apr 24, 2012 at 8:31 pm #1289132
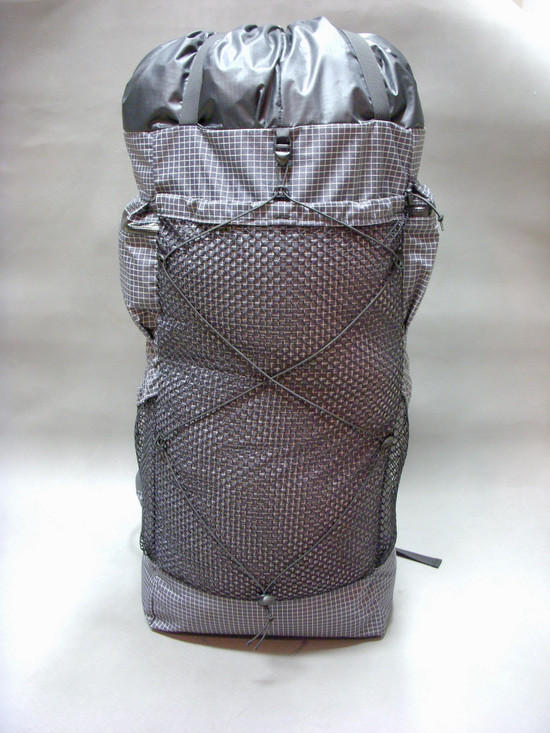
~3500ci main pack/ 57L
~800ci for the 5 pockets
3/4 inch padded shoulder/hip straps with 3D mesh
With internal frame/back pad 18.95oz
Stripped weight 16.00oz
Zimmerbuilt/MLD Exodus inspired
 Apr 24, 2012 at 8:40 pm #1870853
Looks darn good bro!!
Apr 24, 2012 at 8:40 pm #1870854That is very impressive looking good job. Anything you would change if you did it again? I like the way you attached the frame at the top. I'm planning a similar project and I was trying to figure out a way to work the stiching for the top of the frame around the should straps. Looks like your design just wraps around the top of the frame between the shoulder straps. Thats ingenius.
Apr 24, 2012 at 9:03 pm #1870865That's fantastic. I definitely thought Zimmer when I saw it.
All made up as you went or did you base it off any type of pattern?Apr 25, 2012 at 1:30 pm #1871097I just noticed the zippered pockets at the top on both sides. Very slick looking!! Do you have a pattern or any advice on how you made those pockets? I want to make my own hip-belt pockets. They would be nearly identical to what you did, only free from the bag.
Apr 25, 2012 at 8:23 pm #1871293I drew it up on paper and went from there, at some point you go freestyle as the measurements change. The fold over Velcro piece to hold the stays gets sewed into the triple layer reinforcement between the shoulder straps. The zippered pockets were a pain to figure out. I can't explain well how I did it. I'll take some up close Picts to show some detail.
Apr 26, 2012 at 9:09 am #1871468Kaleb,
Very nice looking pack with fine craftsmanship. I really like the contour zippered top side pocket so you can get more in them. Verse my flat zippered side pockets I use on my packs you can barley squeeze a small flash light in . Great job hope you enjoy many miles with the pack.
TerryApr 27, 2012 at 12:35 am #1871776Great design everywhere. For example the V-shaped top strap is much better than a single center strap.
Good frame design. I've retro-fitted factory daypacks with "upside down U" frames of three 1" flat aluminum bars, pre-bent and bolted to the pack with stainless bolts, washers & Nylock nuts. But your solution is lighter and just as effective.
Apr 27, 2012 at 10:00 pm #1872061Thanks for looking, if anyone wants to see any up close detail or more info let me know, I will post some up close detail of the pockets soon. I am almost done with my cuben pack, I will post tomorrow. I am going to retire from MYOG pack building as I got my first job post grad school. I thank and recommend Zimmerbuilt design and quality!
Apr 28, 2012 at 6:15 am #1872111Kaleb,
SWEET!
Congratulations on the new job.
Your employer's gain is the MYOG community's loss.
Now you know me well so you should know what question I am going to ask. What kind of mesh did you use? Where did you source it from? What is the fabric weight of it? See I told you that you would have been able to guess the questions. L O L
Is the stay rod stock or tubular? Do you carry Platypus or some other kind of "flat sided" water bottles?
I really like the way you handled the CCF frame sheet and stay!
The grosgrain bound seam allowances really show the quality of this pack and the attention to detail.
Party On,
Newton
Apr 28, 2012 at 9:13 am #1872162Sean, here are some up close picts. So the top and bottom pieces that get sewn to the zipper coil get sewn upside down, then folded over and sewn again. The width of the front portion of the pouch must be bigger than the back piece. The extra slack of the width is taken up, and folded over and sewn so eventually it is the same width as the back. I tried to show this in the picts.
Newton- went with the Rainshed coarse polyester netting Weight/sq yd: 4.3 oz, stay rod is 6061 aluminum, tubular, via Mr. Swihart. I do carry a flat Platy, but the pockets were designed for poweraide/Gatoraide/smartwater bottles. Thanks for noticing all the raw seam allowances are covered by cross grain. I went through an entire spool of DIY Gutter Tex 50 on 2 packs, stitching it McHale style, actually, I got the Dyneema straight from Dan himself- Thanks Dan!
 Apr 28, 2012 at 9:44 am #1872174
K.C. tell me about the "Mchale method" for sewing on that grossgrain. Is it to add strength or just prevent fraying?
Apr 28, 2012 at 10:13 am #1872178I learned to sew the crossgrain to the main 4 vertical seams and the horizontal seam where the extension collar connects from Chris Zimmer. It does add another line of stitching for reinforcement and also prevents all the thread from rubbing and the raw edges of the main fabric from fraying. The McHale method comes from his site "Count on our packs having twice as much thread as anyone else even claims." I sewed at least 4-5 lines of stitching where the hip belt and shoulder straps connect, at that point the dyneema is folded over once or strips of dyneema are added so there are 4 layers of dyneema at those points. The main vertical seams have at least 3-4 rows of stitching, either side by side or on top of each other. To do this you have to give yourself big seam allowances, at least 1/2 inch.
Apr 30, 2012 at 12:27 pm #1872772Amazing. I make bags for a living and this is amazing! VERY VERY WELL DONE!
-
AuthorPosts


- You must be logged in to reply to this topic.
Forum Posting
A Membership is required to post in the forums. Login or become a member to post in the member forums!
Our Community Posts are Moderated
Backpacking Light community posts are moderated and here to foster helpful and positive discussions about lightweight backpacking. Please be mindful of our values and boundaries and review our Community Guidelines prior to posting.
Get the Newsletter
Gear Research & Discovery Tools
- Browse our curated Gear Shop
- See the latest Gear Deals and Sales
- Our Recommendations
- Search for Gear on Sale with the Gear Finder
- Used Gear Swap
- Member Gear Reviews and BPL Gear Review Articles
- Browse by Gear Type or Brand.
