Topic
Installing a zipper: Is this a brilliant idea or a horrible mistake?
Forum Posting
A Membership is required to post in the forums. Login or become a member to post in the member forums!
Home › Forums › Gear Forums › Make Your Own Gear › Installing a zipper: Is this a brilliant idea or a horrible mistake?
- This topic is empty.
-
AuthorPosts
-
Apr 19, 2012 at 9:11 am #1288909
I'm in the process of making a tent and right now I'm trying to figure out how to istall the zippers. The panels should end up looking something like this:
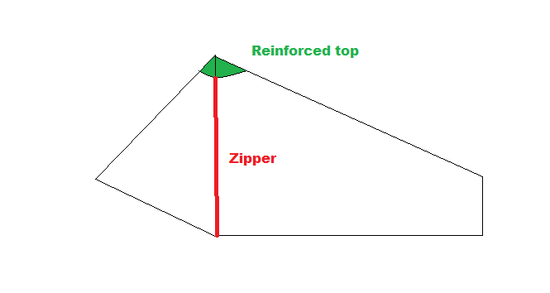
My problem is that the zipper doesn't run al the way to the top because that part needs to be reinforced for the pole. To connect the top part I'm planning on using a felled seam. So far no problem, but now comes the interesting part. Because of the felled seam at the top the fabric on the right panel the fabric is folded up. When the zipper starts it needs to be folded down. I can make a small cut where the transition is, but I'm worried that will severly weaken the fabric. The left panel will be sewn to the zipper a bit from the edge so that there will immediately be a rain flap over the zipper. I've made a (crappy) illustration of what I mean that I hope will help make things clear.
Please tell me if my idea is a good one and if it's not, what the best way to attach the zipper would be.
Apr 19, 2012 at 10:08 am #1869024Rather than using flat felled seam, just sew both sides to the zipper. At the top, after the zipper ends, there will be a gap. Sew a small strip of fabric to close the gap. Then, cover this strip and the top of the zipper with the reinforcing circular piece of fabric at the top which will hide all the ugliness.
Apr 19, 2012 at 11:42 am #1869055Here's a test piece I made:
I sewed the entire seam together first (right sides together) using the biggest straight stitch I could where the zip would go. Rolled and pressed the nylon hem on the back, and pinned the zipper on, centered on the (temporary) seam. Top-stitched through the rolled hems and zipper edge, using a zipper foot. Removed the big stitches with a seam ripper. For a finished piece, I would top-stitch again for two rows of stitches on each side of the zip. If the nylon was hot-cut (or silnylon), and the hem short enough, you could even enclose the hem inside the rows of stitching on each zipper edge, eliminating the rolled hem (which is kind of a pain, esp. on silnylon–hard to get a crease to hold).
For your application, note the zip stops well short of the top of the seam connecting the two pieces of nylon. The reinforcing piece would have a rolled edge, and top-stitch down as Jerry suggests.
Apr 19, 2012 at 12:33 pm #1869075Nice zipper color : )
At the top, it's held together by just the threads of one row of stitches which normally isn't so good, but if you then covered with the reinforcing piece on the top, it would be fine.
Apr 19, 2012 at 2:07 pm #1869110Good point, Jerry. Of course, I would bar tack or box stitch at the top of the zipper if it was a real thing. So maybe if the distance between top of zip and reinforcement wasn't too big, it'd be okay.
I looked a little closer at the OP's diagram, and came up with this:
So in this version, the storm flap and right hand panel becomes one wide flat felled (ish) seam above the zip. Reinforcing patch top stitched as usual.
Workable?
PS: test zip is actually a nice burnt orange color, but sure looks pink in the photo.
Apr 19, 2012 at 2:58 pm #1869134Good idea!
But, I'm anti-storm flap because it just flaps around and doesn't accomplish much and it's not necesary – very little water will go through the zipper. But, if you sew down the flap above the zipper, it may hold the flap over the zipper better. Hmmm…
But, I'm probably in the minority on that so it would work for most people.
When you say "bar tack" above the zipper, you must mean to do a zigzag that goes on both sides, so you end up with another row of stitches holding the two pieces of fabric together, good idea.
If you take the reinforcing fabric at the peak, and have it go down far enough to cover the top of the zipper, then that will also work – regardless of whether there's a storm flap or not.
Apr 19, 2012 at 3:42 pm #1869152David, I had already thought of your first solution. I'm not very excited about that option because, although it looks very nice, there is a relatively high risk of the zipper getting caught in the fabric. The last thing I want to be doing when it's dark and raining is wrestling with the zipper to get in my tent. Now that I think of it, my own and your second solution (nice diagram btw) may not be much better in that regard, but at least the fabric will only get caught on one side of the zipper and there will be plenty of fabric to pull on to get it free. Your second solution may actually be the best option so far.
Another option I've been considering is to cut off the top of one panel, sew that on separately and then attach the rest of the panel with the zipper. This is probably the strongest option because I can use the stronger felled seam, but it's also ugly because there will be an extra horizontal seam.
Apr 19, 2012 at 4:38 pm #1869172Jerry:
I think you're right about the storm flap not being necessary. I'll have to run another test piece with the storm flap idea above, just to see if the construction is as simple as it looks. Of course, I still haven't got around to putting even a zipper in the MYOG shelter I'm using–for now, I don't mind the crawl.
Mark:
With solution #1 (swiped from my Bernina manual's instructions for inserting zips), you could fold back the flaps near the zipper teeth and topstitch down–that would avoid the chance of the zipper sticking. Looking at some commercial packs and such I have around, most use a variation of Jerry's suggestion with the extra strip of fabric, usually placed between the zip and the two panels zipped together, rather than on top. A little cleaner looking. Using a strip of wide grosgrain instead of fabric would save rolling the edges.
Finally, could you use a single piece of fabric instead of two, so there is no seam at all above the zip? Look at 3/4 zip pullovers to see how it's done.
Apr 19, 2012 at 6:39 pm #1869205You can certainly install a zipper the way David Drake's illustrated. It's pretty straight forward.
One possible solution to the storm flap flapping would be a couple of pieces of velcro. I suspect you could put another piece of tape somewhere so you can have the door open wide when the weather is good.
Apr 20, 2012 at 12:24 am #1869282Did it basically the same way the other day. Except I have a water resistant zipper and didn't make it hidden. Hate zipper snag when I wake up midnight, desperately needing to go pee. Had a perfect 20*5cm piece of VX07 I put behind. Think it'll hold up all well enough. + I made a zipper garage at the same time.
-
AuthorPosts
- You must be logged in to reply to this topic.
Forum Posting
A Membership is required to post in the forums. Login or become a member to post in the member forums!
Our Community Posts are Moderated
Backpacking Light community posts are moderated and here to foster helpful and positive discussions about lightweight backpacking. Please be mindful of our values and boundaries and review our Community Guidelines prior to posting.
Get the Newsletter
Gear Research & Discovery Tools
- Browse our curated Gear Shop
- See the latest Gear Deals and Sales
- Our Recommendations
- Search for Gear on Sale with the Gear Finder
- Used Gear Swap
- Member Gear Reviews and BPL Gear Review Articles
- Browse by Gear Type or Brand.