Topic

A simple, dual-fuel, ultralight stove/pot/windscreen design


Forum Posting

A Membership is required to post in the forums. Login or become a member to post in the member forums!

Home Forums Gear Forums Make Your Own Gear A simple, dual-fuel, ultralight stove/pot/windscreen design

  • This topic is empty.
Viewing 23 posts - 1 through 23 (of 23 total)
  • Author
    Posts
  • #1221486
    Jonathan Marshall
    BPL Member

    @marshallj9

    Locale: Bay Area

    This stove/windscreen/pot design was motivated by frustration with the clumsiness of ultralight stoves that I’ve previously used. It has fewer parts to keep track of, sets up faster, works with alcohol or solid (Esbit) fuels, and weighs only 1.5 oz.

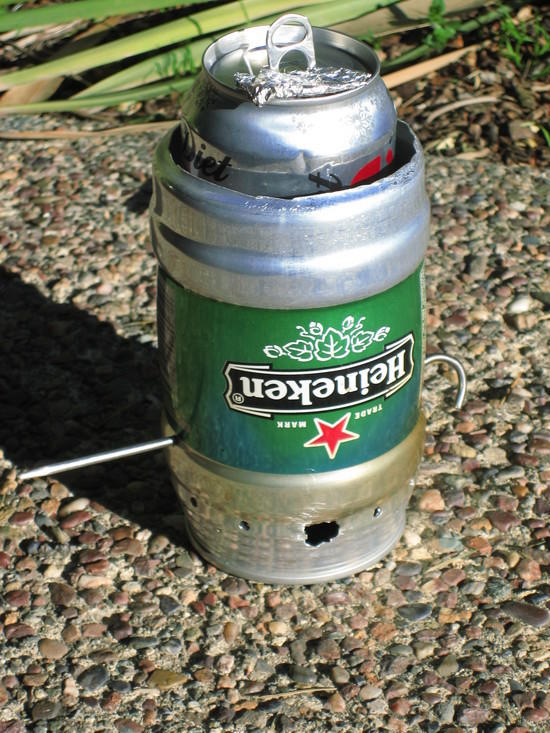
    My previous set-up typically had a heat reflector/priming base (usually aluminum foil), a soda can alcohol stove, a slightly wobbly pot base made out of hardware cloth, a Heineken can pot for boiling water, an aluminum lid, and a windscreen fashioned from aluminum flashing and held closed with a paperclip.

    Even a little wind or numbed fingers made operation of the stove difficult. Light aluminum parts always threatened to blow away. The stove would tend to blow out without the windscreen in place, but was hard to light when surrounded by the windscreen. The windscreen was hard to adjust precisely especially when hot from the stove. Cold fingers made manipulating all these components even more challenging.

    This new design simplifies my life in the great outdoors. The windscreen is a Heineken can with the bottom cut out and turned upside down. (You need metal snips and some patience.) Holes drilled about an inch from the new bottom provide ventilation. A single large hole provides easy entry for a match.

    The heat source is either alcohol (poured onto a small wad of fiberglass insulation thrown in the bottom of the windscreen-can) or an Esbit tab dropped in the bottom. No priming needed.

    The pot for boiling water is a soda can (the usual 12 oz. size works fine for the solo backpacker; there are also 16 oz. cans available in the same diameter that work well for two). It fits down in the Heinekin can with just the right amount of clearance. The soda pop-top is left as a handle for raising and lowering the can. A small piece of aluminum foil covers the opening in the soda can while the water is heating.

    The soda can pot is held above the flame by a single titanium stake borrowed from your tent or tarp, inserted through two small holes drilled about an inch and a half to two inches above the bottom of the Heineken windscreen.

    That’s it. The total apparatus, less the stake, weighs only 1.5 oz. Since the soda can fits nicely in the Heineken can, the two are easy to store and transport.

    In outdoor tests with air temperature in the mid-40s, 0.7 ounces of alcohol heated 12 oz. of water just short of boiling in about 7 minutes—not a great record, but adequate. With an Esbit tab, the water began to boil at 7 minutes. A spurt of water from the top of the pot doused the flame, leaving the remaining tab for later reuse. To my pleasant surprise, the Esbit fuel burned cleanly, with little odor, and left almost no residue in either the Heineken can or on the bottom of the soda can. I’ve never before been able to tolerate Esbit; now I’m a convert. Carrying two tabs of Esbit over a long weekend, you can enjoy two dinners and a hot beverage for only 2.5 oz.
    Heineken windscreen with soda can pot and titanium stake

    #1376310
    Steve Smith
    Member

    @bardsandwarriors

    Locale: Wales

    That's an interesting new paradigm for the ultralight, ultrasimple coffee maker kit.

    I would like to see a nicely engineered version though; and you might want to remove the top of the can to clean it – there is no guessing what will happen in there without you realising it (yurgh). Then the question is, how to add a lid and a pot lifter back into the kit without adding weight?

    #1376436
    Jonathan Marshall
    BPL Member

    @marshallj9

    Locale: Bay Area

    Steve, there's no need for a special lid, which would just be one more component to get lost or damaged. The soda can is sterilized every time you boil water, so microbes won't grow there. When you start a new trip, just take along a recently opened-and-rinsed can.

    This system doesn't just make hot beverages — it works for any kind of freezer-bag cooking or reconstituting freeze-dried food.

    #1376442
    todd
    BPL Member

    @funnymo

    Locale: SE USA

    Jonathan,

    Thanks for sharing your new idea! I can't wait to try it myself.

    Again, thanks for several new twists on the heine & soda cans.

    #1376459
    Brett .
    Member

    @brett1234

    Locale: CA

    Jonathan, the "Marshall" stove seems to be one of those head-slapping 'why-didnt I think of this' ideas. You have reversed the roles of the pop can and the beer can; using the larger and more stable beer can as an integrated stove, pot holder, AND windscreen.
    My beginner's attempts with.. shall we say 'historical' pop can stoves led me to the same conclusions as you; too many parts, too much setup time compared to my jetboil, unstable, wobbly, top heavy, sensitive to windscreen setup, etc.. Your design appears to start addressing all those problems.
    I am going to try this tonight, and I think maybe leaving the beer can upright with the bottom intact, then dropping in a tea-light or mini can stove will provide an integrated base and alcohol/esbit holder. Was there some reason you cut out the top of the can (which then becomes the bottom of the stove?)
    Great design!!

    #1376474
    todd
    BPL Member

    @funnymo

    Locale: SE USA

    Jonathan,

    You inspired me so much I had to try it! My wife is cool, but she does laugh at my "stove exploits"!

    I have had minimal success in the past w/my Heine setup, so your idea, as Brett said, seems to address my issues. I left the bottom intact and used the handle of a screwdriver to round out a depression in the bottom of the Heine. Then I used a 3/16" awl to put holes about 1" apart around the whole can, on the bottom of the "green paint" just above the widest part of the lower half. I used a stake as a support just like you did, and added a second row of holes 1/2" above the first row, but only around half the Heine.

    I used a 12oz Heine for my pot (more durable & used a small foil lid wrapped to fit the opening) and 1/2oz fuel. Water was steaming but no boiling when the fuel burnt out @just over 4 1/2 min.

    I'll keep trying, but I have to say I really appreciate your idea.

    Todd

    #1376501
    Jason Klass
    BPL Member

    @jasonklass

    Locale: Colorado

    Jonathan,
    Great idea! One question: It looks like you would burn your fingers if you try to lift the soda can out while the fuel is still burning. Have you found this to be true?

    #1376537
    todd
    BPL Member

    @funnymo

    Locale: SE USA

    Jason,

    I'm not answering for Jonathan, but burnt fingers will be an issue for me if I grab the can while stove is burning. With the right amt of fuel that won't be a problem, though.

    You can use a stake to pick it up by the tab lifter / ring thingy to avoid burns.

    Todd

    BTW Jason: I look forward to your "efficiency improvement" ideas!

    #1376599
    Jonathan Marshall
    BPL Member

    @marshallj9

    Locale: Bay Area

    Brett: The reason I turned the Heineken can upside down was to get a flat bottom. The regular bottom of the can is curved up, making it hard to set fuel in the bottom.

    Jason: I found the soda can tab remarkably cool to the touch, and flames stayed low enough in that they won't burn your hands. But when it comes time to pour the boiling water out of the soda can, you'll need gloves or a bandana to protect your hand from the heated can.

    Jonathan

    #1377640
    Anonymous
    Inactive

    Jonathan, I have an empty H. can ready to go to work to make your stove. …but I am wondering if I cut the bottom out, punched holes along the side near the bottom and set it over my pepsi can stove once it is lit, that it would do the same thing?? Hate to ruin a perfectly good can. Have you, or is there anyone else who has tried it with an alcohol stove?? This is really a nice little set-up. Good work.

    #1377647
    Jonathan Marshall
    BPL Member

    @marshallj9

    Locale: Bay Area

    John:
    Using the H can as a windscreen should work fine in your proposed situation. The downside from my point of view is added complexity:
    1. You need and must carry a separate stove.
    2. The H can now is open at both ends, so the soda can won't store inside it, unless they are in a bag together.
    3. You'll probably have to light your stove first, then put the H can over it. That could be a problem if there is a lot of wind. In my design, the fuel is protected from wind as you light it.
    Since a can of Heineken's costs only about $2.60, I don't think you'll be wasting too much money to give my alternative a try!
    Good luck,
    Jonathan

    #1377662
    Anonymous
    Inactive

    Jonathan,

    Thanks for your response and for your encouragement. By the way, a 24 ounce can of H is 2.98 here and my neighbor drinks the beer for me. A little steep since I am not getting the enjoyment of the suds. I have put out a bounty locally for empty, undamaged cans hoping to build an inventory of extras to allow for my mistakes.

    Considering the complexity you described, your set up is attractive for the reasons you have stated and would be much preferable. However I have not converted to esbit tabs. Also it seems awkward and difficult to keep a match lit long enough to get it through the hole and light the tab, especially in even moderate winds. My thoughts were to light the alcohol with a fire steel which works well in moderate temps down to about 30° or so, and then throw on the H. can windscreen. One reservation is the flame pattern on a pepsi can stove attempting to heat a pot the size of a 12 oz aluminum can. I am going to give it a try and see how it works.

    #1377687
    Brett .
    Member

    @brett1234

    Locale: CA

    Jonathan, thanks for the explanation. I have been eager to try this, but cant find those H. cans here in Japan. So I bought a 1L beer can instead. I am searching for a can opener which will cleanly take off the top of the can. I believe insulating the outer can with reflectx will be useful. Can you get a rolling boil in the innner can with esbit?
    Thanks for the great design

    #1377732
    Jonathan Marshall
    BPL Member

    @marshallj9

    Locale: Bay Area

    John: Esbit tabs light easily with a drop or two of alcohol on them. I carry them in a small ziplock bag with a bit of alcohol, so I don't need to carry a separate alcohol dispenser.
    If you prefer using alcohol for fuel, try a top-burner design rather than a side-burner like your Pepsi stove. My simple technique of dropping fiberglass in the bottom of the Heineken can to absorb alcohol has the effect of concentrating the flame in the center. You could also drop a tea light shell in the bottom and pour alcohol into it.

    Brett: Other large cans will work besides the Heineken. I tried it successfully with a Foster's beer can. But they tend to be weaker in the sides than the H cans and more prone to deforming as you drill or cut holes.
    The outer can should reflect most of the heat, so I'm not sure you would gain much by insulating it. If you try it and I'm wrong, let us know!

    #1378257
    Anonymous
    Inactive

    Jonathan, Hopefully you will check back on this thread, it has been a few days. Regarding point #2 about leaving both ends open if the H. can is used as a windscreen w/ an alcohol stove. I just tested the lid off of a 3-ball container of Penn Tennis balls and it makes a perfect fitting cap for a H. can if anyone decides to punch the top out. I still haven't tried it yet. I am still looking for the right tool to cut the top out. My regular can-opener is too shallow for the top groove. What did you use to cut the bottom out?

    #1378299
    Jonathan Marshall
    BPL Member

    @marshallj9

    Locale: Bay Area

    John —

    I first drilled a hole in the bottom of the can, then used metal snips to cut out the rest. I smoothed the jagged edges as best I could with sandpaper. Not elegant, but it worked.

    Jonathan

    #1378336
    Douglas Frick
    BPL Member

    @otter

    Locale: Wyoming

    > I am still looking for the right tool to cut the top out.

    I angled my regular can opener tightly against the inside and was able to cut out the top after a few turns. I also picked up a smooth-edge can opener, and on another can it made a nice cut and allowed me to use the top as a lid since it still fits on the can.

    >What did you use to cut the bottom out?

    I stuck a bare utility-knife blade in a junk book at the desired height, C-clamped it and the book to the table, pushed the can up against the book and the blade (to make a nice even cut), and rotated the can until the bottom came off. (This is a standard trick for cutting home-made alcohol stoves.) A light rub with sandpaper to remove the small burr and it was done.

    #1378560
    todd
    BPL Member

    @funnymo

    Locale: SE USA

    After my near-boil attempts recently, I tried this tonight: I lowered my pot support (stake) to 1 1/4" above the bottom of the H-can. Then I put an empty tea candle tin in the handmade depression I made in the bottom. I nearly filled the tea light (to my surprise, no alcohol splashed out while pouring). It didn't quite boil.

    Then, after letting my setup cool completely, I added a little less alcohol to the tea light, but added a few drops in the bottom of the can and lit it. 10 min later I had a full rolling boil (blew my foil lid off!) and it kept boiling for approx two more minutes – I had stopped timing it at this point so I'm not certain.

    I can't wait to take this on a trip soon. Perhaps I'll try a 16oz alum beer bottle for the pot just for kicks. What a lightweight, stable, and compact setup. THanks Jonathan!

    PS: I would like feedback on this: I'm thinking of modifying my pot (12oz H-can) by cutting out the lid (inside the rim)so I can store my fuel bottle, etc inside it & add a full foil lid & wire bail handle.

    #1378562
    Brett .
    Member

    @brett1234

    Locale: CA

    Todd, so did the boil occur because of a faster alcohol burn rate? And that happened because you primed the can, I suppose. I have been unable to get a boil with this setup, it seems the exterior aluminum can conducts a lot of heat away from the inner 'pot'. Ill try priming and burning with a wider (faster) stove device..

    #1378604
    todd
    BPL Member

    @funnymo

    Locale: SE USA

    Brett,

    I have to assume that the priming is what made the difference, since that's the last variable I changed.

    If this setup performs this weekend (will be cold here, even though it's Florida!) it will likely be my new mainstay. I especially like the easy setup compared to separate windscreens, etc. NOt that they're exactly DIFFICULT, though.

    Good Luck, have fun.

    #1378625
    Anonymous
    Inactive

    Jonathan and Doug, Thanks a bunch for your can cutting instructions. Doug, my impression of your use of the can opener was to use a regular opener and angle it by applying lateral pressure while cutting?? Is the smooth edge opener you spoke of the "Good Cook" opener?

    Regarding homemade lids, I have recently started saving the vacuum pack aluminum seals w/ pull taps to use as lids and for other puposes such as heat reflectors. The eco-sized Cremora can comes sealed with this type of lid along with some other products (e.g. Knox Nutra-Joint). The aluminum is more sturdy than regular aluminum foil

    #1378747
    Douglas Frick
    BPL Member

    @otter

    Locale: Wyoming

    >Doug, my impression of your use of the can opener was to use a regular opener and angle it by applying lateral pressure while cutting?

    Right. The hardest part was keeping the gear from ripping through the outside of the can (I ruined one that way). I then made a lid by cutting the top off another can just below the rim, from the outside using the book/blade method.

    > Is the smooth edge opener you spoke of the "Good Cook" opener?

    The same general style–mine is an Oxo Good Grips. It's about $20 instead of $15, but it works well. (The "Good Cook" had a few bad reviews.) The nice thing about a smooth-edge opener is that after you cut the top off, the top can be used as a lid.

    #1378775
    todd
    BPL Member

    @funnymo

    Locale: SE USA

    I noticed after a few burns the 24oz H-can windscreen/ pot support seems a little weaker & susceptible to dents. Is it my imagination, or is this inevitable due to heating of an empty can vs one filled w/water?

    Thanks folks…

Viewing 23 posts - 1 through 23 (of 23 total)
  • You must be logged in to reply to this topic.
Forum Posting

A Membership is required to post in the forums. Login or become a member to post in the member forums!

Get the Newsletter

Get our free Handbook and Receive our weekly newsletter to see what's new at Backpacking Light!

Gear Research & Discovery Tools


Loading...