Topic

Making neat straps


Forum Posting

A Membership is required to post in the forums. Login or become a member to post in the member forums!

Home Forums Gear Forums Make Your Own Gear Making neat straps

  • This topic is empty.
Viewing 25 posts - 1 through 25 (of 37 total)
  • Author
    Posts
  • #1285611
    Sam Jones
    Member

    @sam-pangolin

    Locale: London, UK

    Hello chaps

    Has anyone got any good tips for doing the edging on backpack straps? I did this yesterday for the first time and it was really tricky! I was expecting it to be quite difficult to be fair, but I was wondering if there's any good advice out there.

    For the most part they came out quite well. They are cordura underneath, silnylon on top, and a thin (maybe 3mm?) foam from a cheap sit pad in-between. The edging stuff kept trying to slip off as I went along. How do you combat this? I couldn't pin it as the foam meant the pin would only go through 1 way (going back through the other way would have bent the strap, does that make sense?).

    Here's the finished article
    strap

    And here's an example of a less than brilliant section
    strap detail

    #1838743
    Daniel Sandström
    Spectator

    @sandstrom-dj

    I finished up a pack about a month ago and had similar problems. Not fully pleased with the result I did some research. Next time I'll attach the ribbon with double sided tape before sewing, with a guide for clean result.

    Picked up the tip in this thread…
    http://www.backpackinglight.com/cgi-bin/backpackinglight/forums/thread_display.html?forum_thread_id=16980

    Happy sewing.

    #1838745
    Sam Jones
    Member

    @sam-pangolin

    Locale: London, UK

    Those are really good ideas thanks Daniel.

    Is the guide something like this? http://www.extremtextil.de/catalog/Magnetic-Seam-Guide::664.html

    I like your packs, how are they holding up? This comment really made me laugh… "Unfortunately I miss the sexy pictures of me sewing. Too sexy."

    Are you still using them?

    #1838746
    CW
    BPL Member

    @simplespirit

    Locale: .

    The way the big guys do it is with a folder attachment for their sewing machine. The downside is you usually need a machine designed with industrial use in mind to be able to use the folder.

    #1838747
    Sam Jones
    Member

    @sam-pangolin

    Locale: London, UK

    I'm quite a big guy. Oh wait.

    Yes my machine is far from industrial! Just a basic singer… 8280 I think.

    http://www.johnlewis.com/231136647/Product.aspx

    #1838754
    Joel Hulett
    Member

    @jhalan

    Locale: Midwest

    Use washable fabric glue. position as desired. clamp down with about 55 black 1/2" folder clips. let dry. Remove clips. Sew. This really works well for me, just be sure to get enough of the clips so they are touching all the way around. The clips I'm refering to are small clamp style folder clips you can get at any office supply store. They are just the right size so that the edge of them can be used as a guide for the reveal of the strap.
    Hope this helps.
    Joel

    #1838760
    Christopher Zimmer
    BPL Member

    @czimmer

    Locale: Ohio

    Sam I have found if you fold your grossgrain in half and run it over an edge of a table or counter it will put a crease in the grossgrain and make it much easier to keep centered and pressed against the edge. You might also what to try a tutorial I put together for a different method of putting of building shoulder straps. It can be found Here

    #1838768
    John Donewar
    BPL Member

    @newton

    Locale: Southeastern Texas

    Sam,

    Here is a link to an earlier post of Chris Zimmer's other method of making pack shoulder straps.

    It resembles yours but note that the only padding in his straps is the 3D foam mesh.

    "They are cordura underneath, silnylon on top, and a thin (maybe 3mm?) foam from a cheap sit pad in-between. The edging stuff kept trying to slip off as I went along. How do you combat this? I couldn't pin it as the foam meant the pin would only go through 1 way…"

    You may be trying to sandwich and control too many layers of material on your home style machine. I also use a home style sewing machine. I have used both methods that Chris uses and a variation of my own. The "sock method" that Chris provided the link to is my favorite by far for shoulder straps.

    Party On,

    Newton

    #1838778
    Sam Jones
    Member

    @sam-pangolin

    Locale: London, UK

    Hi Guys

    Thanks for all the replies!

    John – I should have been more clear. I did the sock method first, so the strap was all sewn together, then attached binding around it all once I'd managed to wrangle the foam inside. Perhaps I am just overbuilding it. I did it partly for looks and partly to make a sturdier edge. I think part of the problem was that the sock was a little too loose around the foam at points, so keeping the binding over all the layers was more difficult. As illustrated in this work of art.

    x section

    The sewing machine actually seemed to handle it quite well, no jams. Just tough staying on target. "Stay on target…"

    Chris – Your packs are awesome, and I have pored over your pictures many times on here for inspiration. Thanks! I see in your strap guide you don't bother with a binding so I may follow suit. The only 3d mesh I have is 6mm which my machine struggles with if there is much else involved. I suspect mesh + foam + fabric + webbing = CLUNK… new needle. Maybe I just need some 3mm stuff.

    You mention folding the gross grain. Sadly this attempt was with some binding I bought that was actually readymade for such a task. It is pre folded, and looks like this.

    binding

    It's really easy to keep folded neatly. I am just not very good at sewing yet!

    #1838783
    Angelo R.
    Spectator

    @zalmen_mlotek

    Locale: Northwest CT

    What about just having straps with 6mm mesh plus fabric and no pad in the middle? I know some folks don't need much padding in the straps, i.e. leaving out the foam in the Gossamer Gear straps (and GG doesn't even use 3d Mesh) — your straps might be pretty comfy. It all comes down to the individual, but just a thought. For a day pack or with SUL loads it will probably be fine.

    So 3d mesh, outer fabric and webbing sounds like easy sewing for home machines.

    #1838784
    Michael Duke
    Member

    @mpd1690

    I definitely recommend not using binding. It just compresses the padding, making part of the strap effectively unusable.

    #1838788
    Sam Jones
    Member

    @sam-pangolin

    Locale: London, UK

    But if going without foam I would need binding right? The 6mm 3D mesh is pretty chunky, I don't think I could sew it inside out then flip it.

    FWIW, the binding didn't seem to compress the edges on these straps much. It's pretty thin foam anyway.

    #1838793
    Angelo R.
    Spectator

    @zalmen_mlotek

    Locale: Northwest CT

    Basically I was suggesting using the 'Zimmer Method' but skipping the CCF padding. No binding needed and I would imagine with some effort flipping the 6mm 3d mesh inside out is achievable.

    #1838797
    Sam Jones
    Member

    @sam-pangolin

    Locale: London, UK

    Flip, that might be tricky. I will try this evening and post my results.

    If I get really good maybe they will write a song.

    "They call him Flipper, Flipper, faster than lightning,
    No one you see, is smarter than he"

    #1838800
    John Donewar
    BPL Member

    @newton

    Locale: Southeastern Texas

    Sam,

    "The 6mm 3D mesh is pretty chunky, I don't think I could sew it inside out then flip it".

    I made the hip belt on my wife's daypack out of two layers of "3D foam" that I bought from Rockywoods. It turned out to be 4 mm thick. I never was very good at paying attention. LOL

    What I wound up with is this pictured below.

    Hip belt

    It is essentially 8 mm of foam mesh with the fabric backing on the inside and two layers of of black 500D Cordura also sandwiched inside. I sewed it all together with the wrong sides out and then turned that portion of the belt inside out. I then sewed a top stitch all along the edge to "flatten out" the edges.

    That was a lot of material to fit under the presser foot on my machine but it handled it OK.

    Party On,

    Newton

    #1838810
    Jerry Adams
    BPL Member

    @retiredjerry

    Locale: Oregon and Washington

    "And here's an example of a less than brilliant section"

    I figure that us amateur sewers sometimes have "less than brilliant section" but it's more cosmetic than functional. And it takes longer – professional would just zip along quickly and it would be more perfect.

    Another thing – if you just put foam inside a sleeve, it'll rotate around with use. Need to at least put a few stitches through fabric and foam to keep it in position. I've done hand stitches when my machine wouldn't get through it.

    #1838814
    Christopher Zimmer
    BPL Member

    @czimmer

    Locale: Ohio

    Yeah what Newton suggested is a great way to go for lightly padded/3D mesh padded straps. You can either use a top and bottom layer of 3D mesh or just one layer of 3D mesh and a different top fabric. For my hydro pack I used two layers of 3d mesh and it makes for a nice strap, no need to mess with the binding, just flip right side out and sew around the strap and your good to go with a nice clean edge.

    #1839029
    Terry Trimble
    Member

    @socal-nomad

    Locale: North San Diego county

    Sam you did a nice job on the cross grain ribbon binding the edged of the shoulder straps shoulder straps. I like a sewing machine that has adjustable tension on the tightest tension on the foot to keep the fabric from migrating. Go slow till you get the hang of folding and sewing folded over cross grain faster. The trick I use is I pinch it between my thumb and finger and feed it on to the fabric I am binding let it slide through my finger off the cross grain ribbon roll. It just take doing it enough to get fast.

    On commercial machine they make a binding tool that bolts on top of the sewing plate and it feeds the cross grain ribbon on to the the fabric that your binding and it fold it over automatically and even as you sew along cuts the time down quite a bit and more professional look. Frees both hand to sew instead to keep a straight fast accurate binding.
    Terry

    #1839074
    Hobbes W
    Member

    @hobbesatronic

    Locale: SoCal

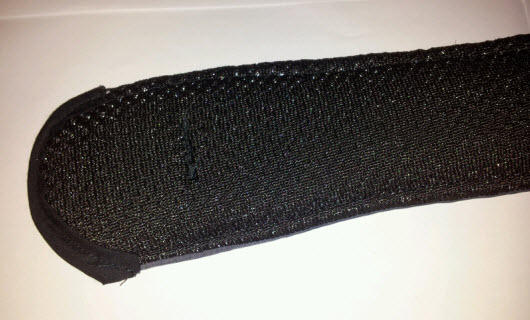
    "Another thing – if you just put foam inside a sleeve, it'll rotate around with use. Need to at least put a few stitches through fabric and foam to keep it in position. I've done hand stitches when my machine wouldn't get through it."

    Leave it to Jerry to mention the most sensible method for the typical MYOG builder.

    Questions: How much weight do you expect this pack to carry; and how long are your planned trips? The reason I ask, of course, is that most packs are **way** overbuilt. If you're doing MYOG, then the entire rationale, besides saving a little $, is to build something exactly to your requirements. That means not only measurements, but the strength & durability of the material(s) used.

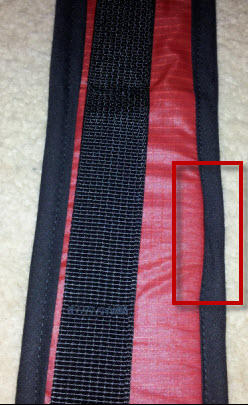
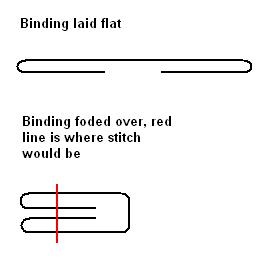
    I highly doubt that you need either your base materials and/or grosgrain. They both add weight, but more importantly, they're a freaking hassle as you're now finding out. By far and away, the simplest method is to take a common piece of fabric and sew a basic seam to form a barrel. (You might be able to pull off a flat felled if the sleeve is wide & short enough.)

    Flip it right-side out and stuff your pad inside (ie the sock method), rotate the sleeve around so that the seam runs down middle of the pad, then run a stitch across the top/bottom (either by machine or hand) to prevent the pad from shifting and you're done. Attach your belt (I use 1/2" grosgrain in lieu of belt) to the top/bottom (or run it the entire length) and you're done.

    In my case, my bear can pack is made from 1.9, so I just use another piece of 1.9 to form my straps. I believe straps should be wide, rather than thick, so my shoulder straps are 3" wide, while my hip pads are 5" wide. At this width, it's a piece of cake to roll & stuff in the padding.

    Oh, and one last thing, I use neoprene exclusively for my pads. It's easy to find @ any general hardware store, typically sold in 1/4", 3/8" & 1/2" thicknesses by the square 6" for around $1. That means all your padding requirements will run under $10. Cheaper than cutting up a cheap blue pad, and way more comfortable to boot.

    #1839198
    Sam Jones
    Member

    @sam-pangolin

    Locale: London, UK

    Morning (or evening) all,

    I made good headway with straps 2.0 last night, using the sans foam method.

    So these are a layer of 6mm 3d mesh, and a layer of laminated nylon. (ripstop nylon laminate, 160g/sqm, item 70526 on extremtextil.com – seems to be out of stock now).

    Those are sewn together wrong sides out, then flipped right side out, then sewn again to create a nice flat edge.

    I haven't finished attaching the webbing yet, had to tidy up and go to bed.

    strap2

    Close up of the top, where I did use a bit of binding to finish the raw end

    strap2top

    And here's the bottom

    strap2bottom

    They are copied from the straps on a camelbak. Some thoughts;

    – 3D mesh is MESSY. Lots of hoovering required during and after the cutting.
    – A roller cutter and cutting board was an EXCELLENT purchase at the weekend.
    – I like the colour
    – My sewing machine is not happy sewing the webbing through all of this. 2 needles broken already. Any tips?

    #1839199
    Sam Jones
    Member

    @sam-pangolin

    Locale: London, UK

    Hobbes, thanks for the tips. I might see if I can find some neoprene.

    You make a good point about intended use and durability. After making a couple of packs from cheaper fabric, I have found a couple of people who want a home made pack to use. This was mainly because, as you keep building new versions of things, they just build up in the house. So I thought this would be a good way to get some experience and not end up with heaps of gear I don't use.

    Well, bigger heaps anyway.

    So these next 2 packs (that these 2 sets of straps will be used in) are for other people. Because of that I want to make them fairly sturdy. I'm happy that both of these sets have come out sturdy, and won't be what fails first. I think they'll be used mainly for cycling.

    #1839206
    Mark Fowler
    BPL Member

    @kramrelwof

    Locale: Namadgi

    At the risk of hijacking this thread, should we be asking a more fundamental question of whether shoulder straps need padding at all. Are we just aping the norm in heavy weight backpacks by including a thick layer of foam?

    My own view is that for the weights normally carried (< 9kg, 20lb) it is most probably unnecessary as long as we use materials that are sufficiently conformable to the shoulders while being sufficiently inflexible to spread the load over the full width of the shoulder strap. The straps I have made use Thru-Hiker 3D mesh with an uncoated 500 denier Cordura as a top layer. A 1" grosgrain tape provides the normal attachment for the buckle, sternum strap etc. This so far seems to provide good comfort. This combination also breathes quite well and may alleviate a little of the sweaty pack strap phenomenon.

    #1839211
    Sam Jones
    Member

    @sam-pangolin

    Locale: London, UK

    "The straps I have made use Thru-Hiker 3D mesh with an uncoated 500 denier Cordura as a top layer. A 1" grosgrain tape provides the normal attachment for the buckle, sternum strap etc."

    Err that's almost exactly the same as the second ones I posted this morning. I used a nylon laminate instead of cordura though. It's not much of a hijack as it's exactly what was discussed on the first page ;)

    #1839234
    Daniel Sandström
    Spectator

    @sandstrom-dj

    Alright, you got a great thread going on. :)

    Well I forgot to tell you what I'd really want.

    This is how my last pack straps turned out.
    Straps

    I used 6mm 3D mesh from extremtextil. Not sure if I'd go the turn inside out way, btw, why have 3d mesh if it can't breath? If for stability, then I'd say EVA foam is better, easier. I got one surprise, the foam is made up of some transparent fibers which mess a bit when cutting the mesh and actually poke through the edge binding later on. I used the same kind of prebent edgebinding as you, but I think it's a bit too thin for backpacking applications.

    On the guide. My machine has a built in rod which I sometimes use. I haven't tried the extremtextil one, but they have delivered good quality stuff in the past. Although, sail rites model seems to be the real deal. Tip, they have lots of great videos. Only downside is you want an industrial machine when done watching.

    The previous pack is still in use. Usually ditch the hipbelt as the load is so low, also made permanent shoulder straps from sturdy silnylon turned inside out with eva. Have used it successfully on solo summer trips. :)

    As I said I finished up my second pack a while ago. Very happy with it, big enough for Finnish winter trips or longer voyages. Might have to do a write up at some point.
    PacK2

    #1839255
    Jerry Adams
    BPL Member

    @retiredjerry

    Locale: Oregon and Washington

    "At the risk of hijacking this thread, should we be asking a more fundamental question of whether shoulder straps need padding at all."

    I think you're onto something.

    My last straps were made from 1/8th inch foam which is close to no foam.

    Maybe this is a carry over from when packs weighed 50 pounds. Then you maybe needed thick foam.

Viewing 25 posts - 1 through 25 (of 37 total)
  • You must be logged in to reply to this topic.
Forum Posting

A Membership is required to post in the forums. Login or become a member to post in the member forums!

Get the Newsletter

Get our free Handbook and Receive our weekly newsletter to see what's new at Backpacking Light!

Gear Research & Discovery Tools


Loading...