Topic

Molly Mac-Inspired Alpha Test Pack


Forum Posting

A Membership is required to post in the forums. Login or become a member to post in the member forums!

Home Forums Gear Forums Make Your Own Gear Molly Mac-Inspired Alpha Test Pack

  • This topic is empty.
Viewing 8 posts - 1 through 8 (of 8 total)
  • Author
    Posts
  • #1284377
    John Almond
    Member

    @flrider

    Locale: The Southeast

    Cross-posted from Hammock Forums, where I'm an active member

    I've been working on a Molly Mac Pack-inspired backpack for a couple of months now. Unfortunately, my sewing machine being sidelined until last week–at which point I purchased a 70s-vintage refurbished Husquvarna Viking–prevented me from finishing the pack sooner.

    The week running up to the 2nd Annual Florida Hammock Hang was a blur of sewing and resewing interspersed with meals and work. I finished the pack with twenty-four hours to spare and went to work on a couple of customized stuff sacks to go with it.

    Many thanks to MacEntyre for his wonderful Molly Mac Pack design (and his permission to share my take on it; you can find his work at http://www.mollymacpack.com/) and Daryl Clark for his lightweight carbon fiber frame design.

    This is not a super-ultralight pack; instead, I've traded off some weight for modularity and quick access to all of my items without having to root through a large bag. It also allows me to strap pretty much anything I want to carry to the pack, regardless of whether it's in a stuff sack or not.

    To the pack proper…

    Stats:

    [*]Total Frame Height: 23.5"
    [*]Total Frame Width: 14"
    [*]Vertical Shaft Length: 22"
    [*]Horizontal Shaft Length: 12"
    [*]Frame Weight: 79g (2.8 oz.)
    [*]Waist Belt Thickness: 2/3"
    [*]Waist Belt Padding Length: 28.5"
    [*]Waist Belt Max Height: 5"
    [*]Waist Belt Min Height: 3"
    [*]Waist Belt Weight: 79g (2.8 oz.)
    [*]PALS Array Height: 10 Rows/19"
    [*]PALS Array Width: 7 Columns/10.5"
    [*]Back Panel & Shouder Strap Weight: 376g (13.3 oz.)
    [*]Total Weight Before Stuff Sacks and Connection Straps: 680g (24 oz.)
    [*]55" Length Lashing Strap: 38g (1.3 oz.) each or 76 g (2.7 oz.) per pair

    I started out with Daryl Clark's sub-three ounce pack frame. He's graciously given me permission to use it. I used carbon crossbow bolt shafts, purchased from WalMart and then cut down by a local archery place to the lengths above.

    I then sewed up the back panel, which is two layers of 1.9 oz./sq. yard ripstop nylon that I got cheap from JoAnne Fabrics, draped over the top crossbrace and then sewn at the edges to make channels for the vertical spars of the frame. I then sewed ten pieces of ~10.5" long, 1" thick nylon webbing to the back panel 1" apart vertically, bartacking every 1.5" across to make the PALS array.

    I then sewed a set of shoulder straps from an old Coleman pack that fit me reasonably well to the back panel. I attached the load lifter straps to the top row of the PALS array, the bottom adjustment straps to the outside of the back panel, and I sewed a pair of 1" nylon webbing strips to accept the "rip and stick" attachment point at the center of the straps.

    Finally, I sewed the waist belt together, putting the 2" belt proper on the double-layer of nylon I was using for the exterior of the belt and sewing loops of 1" webbing to hold the plumbing barbs at the bottom. I bartacked the 2" webbing down approximately every 2" or so to hold it in place, sewed up three sides of the waist belt, slipped two layers of cut-up CCF pad (glued together) into the pouch, and turned it right side out to sew up the last portion of it. To the 2" webbing, I sewed a side-release buckle.

    I then sewed up several lashing straps for my stuff sacks. The longest ones (used for my hammock, insulation, and sleeping clothes all-in-one package) are 55" long. I'm probably going to reduce the length on those; they're a little too long.

    Things I need to change in the Beta design for this pack:

    [*]Rougher material on the inside of the waist belt: The ripstop is too slippery, and the belt slides down on me when I have more than twenty pounds on the pack.

    [*]"REI-style" waist belt buckle: I'm going to switch over to 1" webbing for the belt in a "V" shape rather than 2" straight across, and add a pair of adjustment locks to the ends of the waist padding rather than using one at the buckle proper.

    [*]A pair of keepers for the waist belt: I had the frame slide apart on me this past weekend. There really isn't anything keeping it together but for friction at the plumbing barbs, and the waist belt is almost heavy enough to pull it apart. A set of velcro or omni-tape pads on the belt will help keep it together when I pick it up off of the ground, and will help keep the belt from falling down vertically so that it doesn't face my body when I'm picking it up.

    [*]A haul loop for the top of the pack.

    [*]Heavier material for the pack: Now that I have a sewing machine that will handle heavier material, it's going to be worth it for durability.

    [*]Homemade shoulder straps.

    [*]"Keeper" straps added to my stuff sacks: a simple piece of webbing or fabric added vertically a stuff sack will help to hold it in place and keep the sack from sliding when I run my lashing straps around it.

    Other than that, I'm pretty happy with the pack. I carried ~ 35 lbs with it for three miles this weekend, and it handled pretty well. I carried ~25 lbs with it for another three miles, and it handled really well. I carried ~12 lbs with it for about twelve miles, and it handled like a dream. I think that, with the waist belt issues addressed, it will be a wonderful pack. I'm pretty sure that it will stand up to about 40 lbs with no trouble whatsoever, and that's about as much as I want to carry at any given time.

    Here's a quick video for you on the pack:

    http://www.youtube.com/watch?v=8pU4NUURJwA

    An overview of the waist belt and frame:
    An overview of the waist belt and frame.

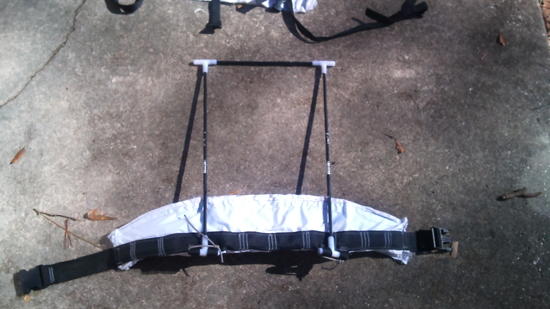
    A close-up of the frame attachment point at the waist belt:
    A close-up of the frame attachment point at the waist belt.

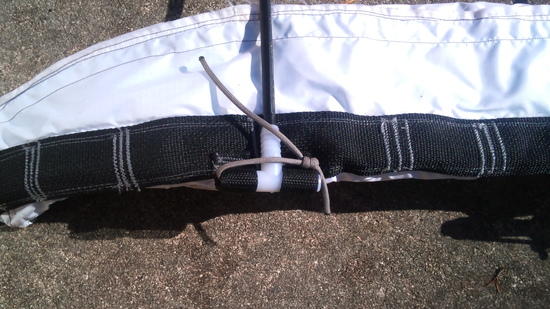
    The back panel, sans frame:
    The back panel, sans frame.

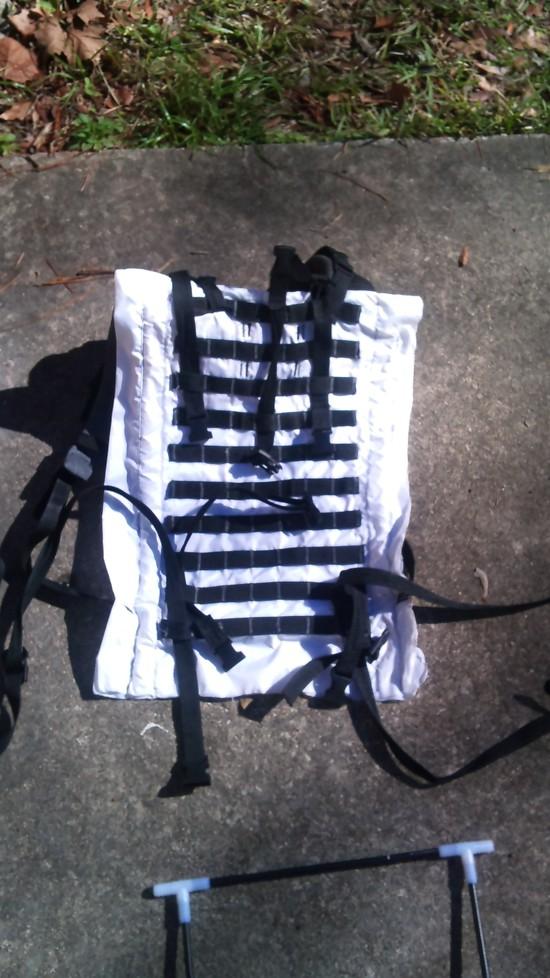
    A close-up of a lashing strap passing through the PALS array:
    A close-up of a lashing strap passing through the PALS array.

    #1827137
    Terry Trimble
    Member

    @socal-nomad

    Locale: North San Diego county

    Very cool and well thought out ultra light weigh frame and pack. I have a Ultimate Directions Redwing pack that uses a internal Delrin Hoop with the same press to fit plumbing irrigation fittings in black.

    I have question are the arrow shaft hollow? I use to work with carbon fiber arrow shafts for awhile for tail booms in making R/C hand launch gliders they would crack or break,splinter on slide in landings instead of hand catch of the nose on my hand launch glider that weighed only 7.5 oz.

    So you might want to do a 10 to 15 lbs loaded pack drop test on the frame from 3 to 4 foot height to see If the shafts crack or splinter.

    If they crack I would replace the spars with heavy duty carbon fiber wrapped large stunt kite spars you can purchase from kite making supply company. Or use solid Delrin rod you can purchase from plastic supply house. The heavier spars would add about 0.5 oz to 1 oz to frame weight and Delrin about 2 oz.

    It would be unfortunate to have frame failure if you fall on a backpacking trip. I would also carry a couple spare fittings, a couple small pieces of wood dowel that fit inside the spar and duct tape to make on trial repairs in case your pack frame spars breaks. With carbon fiber spars you need to check the frame before and after each trip for stress cracks and replace if needed.I always believe in the Boy Scout motto be prepared. Like we use to carry spare clevis pins on external aluminum backpack framed backpacks.

    Carbon fiber kite spars cutting tip:
    You can cut the spars yourself purchase a Xacto hobby fine tooth dove tail saw with aluminum cutting jig to cut the spar. Wrap where your going to make the cut with masking tape and to keep the spar from splintering. After cutting use extra fine sand paper to smooth were you made the cut and use super glue to seal the cut. To keep the cut from splintering.

    Have fun,
    Terry

    #1827169
    John Almond
    Member

    @flrider

    Locale: The Southeast

    Thanks, Terry! Most of the credit for the design goes to MacEntyre and Daryl Clark, though. If it weren't for them, I'd still be buying packs rather than making them. This pack is a lot simpler to build than a standard one; none of the timing issues that you run into when making the bag proper raise their heads.

    The arrow shafts are hollow, and that is a very good point. I'll give the drop test a try next week, after I get my paycheck (want to be able to replace the frame if it does break). I could definitely live with an additional two ounces added to the weight of the pack to ensure that it works in the field.

    Duct tape has a permanent home in my emergency kit; it's just too useful to not carry. The wooden dowels, though…hrm…I wonder if those could serve another purpose. Maybe as spreader bars for my tarp, once I get around to my new design for it? Hrm…

    I appreciate the tip on the spars. The local archery place has an arrow saw, though, and only charges $0.50 per cut, so I think my cost-to-hassle ratio here is in favor of running down there. If I was to be doing a large number of these frames, I'd probably invest in a shaft cutter (not sure of the proper name for it), but with only a couple…well…

    Again, thanks a lot, Terry! I appreciate all of the insight.

    #1827245
    Daryl and Daryl
    BPL Member

    @lyrad1

    Locale: Pacific Northwest, USA, Earth

    John,

    Thanks for the posting and all the good info. Video really helped see things.

    Here's a link to some grippy fabric that might help your slipping waist belt. I've never used it and it is expensive. Might give you some ideas, however.

    here

    Daryl

    #1827305
    John Almond
    Member

    @flrider

    Locale: The Southeast

    Daryl,

    Thanks for the link! That's a good idea. My only issue with it is that, since it's PVC-based, it's probably not breathable.

    I was thinking about using something more like a Cordura fabric (something with the same hand as canvas or similar) or maybe even going with a 3-D OCF mesh foam like what Thru-Hiker or Arrowhead Equipment sell. That way, you get at least a little wicking effect next to your skin to help reduce sweaty hip syndrome.

    Living in Florida, and hiking year-round, sweat management (as much as it's possible during the nine months of summer we get) is very important to me. That's one of the reasons that I went with breathable ripstop rather than waterproof for the pack proper (the stuff sacks strapped to it, on the other hand, are made out of water-resistant material). When the heavens really open up, I use a poncho for rain protection of both myself and the pack, so it shouldn't pick up too much moisture weight.

    Unfortunately, due to the use of CCF as the padding material in the hip belt, sweat is going to stick next to my skin pretty much no matter what I encase it in. I'm just trying to give it as much chance as I can to evaporate.

    Do you have any thoughts about possible alternate padding materials that would allow water to pass through without becoming a soggy mess? I can't think of anything, but it's entirely possible that there's something out there I've not considered.

    Thanks again,
    John

    #1827662
    John Almond
    Member

    @flrider

    Locale: The Southeast

    Some photos of the pack loaded for a day hike. I apologize for the quality of the model; he needs some work…

    Front View:

    Side View:

    Rear View:

    #1827664
    Daryl and Daryl
    BPL Member

    @lyrad1

    Locale: Pacific Northwest, USA, Earth

    John,

    "alternative…materials" question?

    Here's my favorite material for waist belts.

    Daryl

    here

    #1827732
    John Almond
    Member

    @flrider

    Locale: The Southeast

    Thanks, Daryl!

    I'll take a look and see if my local surplus store has anything similar.

Viewing 8 posts - 1 through 8 (of 8 total)
  • You must be logged in to reply to this topic.
Forum Posting

A Membership is required to post in the forums. Login or become a member to post in the member forums!

Get the Newsletter

Get our free Handbook and Receive our weekly newsletter to see what's new at Backpacking Light!

Gear Research & Discovery Tools


Loading...