OBJECTIVE
I like the ULC style Caldera Cone. I prefer it over the Sidewinder (consumes more space inside the pot) and the regular Caldera Cone (cumbersome to store, heavier). The fuel efficiency and pot stability are excellent. However there are still some significant areas for improvement. The areas I've identified are:
1) I would like it simpler than 4 pieces (cone, 2 stakes, stove)
2) The 12-10 stove doesn't light that great in deep winter (ie. 15 F)
3) Could be lighter
4) Could pack even better
PHASE 1 – REPLACING THE 12-10 STOVE
A while ago I discovered Zelph's Starlyte stove and I was blown away. The Starlyte uses a wicking material inside the stove which makes it spill proof, but more importantly for me, it lights easily even on really cold winter days using fuel far below freezing temperature. Check out the Starlyte at -24 F here: http://www.youtube.com/watch?v=6kcyj_nYS1A
It's small size, extremely low height (just 1.8" from the ground to the pot) and light weight (14g) also really impressed me. When combined with a MYOG Ti windscreen that fits inside your pot, it's nearly the perfect system except for one big flaw. It's not very stable.

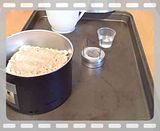
I set out to see if I could remedy the stability issue by using the Starlyte inside a ULC Cone for my 0.9L Evernew Deep Pot. I did a quite a few careful tests to see how well the Starlyte would fair inside the cone. Using the cone and the stakes to hold my pot at the normal cone position 3" off the ground, I averaged fuel economy 8% WORSE than using the 12-10 stove. However, the Starlyte is designed to have the pot on it's integrated (but unstable) pot support 1.8" inches of the ground, not 3". I removed the stakes and did more tests with the pot at the lower 1.8" height. Fuel efficiency increased nicely to 4.9% BETTER than the 12-10 stove with slightly slower (ie. +5%) boil times.

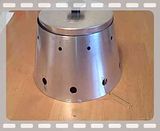
I knew I was onto something here, but I wasn't sure how to modify my cone to get the pot 1.8" off the ground. I could either cut 1.2" off the bottom of the cone, or I could just create new holes for the stakes 1.2' lower than the original bottom row of holes. I opted for the former since it would result in a lighter cone, even though I was nervous about cutting the cone and about the need that would arise to punch new air holes along the bottom as the original ones would be cut off.

I wiggled the pot support off the Starlyte stove, cut 1.2" off the bottom of the cone to lower the pot and then used a hole punched to create holes every 5/8" around the base perimeter of the cone. After a bunch of tests, I averaged 0.6% worse fuel economy than the 12-10….so virtually the same excellent fuel economy. I had succeeding in replacing the 12-10 stove with the Starlyte while preserving the fuel efficiency. I had also dropped the weight of my ULC cone from 29.9g to 20.1g – a one third reduction in weight. I also reduced the weight of the Starlyte stove by removing the pot stand to 12.1g (from 14.0g and vs. 14.5g for the 12-10).

As an added bonus, the whole thing now packs quite a bit smaller with the shorter cone and the smaller stove. The cone no longer protrudes up into the frying pan lid area, so I can now leave the fry pan lid (40g) at home and replace it with a MYOG one or ideally a carbon fiber one around 10g.
SUMMARY OF BENEFITS/CHANGES
1) Windscreen + Stove weight down to 32.2g from 44.4g
2) No significant loss in fuel efficiency
3) Lights much easier in cold winter
4) Easier lighting action since you can light the Starlyte from the side with a lighter (you could do this with a 12-10 too, but you'd have to spill/waste a bit of fuel on the outside and light that).
5) Consumes even less space inside your pot.
6) Lower, and thus even more stable than the original cone
7) Option to replace the frying pad lid and save a lot of weight
SUMMARY OF DRAWBACKS
1) Can't snuff and recover fuel from the Starlyte
2) Boil times average 0:20 longer
PHASE 2 – MODIFYING THE STAKES
In phase 1 I had improved 3 of the 4 areas I had set out to improve. Those areas were winter lighting ease, packability and weight. However, I hadn't significantly improved the simplicity of the system. I'm being a bit anal here, but I don't like using stakes in my cone. For me, they aren't multi-use because I often cook with both breakfast and dinner with my shelter setup and I only carry the minimum number of stakes I need to setup my shelter. Furthermore, the stakes are quite a bit beefier than you'd ever need to support a pot.

Trail Designs has changed the stakes they include over the years from the straight stake shown above left, to more of a traditional shepards hook shape like the one with the orange tip (not actual TD stake, but close). One small downside with these newer stakes, is that if you insert them too far, the one end of the stake droops down as the hook of the stake enters the cone wall. This gives you an off-balance pot, so it's just one more thing to watch. The original Trail Designs stakes didn't work quite as well as tent stakes, but they did work better when used with the cone, which what I (and likely a lot of people) only use them for.
I wanted to shave some weight, eliminate the drooping possibility and make the stakes more packable, so I bent my T.D. stakes as shown so it's impossible to insert them too far. I then snipped off the remaining head of the stake. Previously, the stakes wouldn't even fit in my 0.9L Evernew Deep Pot. Now they not only fit inside, they don't even enter the fry pan lid area so you don't even need to use the fry pan lid. The weight per stake dropped from 8.1g to 5.9g, for a combined savings of 4.4g.
SUMMARY OF BENEFITS/CHANGES
1) Stakes are 26% lighter
2) Stakes now store INSIDE pot
3) No risk of un-level stake surface for pot
SUMMARY OF DOWNSIDES
1) Less useable as tent stakes
PHASE 3 – MOVING BEYOND THE STAKES
I was happy with the changes made to the stakes, but I still hadn't met my original goal of reducing the complexity of the system. I would love to figure out a way to eliminate the stakes while retaining the stability of the cone, but the best I could come up with was reducing the number of pieces by 1.
This stage is still a work in progress, but I used a coat hanger to create this 'tuning fork' shape:

I punched two small holes in the cone 1" apart to use this. The 'tuning fork' needs to be squeezed while you insert it, which is a really good thing because once it's in, it can't move forward or backward. It's rock solid. You can throw the cone around, roll it down a hill – and the tuning fork will stay solidly in place and maintain the shape of the cone.
Unfortunately, coat hanger wire does not work well for this application because it's not very springy. When you squeeze this fork to insert it, it bends so you have to bend it back outwards again to fit into the far holes. What I have done is ordered a bit of 2mm titanium rod ($14 on eBay) which should be a lot more springy and capable of handling these demands without bending as it's squeezed. I should know in another week or two once it's arrived.
This coat hanger 'tuning fork' is 10.2 (vs. 11.8g for the two modified stakes). Titanium is about 45% lighter than steel, so hopefully V2 of the tuning fork will be around 6g, which is down well over half from the original 2 stake weight of 16.2g. If the springy-ness/insertion ease doesn't work out with the V2 tuning fork, then I'll have to widen the holes on the insertion side and narrow them on the opposite so that a wider fork is used that doesn't require bending to insert. I'll update this as I go.