Topic
Finished first MYOG tarp
Forum Posting
A Membership is required to post in the forums. Login or become a member to post in the member forums!
Home › Forums › Gear Forums › Make Your Own Gear › Finished first MYOG tarp
- This topic is empty.
-
AuthorPosts
-
Dec 29, 2011 at 12:45 pm #1283476
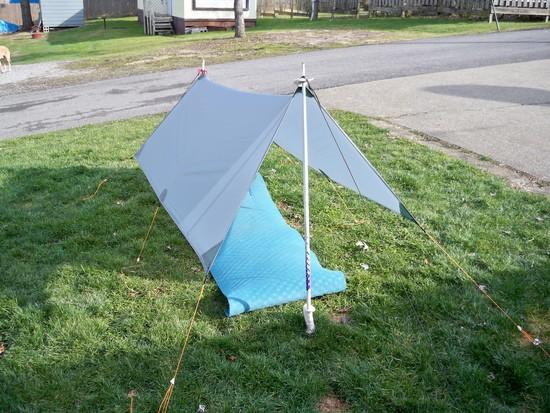
Hey everyone. In my spare time here recently I've learned to sew a little in order to start making my own soft goods gear. Well here's my first attempt at a tarp. I went with a rectangular 5'x7' with 8 tie-outs. I was slightly afraid to try the felled ridgeline seam on my first tarp, that's the reason for the small size. I think it turned out pretty decent and now am making plans for a second tarp.
Now for tarp number two plans. I'm thinking of a 7'x9' A-frame style with an inclosed back panel and beak/overhang in the front. I also want to taper towards the back some. If my sewing skills allow for these additions, then I also want to place a vent somewhere to keep down condensation. I want this to be more of a floor-less tent I guess.
So if anyone has any advice, experience, or just anything helpful to add to my second tarp plans, feel free to post it up.
Thanks!!
Eye candy:
 Dec 29, 2011 at 2:35 pm #1817206
looks good. My first tarp was an 8×10 out of some super cheap uncoated material from walmart (I got over 15 yards for like $2 total- crazy)…so it was low risk, only time lost if I screwed up real bad. I ended up silicone coating it myself after it was done.
but- to my point, the flat felled seam isn't that hard with some practice. One tip I can give you- for a 1/2" seam, draw a line 1/2" in from the edge. Pencils write on silnylon if your go back and forth a few times over the same place- or if you don't care, use a sharpie. Dunno if a washable marker would work and come off easy when you are done or not. But that gives you something to line the fabric up to while you are sewing. My last project I didn't even need to pin it. It wasn't to hard to fold the fabric over as I was sewing. It takes some dexterity (not that I'm an expert) but use your fingers to try and hold the fabric taut in all directions as it's going through the feed dogs. My hands usually end up cramping doing long seems…I have no idea how those sweat shop seamstresses manage.
Anyway, my next tarps are going to be smaller ones like yours, then my ultimate goal is a big 11' pyramid… But that might still be a ways down the road.
BM
ps. Do you think you could post some close up shots of your tieout reinforcements? Did you bond them or just sew them? How are they holding up under tension?
Dec 29, 2011 at 2:57 pm #1817210Yeah, looks good
Don't be afraid of flat felled seam – piece of cake
Yeah, make mark 1/2 inch (or 5/8 inch) from edge on both pieces and just sew through it
I use "Sharpie Permanent Marker" fine point black. But it does leave a mark that you can see in finished project. Mark does wear off over time.
The main problem is that as you sew along the seam, the top fabric drags on the pressure foot and slips against the bottom fabric so it doesn't line up by the time you're at the end of the seam. Practice on long scrap. Put in some pins, or I use hand stitches so I don't poke myself. And as you sew past a pin, then grab the next pin with your fingers.
Dec 29, 2011 at 4:41 pm #1817238Good deal, thank you for the advice. I'm going to start practicing the seam some tomorrow, as my fabric should arrive Saturday I think.
For the tie-outs, I first bonded the reinforcement patches with silicone glue and let it dry overnight. Then I sewed the patches with rounded corners as best I could, I did my best to not have any corners with the stitching here. I used 1/2" grosgrain stitched back and forth a few times near the bottom then did a box with an X through it. I tried a slightly different variation to this on a few of the side tie-outs to see how it came out. i didn't want to change the pattern on the high-stress areas.
So far everything is holding up well. I plan to set the tarp up and leave it out for 24-48 hours to see how she does soon.
I'll try and get a few close-up pics of the corners later tonight.
Thanks guys
Dec 29, 2011 at 6:34 pm #1817272I wouldn't necesarily recommend this, but I stopped reinforcing the tie-outs and it hasn't made any difference. Just do a zigzag in the hem where the fabric is several layers. Or in a ridge flat felled seam where the fabric is several layers.
Or, just do one seam on the reinforcing to main fabric, sew grosgrain through reinforcing/main fabric two layer. No need to glue. If you glue you have to wait for it to dry, and when you sew through glue it gums up your needle.
Just make sure there is at least 2 mm between each needle hole or it will weaken fabric – i.e. don't do tight zigzag (or bar tack).
Dec 29, 2011 at 7:12 pm #1817288I see what your saying, but I don't think I could bring myself to actually doing that. I'll most likely leave the glue out next tarp, but I feel much better with that extra layer of fabric there. Just personal preference really. I didn't experience any gumming up of my sewing needle from the glue. I used a very thin layer, the needle went through with no problems.
Anyway here's a pic of a reinforced patch.
PS forgot to mention in my original post that the tarp with guylines and clamcleat linelocs weighed in at 7.5 ounces.
Edit: The shiny stuff is some silicone glue smeared on the threads.
Dec 30, 2011 at 8:34 am #1817450What "silicone glue" did you sue to bond the patches?
BM
Dec 30, 2011 at 3:29 pm #1817671I used Devcon silicone adhesive, it's supposed to be equivalent to GE Silicone II. At least that's what one of the guys at Ace Hardware told me. They didn't have the GE kind in stock. It seems to hold the silnylon very well, not so good on other fabrics though.
-
AuthorPosts


- You must be logged in to reply to this topic.
Forum Posting
A Membership is required to post in the forums. Login or become a member to post in the member forums!
Our Community Posts are Moderated
Backpacking Light community posts are moderated and here to foster helpful and positive discussions about lightweight backpacking. Please be mindful of our values and boundaries and review our Community Guidelines prior to posting.
Get the Newsletter
Gear Research & Discovery Tools
- Browse our curated Gear Shop
- See the latest Gear Deals and Sales
- Our Recommendations
- Search for Gear on Sale with the Gear Finder
- Used Gear Swap
- Member Gear Reviews and BPL Gear Review Articles
- Browse by Gear Type or Brand.
