Topic
Lite insulation layer
Forum Posting
A Membership is required to post in the forums. Login or become a member to post in the member forums!
Home › Forums › Gear Forums › Make Your Own Gear › Lite insulation layer
- This topic is empty.
-
AuthorPosts
-
Jan 15, 2007 at 4:32 pm #1221247
I have completed making my gear and 95% of the pack-list for an Un-resupplied attempt of the JMT in the summer.
I want everything that will stay in the pack most of the time to be as lite as possible.
I am also going for a pack weight of under 15 lbs at the start.
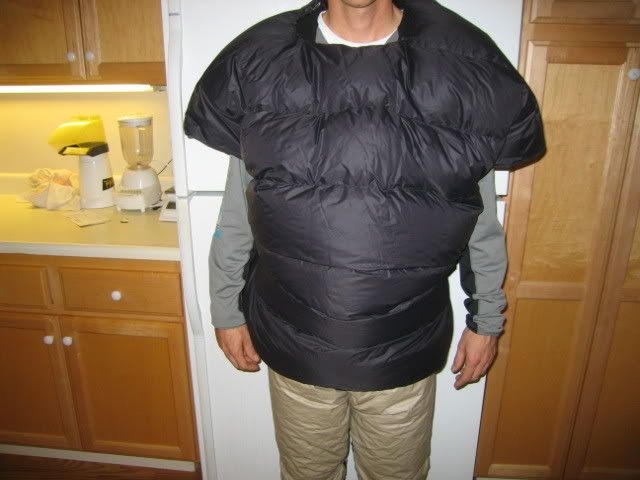
The pictures are my mid insulating layer. The material is wedding veil wraped around Climashield XL. The veil weighs under .25 ounces per square yard. I could make each much more durable by using silk instead of the veil, but would gain a few ounces between the two.
The top is a vest with attachable sleeves. It weighs 7.0 ounces. The vest has a double layer of insulation on the front and sides. Everything else is a single .75" layer.
The bottom is incorporated with Drystopper bottom. It weighs 8.0 ounces. The drystoppers are huge, so I ripped it appart, added the single layer and sewed it back up.
It is velcroed so it can be made into a half bag, but I find that I stay much warmer with the layer going all the way around my legs with such a skimpy piece of gear. It would also be almost impossible to take on on off without ripping over the course of 5 days if it wasn't for the velco.This mid insulation layer will always have a layer on the inside and out of it so it is less prone to ripping or tearing. Even if it does tear, a little duck tape will be enough to get me through 5 days while still keeping me warm.
The top's breathability works very well being seperated from the other layers and is still very warm when not in motion.This is turned inside out showing the front and side that are double layered.
Shown with a Patagonia Flash R-1.5 to show the amount of loft the vest has.
Here is the Packlist as well:
WORN OR CARRIED
28 – Shoes ASICS Cumulus VIII Size 11
1.7 – Toe Socks Injinji
1.1 – Gators
4.6 – Tri-Shorts
6.9 – Long-Sleeve Railriders Eco-Mesh
1.7 – Watch High Gear Axis
1.4 – Shades with cover
5.4 – (1) Pole Komperdell C3
2.6 – Water Bottles (2) 24oz Gatorade
0.2 – Bungees to hold Water Bottles
2.4 – Hat
55.6 / 3 lbs 5.6 ozBASE
6.5 – Homemade Pack 1600ci
5.2 – Tarp 52" x 96" Spinnaker fabric
1.3 – (6) Tarp Stakes
0.1 – Compass Suunto Clipper
1.7 – Ground Cloth G/G Polycryo 40"X 96"
1.7 – Pad G/G 1/4" Thinlite
1.7 – Sea 2 Summit Ultra-Sil Drybag XL
1.0 – O.P. Sack 12.5"X15.5"
10 – All Kits (Water Purification, Bug Spray, Batteries, ect)
4.7 – Light with Batteries Nuwai Lux 1
2.0 – Maps Cash and I.D8.9 – H/made Down 1/2 Blanket 35"X 45"
8 – Homemade Climashield XL Bottom
7 – Homemade Climashield XL Top
5.8 – Rain Top Drystoppers
0 – Rain Bottom Drystoppers (incorporated with insulated bottom)
1.0 – Chaps from .85 DWR for wind
0.4 – BPL Headsweat
1.1 – Homemade Bomber Style Beanie
1.3 – NR2 Gloves
1.3 – Socks warm 1/2 sock
1.8 – Homemade River Shoes
0.1 – Homemade Bug Head-net
74.4 / 4lbs 10.4ozFOOD & WATER
48- Food GORP 6600 calories
64- Hammer Perpertuim 6800 calories
32- Misc Bars 4000 calories
20- Average Water Carried
164 / 10lbs 4oz4lbs 10.4oz – A BASE
10lbs 4oz – B FOOD & WATER
3lbs 5.6oz – C WORN OR CARRIED14lbs 14.4oz – A+B IN PACK AT START
18lbs 4oz – ABC SKIN OUT WEIGHTJan 15, 2007 at 4:37 pm #1374479Aaron,
The gear that you and Bill F. and others are making is absolutely inspiring … and confidence building that we can get out there. Thank you, and the use of the DropStoppers is just great, very good idea — since by themselves people don't like or trust them. Gotta pull mine out and look at the pants and coat again. bd
Jan 15, 2007 at 5:59 pm #1374494Aaron-Why did you use the blue material for the seams in addition to the wedding veil material to hold the insulation? Couldn't the veil also act as the seam?
Jan 15, 2007 at 8:39 pm #1374508Hey Richard,
The veil material will not go through the sewing machine more than an inch without getting caught up, especially with the thickness of the seam. The ripstop seams are sewn together. The material is also very scratchy, which is why it is around the neck.There is no way I would use this as general backpacking item. A 5 day record attempt is a different story. I need high loft and low weight.
If I wanted to get this amount of loft and usability with commercial products I would have probably gone this route.
Western Mountaineering Flight jacket – 11.5 oz – $225
Cocoon UL Pullover – 8.5 oz – $180
Cocoon pants 7.3 oz – $160
Dropstoppers bottom 6 oz – $10The Dropstoppers bottom would still have to added for the water-proof rain protection.
So we're talking about 33.3 ounces and $575.Yeah it would be excellent gear, but the weight of the top, bottom and down vest/ 1/2 bag I have is 23.9 ounces.
Almost all of that 10 ounces would be the weight of non-insulating cloth.
Note: I did cut off 2.25 oz off of the Dropstoper, so we are looking at about 7 oz of excess cloth, but that would not have been cut , so that 2.25 oz would still need to be added back to the weight I lost.Sorry, I am not the best seamstress in the world. I just manage to get by.
Jan 16, 2007 at 11:15 am #1374551Alright, my wife worked late last night and stayed at a friends and I had the next day off of work. It's time to test my gear down to its extreme temperature.
Last time I tried this, (take 1), I had a different 1/2 bag, a different insulation bottom and used my Patagonia Flash R-1.5 instead of the insulation top.
I started the test at a damp from dew, 45*. After a cold hour and 20 minutes I had to bail.Take 2
Even with the change of gear, it was lighter than before.
I fell asleep on the couch for a while until the neighbors went to sleep. At 11:50 pm I set up camp and was bedding down by 12:00 with a temperature of 27*.My 1st priority was to be warm enough to go to sleep. 2nd was to be able to stay asleep without freezing for 3 hours.
The ground was cold and knew it would take a lot of heat from my body to warm it up.
For the first 20 minutes the dogs did not go inside the house, (doggy door), but decided to wine and whimper.
They listen to me very well so I told them to go in. Bow Wow Wow Wow, out comes the neighbors hound dog barking and there other annoying yapper.
After they went back in, 1 of my dogs went in the house and the one in the picture stayed with me.
I could live with that, but it meant sharing the covers.
After another 20 minutes, out came my other dog which started yet another chain reaction with the neighbor's dogs coming out again. Bow Wow Wow, and Yap Yap Yap, again.
After they went back in again, it was time to put the dogs in the house and close the dog door.
One of my dogs knows how to open the dog door, so for the next 20 minutes I got to hear her trying in the background.Finally I started to doze off.
The underside of my body had finally warmed up a little.
As far as warmth went from a 1-10, a 1 shivering and 10 as warm as I could want to be, my torso was a 7-8 and legs a 5-6.
The 1/2 blanket was working excellent in keeping my torso warm enough to even aid in keeping the rest of my body warm.By now I was tired and was starting to node off. Right before I got to sleep, one of my dogs starts to bark in the house, which again triggers a chain reaction with the neighbors annoying dogs.
I had enough of this. As soon as the neighbors dogs went back into the house, I abandoned my post and surrendered to my house. I Checked the temperature before I went in and it was 25*.
The test was not a total loss as I am completely satisfied with the results I got out of it and I could have easily gone to sleep for 3 hours in 25* temperature.
I found only one item that needed to be tampered with.
The 1/2 blanket needs about 2" added to each side so I will be able to tuck it under my shoulders easier. It will stay as it is, but as soon as I move even a little bit it comes loose.Jan 16, 2007 at 1:59 pm #1374576I am far, far from an expert, but I would guess that another few ounces of sleeping pad insulation would pay bigger dividends in additional warmth, than just about any other adjustment, with making the down blanket full length a second choice.
Jan 17, 2007 at 6:57 pm #1374733Aaron,
The way you used your "Drystoppers" as the shell for your insulated layer was a great idea. The veil material was another good idea to save some weight.
I do something like you did to sew my insulation to the outer or inter material. I had a lot of trouble sewing the exposed insulation so I just left a little extra material on what I was sewing the insulation to. I used that extra material sort of like "bias" tape.
I will assume that the GG 1/4" pad has been cut down from its full size?
Folks need to understand that this set of gear is for "1" hike, your record attempt and comfort is not a big part of the equation. Staying alive first and comfort someplace down the list.
Your "test" session was interesting to read about. We had an ice storm and a low temp of 26 here yesterday and today. My power was off from 730 pm on Tuesday night till about 4 pm today and then back off again till about 6 pm today. I had a good chance to wear and sleep in a lot of the cold weather gear I have been making. I had just finished a new Down quilt about the time we lost power last night. I used it to sleep under and was very warm. I also wore a few different things this afternoon on a couple walks to see how they worked. It was about 28 degrees and a light sleet / rain. I got warm quick and now have to work on ways to get things off or be able to vent easy.
Having your gear list more or less final this far in advance of your hike is going to be a big advantage for you. It give you a lot of time to get to know each piece of gear and fine tune it as necessary.
Jan 17, 2007 at 8:24 pm #1374738O.K. more pictures,
Here is how I stayed nice a cozzy down to 25* the other night.
the 1/2 bag weighs 8.9 ounces and has about 2 1/2" of fully baffled loft.The size is 35" X 45", but it would be much better if it was 5" wider. It would then be easier to tuck under my elbows and would make wearing it as a vest much easier.
I am going to add the 2 1/2" on each side of it before the attempt. It will more than likely be just fabric with a piece of insulation by where the elbows make contact.
Here is the tarp. Nice and low, it will be used as a bivy unless it rains.
In flat mode. The cut-out is for the head.
Worn as a vest, (plenty of loft).
I came up with the idea of reconfiguring the bag to act like a mummy by accident. Having the loft around your head helps 10 fold than doing with out. The outside fabric is momentium 90, the inside is .80 ripstop.
This bag does absolute justice in keeping me warm.
I will eventually make one 40" X 45" with 2" of loft and snaps were needed for the vest and bag configuring.
Incorporating this with clothing and a bivy should keep me warm down below 40*.Bag weight should be 8 ounces and bivy 4.6 or less from a home made one similar to BPL's one.
Jan 18, 2007 at 5:50 am #1374762I love it! As a non-expert I probably can't appreciate all the details, but that mummy-effect looks really warm. When you originally said "half-blanket," I was picturing a doggy blanket laid on top of everything, but this is tight. How did you blow that down into the baffles?
Jan 18, 2007 at 8:58 am #1374777Hey Robert,
___________________________________________________________
How did you blow that down into the baffles?
___________________________________________________________
I put a plastic bag directly on the scale, re-set to read 0.0 grams.
Once I calculate how many grams I want in each compartment, I put the bag of down over the plastic bag and just pull it into the plastic bag on the scale.
I'll put an extra gram in bag because so I don't have to worrying about getting it all out.
Then I take the plastic bag with the down and stuff it into a cardboard roll, (like what wrapping paper comes with).
The roll then goes into the bag compartment, (to the bottom) and I'll use a round stick to shove the down out of the roll.I rarely spill more than a gram or two throughout an entire project by using this method.
Jan 18, 2007 at 11:48 am #1374790Clever !!
Jan 18, 2007 at 2:56 pm #1374804Aaron, MOST EXCELLENT! Ingenius gear! I bet that little 4 legged heater wishes it was going along with you on the trail.
Those pants look great, Same with the half bag, I am interested in that project also…First snow of the Winter season here in NJ late this afternoon, has me fiddling with my own sewing machine.
Jan 19, 2007 at 10:21 pm #1374952I'm not so sure I would attempt to use the Dropstoppers with insulation during normal hiking.
I expect to Dropstoppers to get several rips in them and not be happy with them.
The only thing I am expeting from them is to keep me marm and dry.
-
AuthorPosts
- You must be logged in to reply to this topic.
Forum Posting
A Membership is required to post in the forums. Login or become a member to post in the member forums!
Our Community Posts are Moderated
Backpacking Light community posts are moderated and here to foster helpful and positive discussions about lightweight backpacking. Please be mindful of our values and boundaries and review our Community Guidelines prior to posting.
Get the Newsletter
Gear Research & Discovery Tools
- Browse our curated Gear Shop
- See the latest Gear Deals and Sales
- Our Recommendations
- Search for Gear on Sale with the Gear Finder
- Used Gear Swap
- Member Gear Reviews and BPL Gear Review Articles
- Browse by Gear Type or Brand.