Topic

Snow melting techniques


Forum Posting

A Membership is required to post in the forums. Login or become a member to post in the member forums!

Home Forums General Forums Winter Hiking Snow melting techniques

  • This topic is empty.
Viewing 25 posts - 1 through 25 (of 68 total)
  • Author
    Posts
  • #1282832
    Travis Leanna
    BPL Member

    @t-l

    Locale: Wisconsin

    What are some good things to remember when melting snow? I'm sure there's more to it than just dumping snow in a pot (at least with BPL standards).

    Is it better to start with a little water in the pot to begin with?

    Should I compact the snow before I add it?

    Is the older, more compacted snow below the surface better?

    #1810123
    Andy F
    Spectator

    @andyf

    Locale: Midwest/Midatlantic

    I don't have much experience with melting snow myself, but I would answer a definite yes to all of those questions.

    #1810135
    Gary Dunckel
    BPL Member

    @zia-grill-guy

    Locale: Boulder

    Travis, you must have an inch or so of water in the pot before you add the snow. Otherwise, the pot will scorch. Funny how that works. Also, I find that uncompacted snow will melt quicker than a snowball. Try it on your Wisconsin winter patio and you'll figure it out right away.

    #1810137
    Travis Leanna
    BPL Member

    @t-l

    Locale: Wisconsin

    Thanks guys.

    Gary….no snow yet!

    #1810146
    Gary Dunckel
    BPL Member

    @zia-grill-guy

    Locale: Boulder

    No snow there? Man, I have a full foot in my yard, and my north facing driveway looks like a blue ice glacier. Want me to FedEx you a box of Colorado snow as a PIF gesture?

    #1810148
    Travis Leanna
    BPL Member

    @t-l

    Locale: Wisconsin

    That'd be awesome! Would mind throwing in one of your cool Colorado mountains as well? We're short on mountains here.

    #1810153
    Chad Miller
    Member

    @chadnsc

    Locale: Duluth, Minnesota

    As a few other have said:

    1. Use a larger diameter pot that is about 1.5 times bigger than your stove burner. It's will be more fuel efficient and melt the snow faster.

    2. Have around five times the volume of clean snow compared to the amount of water you want to make. Snow is very low in moisture content and it takes a lot of snow to make water.

    3. Have some water in your pot otherwise you'll scorch your pot and get 'burnt' water.

    4. When you first start out melting snow sir it often and once you build up a couple inches of water in your pot you can simply dump in fist size chunks of snow without having to do much with it.

    5. Keep the lid on your pot as much as possible!

    6. When you do take the lid off you pot to stir the snow / water mixture be careful where you put the lid. If you simply put the hot lid on the ground snow will stick to it then melt off after you put it back on your pot. This could douse your stove.

    7. You'll have dirt and organic matter floating around in your newly melted water. I recommend filtering your water through a reusable nylon coffee filter to get the gunk out.

    8. Pouring your newly made water from your pot to you water bottle can be a messy PAIN! (even more so if you're using a narrow mouth container). I recommend getting a small kitchen funnel to help you get all that water from your pot to your bottles without spilling on your gloved hands or down bootied clad feet.

    Dang, I never realized how much went into melting snow for water. No wonder it can take so long. ;)

    #1810161
    Travis Leanna
    BPL Member

    @t-l

    Locale: Wisconsin

    Good stuff, Chad.

    >Dang, I never realized how much went into melting snow for water. No wonder it can take so long. ;)

    Ha, yeah, that's exactly why I asked! I've learned over the years that even the most mundane activities will have their finer details, especially here on BPL.

    #1810170
    Chad Miller
    Member

    @chadnsc

    Locale: Duluth, Minnesota

    More like even the most mundane tasks get a whole new level of difficulty in the winter. ;)

    #1810176
    Travis Leanna
    BPL Member

    @t-l

    Locale: Wisconsin

    Seriously. Have to pee in the night?

    1. Convince yourself that you have to go bad enough to get out of your bag.
    2. Fumble with the drawcords for the bag's draft collar and hood/find your headlamp.
    3. Unzip the bag.
    4. Depending on your system, put on some clothing. (or skip this and bear with the cold)
    5. Put some sort of footwear on.
    6. Get out of your tent/shelter.
    7. Relieve yourself. Cold hands are bad news. Shiver.
    8. Dash back in your shelter.
    9. Take off necessary footwear/clothing.
    10. Get back into your bag.
    11. Zip up the zipper.
    12. Re-do the drawcords.
    13. Ask yourself why you camp in cold weather.

    Ah, its not always that bad, but making the list was fun.

    #1810178
    Chad Miller
    Member

    @chadnsc

    Locale: Duluth, Minnesota

    1. Grab pee bottle.
    2. Open pee bottle.
    3. Pee in pee bottle.
    4. Close pee bottle.
    5. Still warm, go back to sleep.

    #1810184
    Bob Gross
    BPL Member

    @b-g-2-2

    Locale: Silicon Valley

    Believe me. I have been down this road before, but never with Wisconsin snow.

    "Is it better to start with a little water in the pot to begin with?"
    "Should I compact the snow before I add it?"
    "Is the older, more compacted snow below the surface better?"

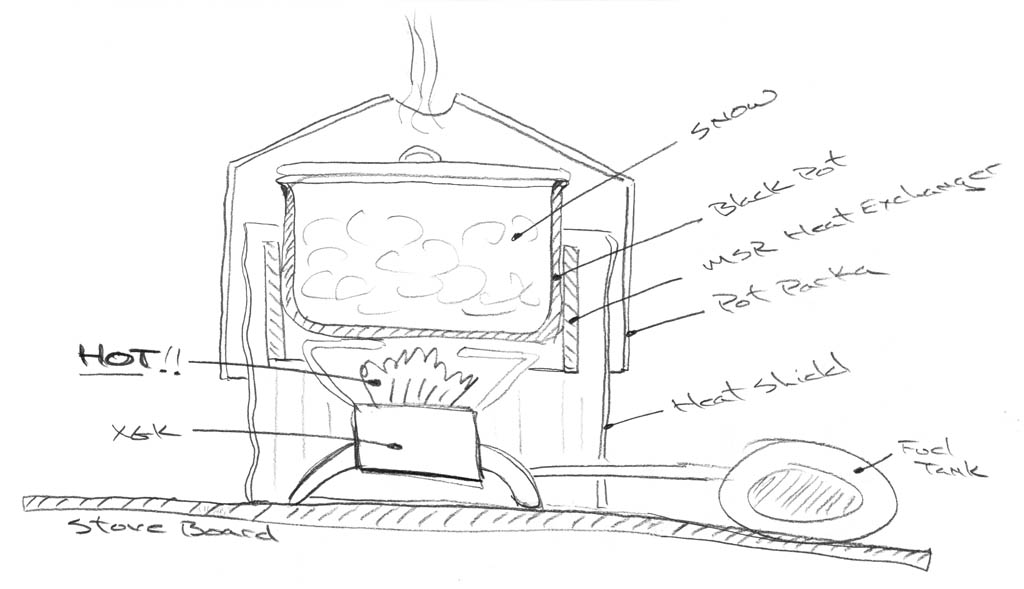
    First, you get your stove all ready to go. Then grab your largest melt pot. I usually use an aluminum pot that is about two quarts, although I have used larger and smaller ones. Wander off from camp a bit and find a clean patch of snow. Using the metal lid, you scrape off the top inch of snow, especially since often there are leaves, pine needles, or dirt in it. That top snow is discarded. Then using the main pot, you scoop it full of clean snow, and you can use the metal lid as a scooping tool if necessary. It depends on the consistency of the snow. Return to the stove and light it. While the stove is reaching its normal temperature, you wipe off the bottom of the melt pot with a glove. You don't want ice or snow hanging on the bottom, because that might extinguish the flame. Put the melt pot on the stove, and immediately pour some liquid water through the snow into the pot. If the pot is level, it should not require too much water to completely cover the bottom. A fraction of an inch of water is sufficient. The advantage of pouring the water through the snow in the pot is that it slightly melts the snow and causes it to form better to the hot pot surface. Once that is started, you can put the metal lid on the pot. From then on, it is all about minimizing lost heat, so keep your windscreen there and maybe even put a piece of aluminum foil loosely over the top of the whole thing. This is also one situation when you need the heat reflector underneath the stove burner to keep reflected heat from melting out the surface underneath the burner. While that first pot of snow is melting, return to your snow gathering site with a plastic bag and a shovel. If you don't have a shovel, then you are going to have to steal the metal lid off the snow melt pot.

    For an individual, it doesn't take much more than a gallon-size bag. For a group, I have used a large garbage bag. Shovel more clean snow into the bag, and carry it back to the stove. Keep it at arm's reach so that you don't have to keep running out to get more snow for the melt pot. If you do this right, you can do the melting in the vestibule of a tent and keep the snow bag between the tent layers.

    Beginner snow campers will soon learn that liquid water is a valuable resource, and you can produce it easily from snow, assuming that you have the right stove and plenty of fuel. Incidentally, this is one area where wood fires are very good. Wood fires are very hot (which you will know if you have ever seen deformed aluminum cookwear). So, if I think that I will be using a wood fire, I take a titanium pot instead.

    Very old snow is dense, so about two quarts of snow will yield one quart of water. Very new powder snow is fluffy, so about ten quarts of snow will yield one quart of water. All snow is different.

    –B.G.–

    #1810220
    Hikin’ Jim
    BPL Member

    @hikin_jim

    Locale: Orange County, CA, USA

    Wow. Pretty well covered on this subject.

    The only thing I'd add is that I have a strong preference for remote style stoves for snow melting. I definitely prefer a bigger pot, and a remote stove handles bigger pots better.

    However, having said that, I've seen guys use Jetboils and regular canister stoves to melt snow, so each to his own.

    HJ
    Adventures in Stoving

    #1810224
    Bob Gross
    BPL Member

    @b-g-2-2

    Locale: Silicon Valley

    If there is a group of any size, then the snow melting fuel consumption can be really high. A white gas stove will prove to be very economical in that case.

    The upper limit on melt pot size is somewhere around four quarts, for practicality. I've tried to melt snow in a six quart pot before, and it takes forever. Plus, of course, a six quart pot makes such a huge lump in your pack. So, the whole key to it is to have a melt pot that is just the right size for your group.

    We were climbing a high peak one time, and three of us were sharing one stove. I would wander around with my plastic bag, attempting to gather clean snow to melt. All I kept finding was slightly off-color snow with little petrified artifacts from previous campers.

    –B.G.–

    #1810231
    Roger Caffin
    BPL Member

    @rcaffin

    Locale: Wollemi & Kosciusko NPs, Europe

    What Chad wrote is pretty good, but I will add a few comments.

    1) It is very worth while spending some time digging for water, even if it is some way down. Or even carrying water for a little time.

    2) It doesn't matter whether the snow is fresh or old: the energy required to melt the snow depends only on its (sub-zero) temperature. Expect to use about double your normal amount of fuel.

    3) There is a myth about scorched pots. As far as I can tell, it's a myth. After all, some people fry stuff in their pots. Better not melt an aluminium pot of course! Does a very hot pot add any taste to the water? Not that I can detect.

    4) Be very careful at the start, as the sub-zero pot bottom can create condensation from the flame, and this water can drip onto your stove with unfortunate results – even putting the flame out in extreme cases. (With the fuel still coming out …) Having some liquid water in the bottom of the pot will minimise this risk.

    5) I use a cup to get water out of the pot and pour it into my PET water bottle. I hold the bottle over the pot while pouring, so any spills just go back into the pot.

    Bob's comments about minimising heat loss are also very much to the point.

    Cheers

    #1810252
    David Goodyear
    BPL Member

    @dmgoody

    Locale: mid-west

    Not much to add here. I agree with most everything said. I may add that if you are in a forested area, you may consider a weight free fuel – wood. I carry a white gas stove with a windscreen that doubles as a wood burning hobo stove. This way I am covered – if the weather permits, I use wood, If not I use the gas stove. I use a tight fitting lid when using wood as I have tasted smoke water and it is not so good. Where I hike we have several feet of snow, this this creates a different problem. You will need a stove board, or fire pan (old cookie sheet) set on top of a couple of logs. To conserve fuel, I have adopted (copied) the method used below.

    http://straightchuter.com/2009/05/expeditions-stove-set-up/

    Enjoy,

    Dave

    #1810263
    Hikin’ Jim
    BPL Member

    @hikin_jim

    Locale: Orange County, CA, USA

    We were climbing a high peak one time, and three of us were sharing one stove. I would wander around with my plastic bag, attempting to gather clean snow to melt. All I kept finding was slightly off-color snow with little petrified artifacts from previous campers.

    Now we know why they call you Bob "Gross". ;)

    HJ
    Adventures in Stoving

    #1810265
    Hikin’ Jim
    BPL Member

    @hikin_jim

    Locale: Orange County, CA, USA

    Dave,

    Now that's an interesting set up. Hard core cold weather set up!

    HJ
    Adventures in Stoving

    #1810270
    David Goodyear
    BPL Member

    @dmgoody

    Locale: mid-west

    Hi Jim,

    The only mods I made was to replace the heat shield with a hobo and the stove board with a cookie sheet. I can pull the stove out the top with the fuel bottle attached and burn wood. (this protects the o-ring at -F temps)

    enjoy,

    Dave

    P.S. I should mention that in the winter I pull a sled. This way I can leave the stove set up and ready to go. The hobo is riveted to the cookie sheet and provides protection for the stove in the sled.

    #1810296
    Bob Gross
    BPL Member

    @b-g-2-2

    Locale: Silicon Valley

    "little petrified artifacts"

    You know the raisins in the rice pudding? They weren't raisins.

    –B.G.–

    #1810619
    Brian Austin
    Member

    @footeab

    Locale: Pacific Northwest

    Can't stress how much a radiation/wind screen is for melting snow in winter. Makes difference between 6 minutes and 9 minutes unless in a tent of course. Super Heavy aluminum foil is your friend. Several layers works.

    0) Note must insulate from Snow below as is shown in the diagram. Most novices forget this! and tippo oops there goes the show as the pot falls off. I use my snow shovel below.

    1) Before all snow has melted, take off the stove and pour out. Melting ALL chunks will take another 1-2 minutes. It is not necessary to do so. Place said bottle close to you. Do not place back in snow and refreeze it.

    2) DO NOT use ice chunks unless you are desperate. See #1. Less surface area and therefore takes longer to melt. Need "snow" with lots of surface area to allow quicker heat transfer.

    3) As others have said a cup of water in the bottom will transfer more heat to a larger area of snow quicker. This will decrease melting times from 7/8 minutes to 6 or less for 2 quarts of water from a 3-4 quart pot.

    #1810683
    Gerry Volpe
    Member

    @gvolpe

    Locale: Vermont

    What do you guys do about purification? I was taught to bring melted snow to a boil back in the day. I think the BPL article said to just melt and use chemical treatment to conserve fuel which I tried with aqua mira and liked. I have also heard folks say they just melt and drink without treating. Just wondering what others are doing.

    #1810704
    Chad Miller
    Member

    @chadnsc

    Locale: Duluth, Minnesota

    I don't purify or boil my water from melting snow. I just melt the snow and drink.

    #1810709
    rOg w
    BPL Member

    @rog_w

    Locale: rogwilmers.com

    deleted

    #1810718
    Jeffs Eleven
    BPL Member

    @woodenwizard

    Locale: NePo

    Roger said:
    5) I use a cup to get water out of the pot and pour it into my PET water bottle. I hold the bottle over the pot while pouring, so any spills just go back into the pot.

    Man that's it right there. I always hated picking up the pot to pout it into a bottle. you waste heat, disturb the windscreen, and can spill.

    a cup! Duh! quick, and elegant.

    and light! (assuming paper cup, of course)

Viewing 25 posts - 1 through 25 (of 68 total)
  • You must be logged in to reply to this topic.
Forum Posting

A Membership is required to post in the forums. Login or become a member to post in the member forums!

Get the Newsletter

Get our free Handbook and Receive our weekly newsletter to see what's new at Backpacking Light!

Gear Research & Discovery Tools


Loading...