Topic

Foster Cans With Ridges

  • This topic is empty.
Viewing 16 posts - 26 through 41 (of 41 total)
Eric Lundquist BPL Member
PostedOct 14, 2011 at 3:35 pm

From what I understand to increase heat transfer such as in the Jet Boil systems there is additional surface area which acts as a heat sink. Bob's modifications would not increase the surface area and simply add vertical ridges to the can.

At each end of the vertical 'folds' there would be extreme stress on the can and unless you rounded off the corners of the rolling pin at the ends it would probably puncture the can. I wonder Bob's method would be worth the effort though. Zelph's horizontal bands would work as a compression ring adding additional structure to the can.

Dan Yeruski BPL Member
PostedOct 17, 2011 at 7:12 pm

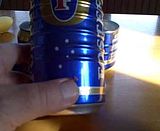
Hi B.G, How are you coming along on your corrugated windscreens and your vertical ridges for the Fosters? I tried the vertical ridges first and gave up on it. I like your diagrams, they make it look easy. The horizontal ridges make for a secure grip.

Thanks everyone for the positive comments.

Bob Gross BPL Member
PostedOct 17, 2011 at 7:32 pm

"How are you coming along on your corrugated windscreens and your vertical ridges for the Fosters?"

Whose vertical ridges do you refer to?

Nothing is ever easy the first time that you try it.

–B.G.–

Dan Yeruski BPL Member
PostedOct 17, 2011 at 9:39 pm

B.G. Your rolling pin design. Have you made one yet for the windscreens/pot?

Bob Gross BPL Member
PostedOct 17, 2011 at 9:57 pm

The basic idea is one that I had a long time ago for creating a simple corrugated aluminum windscreen for a stove.

–B.G.–

Kevin Beeden BPL Member
PostedOct 18, 2011 at 11:00 am

After I first saw this thread, I went home, picked up an empty can with the cap removed, picked up a flat-bit wood drill that has a 1/4" shaft that has a nice, smooth end to it, put the can on the carpet, and ran the end of the shaft up the inside of the can, pressing into the floor.

The result wasn't pretty, as the ridges weren't perfectly straight, or very well defined, but the basic idea worked, and the result was a somewhat stronger can sidewall.

You could probably do the same with a cylindrical plastic ballpen (plastic to avoid scratching the epoxy lining).

My gut feeling is that the radial ridges will be stronger than vertical ridges (possibly borne out by radial reinforcements on thin plastic bottles).

Dan Yeruski BPL Member
PostedOct 18, 2011 at 6:27 pm

Hi Kevin, I do belive the "grain direction" of the Fosters is in the radial direction. That is why it is so difficult to get good formation of vertical ridges of any worth. I have found the vertical are easily cracked while forming. Sheet metal has a "grain" direction. More information can be found on it if googled. Search grain direction of sheet metal. Here is a brief quote from one of the sites that come up: NOTE: grain is the rolling direction which elongates grains in the same direction. When bent transverse to the grain, long edges of grain boundaries are exposed to high strain with high potential for crack initiation. You may have experienced the grain direction when forming your pot support windscreen combination unit.

Tomorrow I'll list an introductory offer to members here on BPL. There will also be a paypal button for International Orders that will include the necessary additional shipping fees.

Eric Lundquist BPL Member
PostedOct 18, 2011 at 8:20 pm

Will the introductory offer include the mini (half-height) Fosters can seen in one of your videos? I want one of those!

Kevin Beeden BPL Member
PostedOct 20, 2011 at 10:54 am

> Hi Kevin, I do belive the “grain direction” of the Fosters is in the radial direction.

I found quite a nice powerpoint presentation by Alcan a couple of years ago, which has some pictures showing how cans are made, starting from a blank disk of Al alloy. Basically, it’s a multi-pass drawing process, using a series of annular dies and a punch. Useful slides can be found here and

Dan Yeruski BPL Member
PostedOct 21, 2011 at 6:05 am

"I found quite a nice powerpoint presentation by Alcan a couple of years ago, which has some pictures showing how cans are made, starting from a blank disk of Al alloy. Basically, it's a multi-pass drawing process, using a series of annular dies and a punch. Useful slides can be found here and"

Prior to making the blanks the material is rolled to the desired thickness. The grain direction is formed there no doubt. What happens in the drawing process to the grain would be interesting to know.

Did you experience any fracturing when designing your multifaceted windsheild/pot support? Anything that may have been related to grain direction of the material?

Thanks Kevin for the link to the very interesting slide presentation.

I now have placed the ridges so that the first and fourth ridge from the bottom of the can designate 1 cup and 2 cups capacity respectively.

PostedOct 21, 2011 at 8:36 am

The idea is only the direction of the groove is not only vertical or horizontal.
Once you've rotated the can and set a little obliquely, I feel like the shape of a screw produce well. Even minimal fixtures, and who could be a continuous groove.
ใ€ใ€ใ€ใ€ใ€ใ€ใ€ใ€ใ€ใ€ใ€ใ€ใ€ใ€ใ€ใ€ใ€ใ€ใ€ใ€ใ€ใ€ใ€
ๅฐ‘ใ—ๆ–œใ‚ใซๆบใ‚’ๅ‰ตใ‚‹ๆฒปๅ…ทใ‚’ใ‚ปใƒƒใƒˆๅ‡บๆฅใŸใ‚‰
็ผถใ‚’ๅ›ž่ปขใ•ใ›ใฆใ„ใใ ใ‘ใง
็ผถใฎๅด้ขใซใ€ๅคงใใชใƒใ‚ธใฎใ‚ˆใ†ใช้€ฃ็ถšใ—ใŸๆบใ‚’ๅ‰ตใ‚Šใ ใ›ใใ†ใงใ™ใ€‚

Dan Yeruski BPL Member
PostedOct 22, 2011 at 9:05 am

Thanks Yukio for your insight. Shape of a screw sounds interesting.

I’m in the process of modifying the height of the can. I’ve been able to cap off the lip sucessfuly.

<center>

</center>

Dan Yeruski BPL Member
PostedOct 23, 2011 at 3:43 pm

I made a few min pots and will be testing the new aluminum cap on the top lip and the flat aluminum bottom on the ones seen in this video:

Click on the picture, it’s a photobucket video. How do I embed a youtube video?

<center>

</center>

Kevin Beeden BPL Member
PostedOct 31, 2011 at 12:14 pm

Dan, are your short cups made using a rolled lip?

They look really nice. I've tried turning a lip by hand in the past, but it didn't go very well; lots of fine cracks, and very difficult to get an even result… I'm sure proper tooling makes it a lot easier.

Viewing 16 posts - 26 through 41 (of 41 total)
Loading...