finishing up a 10 X 10 flat tarp with glued seams. Only sewing the guy outs to the edges. Should be ready for testing in a week – just need to glue-on the mid-panel guy outs.
Construction is based on this article:
Enjoy,
Dave
Topic
Become a member to post in the forums.
finishing up a 10 X 10 flat tarp with glued seams. Only sewing the guy outs to the edges. Should be ready for testing in a week – just need to glue-on the mid-panel guy outs.
Construction is based on this article:
Enjoy,
Dave
Looking forward to seeing this, hope you tooks photos along the way.
Hello Dave,
What you are trying CAN work very well. If you haven't figured this out on your own I'd suggest laminating the ridgeline seam like the following diagram.

With a 1 inch overlap the joint is stronger than the fabric.
Thanks for your inspiration and advise JIm.
I read a discussion of ridgeline seams on this forum a while back and used this one that is modified from a canvas tarp seam – minus the 1" insert.
1. glue a 1" overlap. let dry.
2. roll the seam to cover the raw ends. first gluing one side, then the other – resulting in a 4 layer glued seam.
3. I can't draw very well – see attached pic.
4. glue and roll edges twice to cover raw edge.
Dave


Do you mean:

Make sure and test that good – like set it up and pull on it pretty hard, and leave it set up during a very windy period.
Yeah, sorry I can't draw. I revised my pic.
I'm planning on a windy rainy test – hopefully with a few thunder boomers for added effect. We do a lot of off trail, backwoods hiking and we don't shop the weather.
If it starts to peel, then I will just add one line of a weak zig-zag and call it a bust. (but the tarp will still be in service)
Dave
Dave's seam is exactly what to use if sewing the ridgeline but a bonded seam done that way will peel with not a lot of force.
"If it starts to peel, then I will just add one line of a weak zig-zag and call it a bust."
If you can sew, then you may as well just do that
It seems like glueing would only be appropriate if you didn't have access to sewing machine
But now that you've done it, it would be a good experiment to test
Good discussion. only time will tell.
My reasoning for gluing the seams:
-There has been a lot of discussion about seams and thread tension – failure, thread popping, sew holes opening and silnylon stretching – solution is to use a stretchy thread or a weak zigzag. (seems kind of whimpy to me)
-a bonded approach spreads the pulling force over more than just a thread line.
-no seam sealing (although one may argue that gluing is just as much a pain)
-My sewing skills with slippery silnylon -(rolling the seam – or using a thousand pins)
-I chose this seam to bury the cut edges and have a thicker, stronger seam. Initially, I had intended on gluing and sewing the seam, but it was stronger than I had anticiapated. At first it looks as if tension will make the seam pop up, but my initial pulling on the seam has done nothing. (although I'm not a bodybuilder or engineer)
Thanks for the input,
Dave
David, I agree with others who have concerns about the folded-over seam you plan to use. All adhesives are stronger in shear (given a reasonable surface area) than in peel. The seam you propose, which is in peel, may be strong enough for your application, but why choose it over seams that are stronger, simpler, and lighter?
In the crude MS Paint image below, seam D is the strongest. Two linear inches of glued seam must be pulled apart to break it. But it's unnecessary because the simpler seam B is probably stronger than the fabric. Seam C, suggested by Jim, is no stronger than seam B. They both can be broken by pulling apart only one linear inch of bonded fabric. And again, seam B is simpler. Seam A (the folded-over seam) will probably pop open to become seam B at tensile forces below the breaking strength of the fabric.

Seam D uses 2/3 the glue of your seam (A), seam C uses half, and seam B uses 1/3 of the glue that the folded over seam (A) requires. Seam A has hidden edges (before it pops open), but the edges on the others won't fray or unravel. They're bonded down.
I apologize for the long, opinionated post. Just still curious about your rationale for using the folded-over design.
Colin – I agree with your post 100% when bonding.
Colin – thanks for your post. I should have posed this seam question before I glued my tarp. You put it in a way that I can understand.
My plan was to make a strong lighter tarp with a seam that didn't have the sewing issues mentioned above. I have very little experience with sewing silnylon and thought it would be stiffer, stronger and easier to sew once it was bonded. My rationale was that the sheer force would be distributed along the gluing surface and that the stitch line was the last line of defense before failure of the seam could happen. As fast as that stuff frays, I thought I needed to bury the cut edges – so I folded it. (sure would have been easier to stop before folding) When I pulled on the seam to test the strength – It "seemed" very strong – so I thought that I could get away with not sewing the safety stitch on the ridgeline.
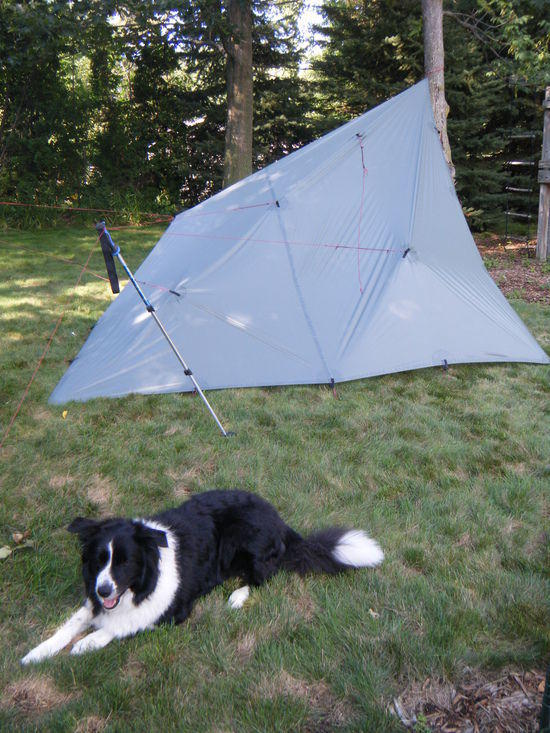
Most of my pitches will be in the explorer or flying diamond configuration, thus the glued ridgeline is not the true ridgeline as in the A-frame style.
I'll be gluing on the mid-panel guy outs today and should be ready to rock -n- roll. I’ll set it up in the back yard for a few days and then I have a SAR at the end of the month.
Thanks again,
Dave
P.S. Some tips and deviations from Jim's article.
-Write on the silnylon with a sharpie – it makes it easier to line-up the folds.
-Thank god my wife had a fold out 1" grided workboard.
-I only spread the glue on one side – there is plenty to bond and less to squeeze out.
-I used cheap insulation panels – taped together. The glue does not stick to them.
-I left the weight on overnight as the corners tended to pop-up
-Definately use seam B as Colin suggests.
I don't think there's any reason to avoid sewing silnylon
Once you get the hang of it, it's straightforward
Use a sharpie to mark a line on each piece where you want the seam to be
The problem is the top piece hangs on the pressure foot and slides on the bottom piece so the two pieces are not aligned when you get to the end of the seam, but proper technique will avoid this
Use a few pins or hand stitches to align the two pieces along the seam. Hold both pieces with both hands as you're sewing. Practice with long pieces a couple times to figure out how to do it.
the seams and guy outs made it through the first wind storm in my first flying diamond pitch.
will keep you updated.
Dave
self tensioner:
first pitch:
P.S. set up for 4 days straight and 2 storms – no seam peal or need to tighten guy lines…may have to update that graph
No failures
No seam peel
No issues
Used this tarp on at least one trip per month for the past 6 months. Trip length ranging for 4 days to 8 days. Snow load ranging from dusting to 4 inches of heavy wet snow. Two rain storms and winds range up to 35 mph. Temp range 95 F to -15 F.
This will remain my go to shelter.
We had one failure on another tarp that had sewed guyouts. (heavy, wet snow caused a rip-out of the guyout at the grosgrain stitch)
Enjoy,
Dave
P.S. Although I think that I need more time in the bush with this tarp before I give it two thumbs up, I think it is promising so far.

Glad to hear that the tarp is working out well, and that the seams turned out to be strong enough for your application. It is a good looking shelter.
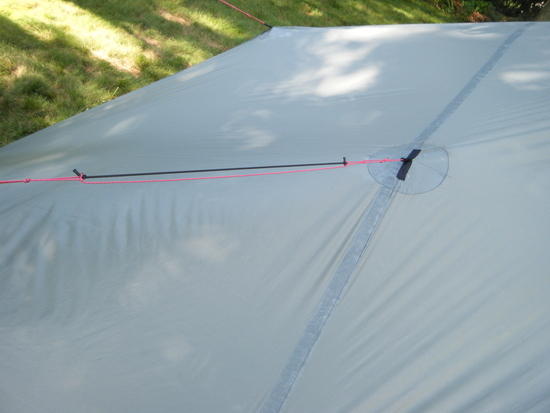
I am thinking of adding a small, glue-bonded tab on the inside of the mid-panel and center tie-outs. They would be used for hanging light items under the tarp…bug net on bivy, small flashlight (lantern), a wet sock or two. I don’t want to distort the pitch too much, but it seems like an underutilized area of the tarp. Has anyone tried this?
I was thinking of some sort of a butterfly shaped piece of silnylon folded over in the center to support a fabric loop…hmm any ideas, shoot them my way.
Thanks,
Dave
It's almost a year now…any update on this?
It's the second season and Still going strong with no sign of wear or peal. I did add the butterfly shaped tabs on the inside and they came in handy to hang my bug net sleeping bivy from – also a few wet socks from an unexpected swamping of my boots.
This year I have slowed down a bit on the trips as we are working on our certifications and physical requirements for SAR.
I have an ongoing bet with one of my hiking buddies about who's tarp will fail first and he lost a pullout due to the heavy snow load last Feb :) Others in the group have started gluing on the mid-panel guy-outs – hmm… I think I'm winning.
Have fun and thanks for the inquiry.
Dave
Become a member to post in the forums.
advertisement
Discover under-the-radar ultralight gear from small brands.

 Loading...