Topic
Cuben Tent Design
Forum Posting
A Membership is required to post in the forums. Login or become a member to post in the member forums!
Home › Forums › Gear Forums › Make Your Own Gear › Cuben Tent Design
- This topic is empty.
-
AuthorPosts
-
Jun 30, 2011 at 4:24 pm #1276139
Alright, this is my first post in this forum, and its really just an informational one, for me. I am a little young (I thoroughly searched the use policy to make sure I am old enough to post on the board, and I am, which is good) so a lot of what I research in hiking is just information for hopes and dreams and plans for later in life. This is just an idea I had and was wondering if other people would critique it. This is currently a theoretical plan but one day (or if by some streak of blind, awesome luck my parents decide UL camping is what they want to do and I get to make this.) I hope to make it, or something like it.
So I recently was following a vain of research involving ultralight tents and I discovered the wonders of Cuben fiber, which then lead me to MYOG. And so far I like the idea, make equal or better gear suited to what you need for less. Its a solid plan.
My inspiration, before anything is shown, is the Lightheart Gear Solo tent made of cuben fiber. And it really is basically a light heart. And before anyone points out the mistake, I realized after the drawing that by adding a straight 1 foot section I added a need for 2 more stakes and guy lines, which means more weight.
Materials:
Wall- .74oz Cuben Fiber
Mesh (gray, see through spaces everywhere there is not color)- .7oz nanoseeum
Tub- 1.5oz Cuben Fiber w/mylar (Not sure how to say it, but cuben laminate with strong mylar)Dimensions:
78" long
42" wide
35" tallRandom FYI:
Supported by two hiking polls or adjustable support rods (for those that dont hike with polls) and a spreader bar.
The rainfly is integrate and rolls away too one side when not in use. It is all split on one side to allow use as a vestibule/awning.
That gray area at the bottom of the base tent is the tub, I believe it is called.
This is a designed as a 4 season tent in my mind, which is my justification for not having full length mesh, and having the cuben fiber make part of the walls in places. In my mind this makes the tent better at retaining heat, in reality probably not. I think it was just a looks thing for me, plus it does make the overall tent lighter.All 3 stages of the tent

Tent with rainfly rolled away from the front
Same thing, just from the back
This is the tent with the rainfly up partially and the vestibule stake out
The tent with the rainfly fully staked out, air flows underneath for ventilation
Jun 30, 2011 at 10:24 pm #1754915Here's a few comments:
With the walls being at such steep angles at head and foot, you will have to be quite short to fit. I often build a scale model, and try to put a cutout coffin-shaped block of foam into it that is scaled to my size, including the length of my feet pointed up.
Often the foam block will not fit at all, and when one end of it is bent upward to simulate sitting up, it is clear that my head would strike the tent wall. A formula that works for me is that to be comfortable, the length of the tent at the bottom must be at least a foot longer than my height, and that is for tents with walls that do not slope at so sharp an angle.I recommend the cuben with the thicker and stonger mylar for floors. Zpacks often sells the 1.26 oz cuben with the stronger mylar. If you can get the thicker mylar, often signified by ".18" at the end of the material code, in a lighter weight cuben, go for it. Look at the mylar along the edge of a roll of the .08 cuben and ask yourself if you think that would be enough protection under you as a floor.
Tent design and construction takes a huge investment of time, which I have more of as I am semi-retired. There are a lot a well made tents of this type on the market, and you might have other more rewarding things to do with your time than building one. On the other hand, if you may be going into engineering, tent design and building might be good preparation. But be sure you can handle the math before getting into engineering. It will be intense.
Jun 30, 2011 at 10:38 pm #1754923It is funny you brought up engineering as my main thought for a career path for many years has been an engineer whether a biological engineer or mechanical I am not sure, but an engineer none the less.
And would you recommend that I widen the tent? I will lengthen the tent also (I am 5'11" right now and come from a tall family, according to the doctor I haven't even hit my growth spurt yet) to 85" just in case.
Jun 30, 2011 at 10:45 pm #1754925" I am 5'11" right now and come from a tall family, according to the doctor I haven't even hit my growth spurt yet "
Some of us have recently hit our growth spurt, but it is in girth, not height.
–B.G.–
Jun 30, 2011 at 11:08 pm #1754935Yup, go 1.26oz or 1.5oz cuben for the floor. It's tough enough to stand up to reasonable use with needing a groundsheet. If you go with lighter cuben then you'll realistically need a groundsheet so you won't save any weight and your tent will get damaged easier.
For the main body, I would do 0.51oz or 0.74oz. The 0.51oz stuff is barely heavier than the 0.48oz stuff and it contains a lot more spectra (1.0K vs. 0.6K). So that's about 2/3 more spectra for just 0.03oz/yd, or maybe 0.2oz on the whole tent. I personally like 0.74oz the best because it's quite a bit stronger still (2K of spectra vs. 1.0K) and I get the impression it's going to last longer. You might need ~6 yd of fabric for your canopy, so the 0.74oz stuff only adds about 1.5oz to the whole tent versus using the lighter stuff. It depends on your goals though. 0.51oz stuff normally fares fine if you are reasonably careful with it and don't encounter extreme weather.
Bond as much as you can (rather than sewing) and use a good tape (ie. 3M 3485???) rather than a liquid adhesive because liquid adhesives take forever. The exception to this is complicated areas, where a liquid adhesive is nice because you can adjust it while it drys, whereas tape sticks instantly so you need to put it together bang on. With a big of practice, you can get really good at applying the double sided tape. I used the 3M stuff (search 'basting tape' on SailRite.com) with good results.
Jun 30, 2011 at 11:08 pm #1754936Can't imagine why you would need more than 42" for a solo tent. 36" is plenty for me and my two shelties (20# dogs). For a duo, it is a matter of preference – they generally run from 50-60" in width for Americans, who tend to be 'girthier.'
Jul 1, 2011 at 12:06 am #1754942I was inferring the fact that it should be widened from the realization that if I make it wider the walls will not be as steep. And I remember steep walls being mentioned as a problem.
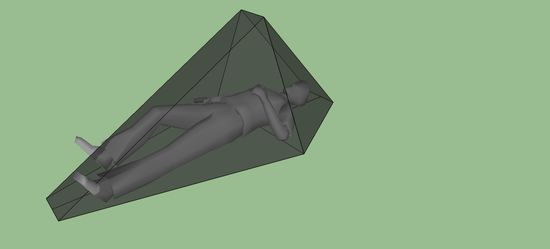
Jul 1, 2011 at 12:08 am #1754943Dimensions:
78" long
42" wide
35" tall
This is what a 78" long , 35" high looks like in 3D :
I am 5'8" and the 6' mat is flat.
FrancoJul 1, 2011 at 12:13 am #1754945Haha, wow looks like my guestimations were a bit off. Thank you for the visual Franco, it will actually be pretty helpful. Now looking at your picture I should be able to do reasonable mock ups tomorrow to figure out a good realistic size.
The materials changes were made in the original post, measurement changes will come along soon enough.
Thank you everyone for the input so far, I know it is just an idea but sometimes these things have a way of growing into something so much more…..like an obsession, or an unhealthy habit.
Jul 1, 2011 at 3:05 am #1754961> I know it is just an idea but sometimes these things have a way of growing into
> something so much more…..like an obsession, or an unhealthy habit.MYOG an obsession? Whatever makes you think that?
Cheers
Jul 1, 2011 at 7:47 am #1754998Sam,
You might like to have a look at this recent thread, where very similar two-pole tents are discussed.
The angled-to-the-ground ends are great for wind shedding, but, as others have pointed out, not so good for internal volume, hence the truncated ends of my effort.
As for the waterproof groundsheet tub, think about how you might build & peg out those acute angled ends. Go and look at a bunch of tent designs and see if you can figure out why no-one does it.
Think about the integrated flysheet, and look at other tents, and ask yourself why there's usually a gap between the flysheet and the tent inner.
Since it looks like you're using SketchUp, you can always make a 'body model' (even if it's only a 'block of foam' like Samuel suggests, or get a SketchUp body model from somewhere, like David Drake has). This body model will help you to identify collisions, and space/volume problems. I think there are SketchUp plug-ins that will create flat patterns from your drawing, which you could print out and make paper models; that's what I do (not with a plug-in, though; I wrote some code about 16 years ago to do something similar, and I keep tweaking that…).
> I know it is just an idea but sometimes these things have a way of growing into something so much more…..like an obsession, or an unhealthy habit.
Or a career…
Designing things is great fun. I've been doing it since I was four, and have been doing it as a career, all my life. I still get incredibly excited when I'm designing stuff (even at work sometimes…), and get a real sense of achievement. That's why I've not told you how your design should be, but, hopefully, have given you pointers as to how to go about looking at, and solving the problems. If you just want to build something, then being told is fine. If you want to design things, it spoils the fun…
Have fun!
Jul 1, 2011 at 9:55 am #1755028Hi Sam,
The SU 3D person I used can be found via the "Components" window in SU. Open the window, open the drop-down menu under the house icon, click on the "People" collection, then the "3D people" file. This will give you a variety of poses–I used "3D man resting on back." Click on it and it will be placed in your model, after which you can move, rotate, etc. The size of the stock figure is about 6' tall–I used the scale tool to change proportion to be closer to my own.Apologies if you already know all this.
Your design is looking good–if I might make a suggestion, zooming in on your SU model before you export the 2D image will make it easier for us to see the details in your design.
There are a lot of ways you can make physical models and full-size mockups of your design for very low (or no) cost. For my full-size mockups, I've been using the wrapping from lumber, which I get free from the local building supply store. I sew it, but if you don't have access to a sewing machine, you could use clear packing tape, which sticks well and is quite strong. It's a little heavy for an actual backpacking trip, but just fine for testing in the back yard.
Have fun.
Jul 1, 2011 at 10:11 am #1755034Thank you for all of that information David, and while I am decently proficient with SU I only recently found the models section, and only just learned (from you) that there is more than one 3d person model.
And the idea for using timber wrapping is a great one, and I do have access to a sewing machine so that is pretty cool. And a design career is something I have always looked at, that is why I have been leaning towards mechanical engineering for awhile now.
And you are right, even when I design something small like a mini trebuchet I feel so good about the fact that I designed it and followed it through to completion. As to getting excited for designs it happens to me all the time, I will be sitting in class and all of the sudden you will see me rush to rip out a page of a notebook and hurriedly write down an idea or inspiration or solution to a vexxing problem, it is all very exciting and fulfilling.
Finally, for why the fly is not usually so close to the tent itself is because, from basic understanding, condensation. By allowing space in between the two 1. the condensation doesnt move from the rainfly to the tent itself and 2. maybe it allows ventilation to try and stop condensation on the underside?
EDIT: I changed the tent design up, I still have not figured out the whole rain fly situation but I still want to try for the integrated tent fly/vestibule.
New dimensions:
90" long
44" wide
35" tall
12" space at top
10" space at bottomAs you can see a few parts stick out but that is not from lack of room, that is just from my lack of ability to place them in the right spot and the position just not fitting the space.
Jul 1, 2011 at 4:56 pm #1755168Sam
it is still far too short and not high enough for your size.
The problem is that for a start you do not take into account the mat. Even on top of a 1" mat because of the slope of your walls , it makes a big difference.
Take a look at the SMD Skyscape for a more realistic size using a similar design.
(hint, it is 45" high and the fly is 120" long)
FrancoJul 1, 2011 at 5:42 pm #1755180What I was trying to do was save weight in odd ways. In my reasoning if I make it taller it makes the walls steeper which cuts of more room. To counteract this I need to make the tent longer. I was just trying to be a scrooge.
But I will make the changes. And thanks for the example.
Jul 3, 2011 at 2:39 pm #1755662Commendable effort. The nice thing about building your own is there are no rules. . . So do you need walls? Would a bivy/tarp/groundcloth work? How about a hammock? If you do need walls, check into bubbles, bucky balls, pyramids. Could you use some sort of cross brace to keep the walls farther apart and then taper at the more acute angle. Test anything that pops into your head, especially the stuff that seems silly.
-
AuthorPosts


- You must be logged in to reply to this topic.
Forum Posting
A Membership is required to post in the forums. Login or become a member to post in the member forums!
Our Community Posts are Moderated
Backpacking Light community posts are moderated and here to foster helpful and positive discussions about lightweight backpacking. Please be mindful of our values and boundaries and review our Community Guidelines prior to posting.
Get the Newsletter
Gear Research & Discovery Tools
- Browse our curated Gear Shop
- See the latest Gear Deals and Sales
- Our Recommendations
- Search for Gear on Sale with the Gear Finder
- Used Gear Swap
- Member Gear Reviews and BPL Gear Review Articles
- Browse by Gear Type or Brand.
