Topic

New Titanium Caldera Clone

  • This topic is empty.
Viewing 20 posts - 1 through 20 (of 20 total)
PostedJun 1, 2011 at 11:56 am

Hi,
just finished my first Caldera Clone. Altogether it weighs about 65 grams (I haven't got round to the caddy yet). The ti foil was from Ti goat; the burner is made from a Redbull type can (I prefer Pimms to Redbull).
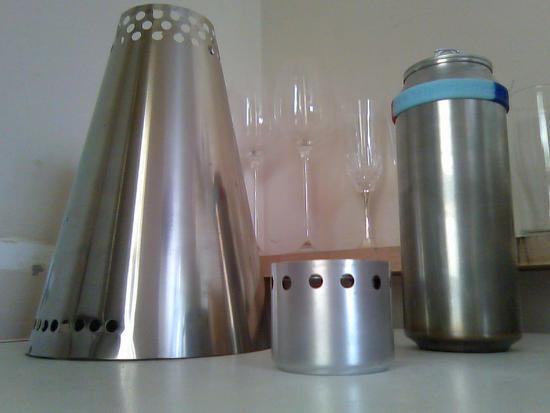
Caldera, Pan and Burner

It boils 500 ml of water in 8 mins 20 secs using about 17 ml of meths. Credit should really go to Kevin Beeden as I used his Postscript program to design it; it really is a great tool, and anyone interested should pm him for a copy! I set many of the variables according to a Trail Designs Caldera I already own (soon to be offered on Ebay). I won't go into exact details as I don't think that would be fair on Trail Designs. But as feedback for Kevin I will say that, as can be seen, my Caldera has much more venting area at the top than at the bottom; it would be handy if the Clone script allowed for 3 or even 4 rows of holes at the top, you only need one row at the bottom.
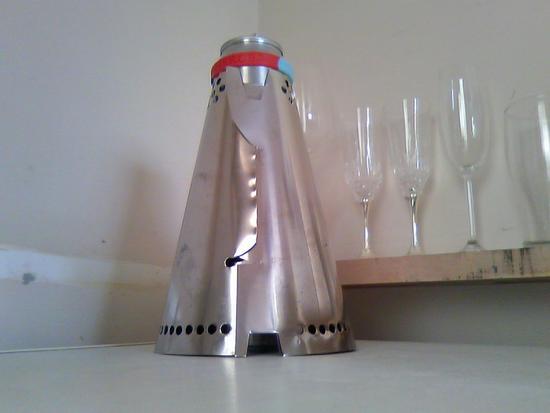
Assembled Caldera Clone

I had no problem cutting the ti foil, but punching the holes was much harder. I used a Mc Gill paper punch at first, the holes it made were really neat, but it gave up the ghost after 3 holes. I then invested in what I thought would be a state of the art heavy duty sheet metal punch. It made a mess to say the least. I managed to hammer the foil back into reasonable shape. Oh well, not bad for a first go. Any advice on the hole punching would be much appreciated, and if anyone knows of an online supplier of hard tempered 0.15mm aluminium foil (don't ever buy foil in the soft condition), either in the UK or the US, then I would be eternally greatful. The foil situation here in the UK is absurd, and ti foil is to expensive for experiments.
Matt

Kevin Beeden BPL Member
PostedJun 6, 2011 at 10:07 am

Matthew,

Thanks for posting pictures of your cone.

I guess the issue with the number of holes at the top is down to the fact that you're using a drinks can as your pan, so the circumference of the top of the cone is very small, and you can't fit many holes into it…

With a more conventional pan, two rows of holes are usually adequate.

I'll think about adding a third row of holes; probably shouldn't be too difficult.

The overlap thing you've done on the joint looks interesting; I guess to stop the sides bowing out, rather than use the triangular folded structure, which is somewhat difficult to form in Ti.

Kevin Beeden BPL Member
PostedJun 7, 2011 at 4:54 am

Matt,

I've updated the script to allow any number of rows of holes.

I also checked my correspondence list, and notice that you asked for the script in August 2009… The script has developed a bit since then.

If you're still at the same email address, I'll send the latest script.

[edit] a closer look at my correspondence list reveals I sent Matt a revised script a couple of weeks ago, and I imagine this is what he's used to build this latest clone…

Latest script now sent…

PostedJun 11, 2011 at 12:45 am

Hi Kevin,
just got the new script, looking forward to using it. Your absolutely right about the problem with narrow pots and crowded vent holes. This problem becomes even worse when the cone is made of titanium, because the stiffness of the material makes punching holes close together very difficult without bending the foil (depending on which method of hole punching you use). With regards the new script, you could get really technical and allow a different number of holes on each row: say 10 at the top, 15 below, 20 below that and so on. It's just a thought, the script as it stands does a perfectly good job. The flap I designed works well and adds to the structural integretiy of the cone when assembled. The only slight problem is that little bit of foil at the top that sticks out, but it is really quite a minor issue, the cone itself is a very good stable fit, and ti foil makes for a very even and uniform cone. I have found a source of .0078 aluminium flashing, made by Amerimax, that ships to the UK:

http://discount-cabin.com/shop/product_info.php?cPath=4_125_22862_149846_156512&products_id=225990

I don't know if this flashing is in the hard state or soft state. I was warned that some flashing is in the soft condition, and therefore unsuitable for cone building. The thickness of .0078 inches equates to about .19mm so it should be workable. Does anyone have experience of working with this flashing? Discount Cabin sell other varieties that may be better. I have enough ti foil left for an ultralight esbit stove, very much like the one on Steve's site suluk 46. As soon as I get a better punch I'm going to make one.
Matthew

Kevin Beeden BPL Member
PostedJun 13, 2011 at 10:18 am

> With regards the new script, you could get really technical and allow a different number of holes on each row: say 10 at the top, 15 below, 20 below that and so on.

Not really. The hole arrangement is already quite technical*, being based on close hexagonal packing ;-) This is the optimal packing density for regular circular items. If you used different numbers of holes in each row, you wouldn’t be able to pack them as closely, and you’d get different ‘lands’ between the holes in adjacent rows. Using a CHP-based layout means that the hole/land design is identical for all holes (actually, the lands get bigger as the rows progress down the cone).

> The only slight problem is that little bit of foil at the top that sticks out

That bit of foil can be trimmed down a bit, as there’s plenty of material in the deep slots you’ve created to hold the tab in place. Ti foil is much springier than Al (less ductile), and cannot be ‘persuaded’ to hold a pre-curved shape. Thus, the outer end of the cone does tend to stick out at bit.

[edit]
* actually, there’s probably an application of prime number theory or fibonacci sequence to the selection of the arrangement of holes; fibonacci is commonly found in nature, in things like pine cones, sunflower seed heads, etc, where regular-sized things form rings or spirals. Hmmm… I think the secret is in the spiral part.

The base plate of the Trangia stoves has a number of rings of identically-sized holes, with different numbers of holes in each ring.

Maybe I need to go away and re-consider optimal hole packing, based on fibonacci spirals. Or maybe not…

PostedJun 13, 2011 at 2:25 pm

"…The hole arrangement is already quite technical, being based on close hexagonal packing.."

Have you considered basing the number of holes on combustion requirements and heat transfer?

PostedJun 13, 2011 at 8:14 pm

Harbor Freight Tools sells two hole punches that come in two different sizes and work well on Ti sheets. They're cheap too. Less than $30 for the deep throat model and about $20 for the standard model. I'd attach photos but my computer is acting up and won't download photos.

Kevin Beeden BPL Member
PostedJun 14, 2011 at 10:49 am

> Have you considered basing the number of holes on combustion requirements and heat transfer?

You missed the winky from that post, I take it?

If not, then, yes, the size and number of holes is intended to allow adequate airflow (the x-section areas are reported by the script generator, on the template). It's the configuration of the holes that is determined by CHP.

As I've said in the accompanying 'readme', and elsewhere, the script is intended to be an aid for a competent user to design and build a clone, and determine for themselves whether it is safe and fit-for-purpose. It's not intended to be a "if you build it this way you will be safe, if you don't build it this way you will die" design, because it's impossible for me to know what pan and burner people will use. I added a caveat at the beginning of the 'readme' in an attempt to placate a US audience…

PostedJun 14, 2011 at 11:33 am

Hi Kevin,
I take your point with regards the hexogonal hole packing; that makes alot of sense. With three rows of holes the builder can always program in more holes than needed, and then punch out every other hole on the top row. That would be a reasonable compromise. I think we need to try out a few alternatives; I was just throwing ideas round really, and without seeing the results I couldn't say for sure what I personally think is best. Thanks for the input (poster above) re hole punching, I will check them out. I know it's not finished yet but I just had to post the photos of my latest pot.

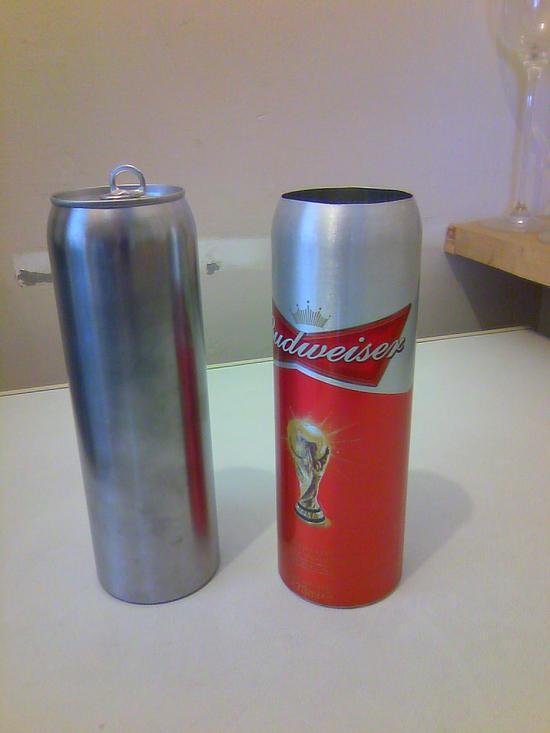
Limited Edition Aluminium Bottle Pan

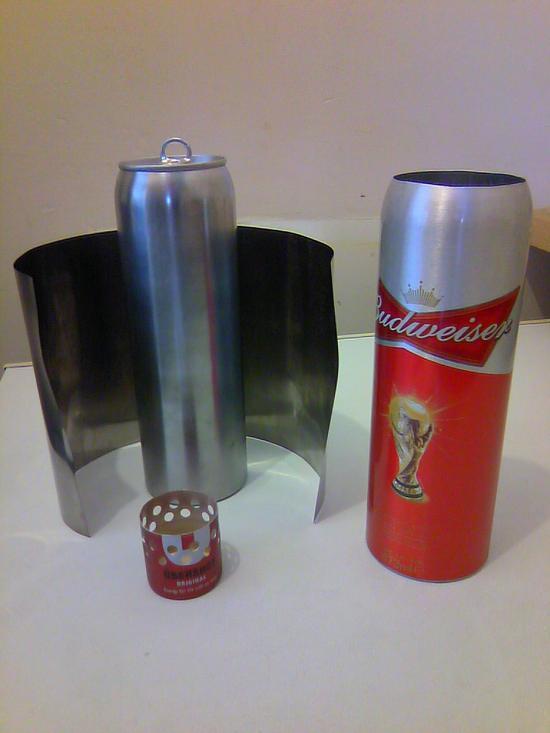
I made it from one of the limited edition aluminium bottles that came out during the world cup 2010. I dicovered that they can be cut with a pair of stout kitchen shears, leaving a very neat rim. A redbull type can top forms the lid. The pan is of course heavier than a normal can, but more robust, so that a protective caddy is not really needed.

Pan with burner & Ti windsheild

The small burner in front is a prototype made from a small 58 ml aluminium energy drink bottle (also cut down with shears). The finished burner will only have one row of holes; both it, and the yet to be completed ti wind sheild fit neatly inside the pan, along with a small fuel bottle. Weight at the moment is about 55 grams, but there's the fuel bottle and titanium rods to add to that.

Kevin Beeden BPL Member
PostedJun 15, 2011 at 5:06 am

Matthew,

I notice your script request came from BPL. Have you looked at the OM thread on the clone? There are a number of drinks can/bottle versions of the clone on that thread (e.g. Derek Goffin, Robert Hubbard, sierradoug). There may be some useful thoughts on the thread.

I managed to find a couple of the Bud bottles, and took the top off exactly as you have, including the drinks can lid. I’ve only played with it a bit, but it seemed to work pretty well as a pot.

PostedJun 15, 2011 at 6:31 pm

Matthew, in regards to cutting the Bud bottles, if you score them with a stanley knife blade, as you would when marking out a pepsi can type stove, you can cut up to the score line with shears/scissors and then tear along the score for a very neat edge, i've done it lots of times whilst making WBS type Bud stoves, it works perfect every time.

Kevin, if you need a couple more Bud bottles pm me on OM, i have around 20 left. :hic:

Dan Yeruski BPL Member
PostedJun 16, 2011 at 8:13 am

Hello Matthew. Nice project you have there.

Do you think the locking tabs at the top and bottom will break/crack over a period of a dozen assemblies?

My local Harbor Freight store indicated the deep throat puch has been discontinued.

Can you give a link to where you purchased the pot you are using with the clone?

Does your stove smell like it is burning efficiently? The proper amount of holes will determin how it smells. Better to have lots of air entry holes and then control rate of burn by the exiting holes. Lots of trial and error will get you in the right place.

Thanks in advance for the link or name of the pot.

Kevin Beeden BPL Member
PostedJun 16, 2011 at 11:06 am

Dan,

You may be making a common misunderstanding about how the tabs work. If you look carefully, you'll see that there's a tab at either end of the clone; one points out, one points in. To make the joint, you slide the ends of the clone into each other, mating the tabs into the corresponding slots. The tabs never have to be unfolded, once they're made.

You have to take care when making the folds in Ti or thicker Al, as they can fracture, but, provide you make them successfully (and with a reasonable radius), they should last. The same slot and tab joint concept is used in the SqueezeBox stove, and Paddy Dillon's Ti version has had a lot of use, and, so far as I know, still going strong. Likewise all my Al ones.

Should the tab break, another slot & tab can always be cut; just means that the slots become a little deeper.

As for the holes, yes, trial and error and smell will tell you (or a combustion gas analyser…). That's why the script goes a bit OTT with the holes that it prints, to allow users to start with a small number, and increase them if testing shows it to be necessary.

As for the pot, it looks to me like the first one is a very nicely cleaned-up drinks can, probably a (real…) pint (567ml), since he's boiling 500ml. The later one is clearly a stripped Budweiser bottle.

ps. I thought I'd sent you a clone script many moons ago, under one of your other user names. Maybe it was a similar name, but someone else.

PostedJun 16, 2011 at 1:40 pm

Hi Dan,
as Kevin points out, the tabs are permanent flaps, you slide the opposite face into position. It's very stable, don't be put off! As for the can, it is a stripped 500ml Budvar beer can. As I point out in the original post, the ventilation paramaters are lifted straight off a Trail Designs Caldera Cone. I can't be bothered experimenting.

Dan Yeruski BPL Member
PostedJun 16, 2011 at 7:15 pm

Your pot looks like stainless steel. I compared the finish to the stove next to it. The pot looks commercial grade, take that as a compliment.

You can't be bothered experimenting? I thought you were looking for suggestions, sorry to have suggested it.

Thanks for the explanation on the tabs. The tabs I was refering to were the ones shaped like piramids at the top and bottom, not the tabs that slide left to right in the center of the cone.

Cheers

Kevin Beeden BPL Member
PostedJun 17, 2011 at 6:40 am

> Thanks for the explanation on the tabs. The tabs I was refering to were the ones shaped like piramids at the top and bottom, not the tabs that slide left to right in the center of the cone.

Dan,

The tabs at top and bottom of the clone ('like pyramids') are formed once, and never have to be bent again; they slide into each other. Have a play with a strip of paper; at one end, cut a slot at the bottom, and a tab at the top. At the other end, cut a slot at the top and a tab at the bottom. Fold one tab out and one tab in. Then form a cylinder with the strip, with the ends offset vertically from each other, and slide the tabs into the slots. Then you'll see that the tabs never need to be unfolded once they're made.

These tabs are part of the standard design produced by my script. The side tabs are Matt's own idea, and an interesting addition to the design, addressing the problem with Ti foil that it isn't ductile, and therefore cannot be pre-formed into a nice curved shape. That's really what the script was intended to be; a starting point for people to play with the idea and experiment for themselves. However, I'd guess that most of the 100+ script users have used the design as it comes, at least, judging by the pictures posted on the OutdoorsMagic thread.

Dan Yeruski BPL Member
PostedJun 17, 2011 at 7:12 am

That clarifies it Kevin, thank you.

The large tab hole at the bottom looks like it will cause a large draft of air to blow against one side of the stove and cause flames to be pushed to the back side. What are your findings if any?

I have done eperiments with DIY cones that I have installed a large sheet of mica into the wall of the cone to allow viewing of the flame pattern under varying conditions.

Kevin Beeden BPL Member
PostedJun 17, 2011 at 8:32 am

> The large tab hole at the bottom looks like it will cause a large draft of air to blow against one side of the stove and cause flames to be pushed to the back side

Dan,

The solution is very simple; turn the cone so that the hole is facing away from the wind. The windward side of the cone can be made without punched holes; again, whilst the template has holes all round, you can choose not to punch them.

Dan Yeruski BPL Member
PostedJun 17, 2011 at 9:18 pm

No matter which direction it faces the air will follow the path of least resistance. The large hole will be sucking in lots of air. The chimney effect is drawing the air into the large hole first. Pucker your lips up and blow lightly at a candle flame and see what happens. Makes it lean away fron the air source.

I modified a Starlyte stove that works well inside a DIY clone cone. The pot I use is a Kmart Grese Pot. The cone rolls up and fits horizontal inside the pot. Boils 2 cups of water with 1/2 oz.(30ml) of denatured alchy. I'm familiar with how the flames react inside an enclosed cone and vertical windscreens.

Kevin Beeden BPL Member
PostedJun 20, 2011 at 10:39 am

> No matter which direction it faces the air will follow the path of least resistance. The large hole will be sucking in lots of air. The chimney effect is drawing the air into the large hole first. Pucker your lips up and blow lightly at a candle flame and see what happens. Makes it lean away fron the air source.

The hole formed by the slot and tab joint isn't that much bigger than the punched holes. If this hole is providing a preferential access point for air, it may be that the larger diameter of the cone base allows this to diffuse. In any case, the velocity of the air flow in with a cone with 'blocked chimney vent' isn't that high, I think; certainly, there's no noticeable 'wind' coming out of the top vents. If this air flow causes some movement of the flame, that may be beneficial, acting to spread the flame across the base of the pan. I've certainly never seen a flame 'streaming' in a draft from the air intake.

The hole I'd be more concerned about isn't present on Matt's cone, because he's using a pot with pot grip; the hole required for a pot with a fixed or folding handle is much bigger. Granted, it's usually above the burner.

That aside, I can't say that I've seen much movement of the flame due to venturi effects of rising air (e.g. testing in a still air environment of my kitchen); the effect of wind blowing through a cone with vent holes is, in my experience, much greater, and the one I'd be worried about.

> I modified a Starlyte stove that works well inside a DIY clone cone. The pot I use is a Kmart Grese Pot. The cone rolls up and fits horizontal inside the pot. Boils 2 cups of water with 1/2 oz.(30ml) of denatured alchy. I'm familiar with how the flames react inside an enclosed cone and vertical windscreens.

30ml seems to be a lot of fuel to boil 2 cups (~475ml) of water. Is that a boil+ (i.e. continued rolling boil for some time)? I usually find 15ml of 95/5 ethanol/methanol is enough to bring 500ml to a boil and a bit. Ah; you said 1/2oz but 30ml. 1/2 oz is roughly 15ml. Problem solved…

Viewing 20 posts - 1 through 20 (of 20 total)
Loading...