Topic
2oz MYOG pack failure :(
Forum Posting
A Membership is required to post in the forums. Login or become a member to post in the member forums!
Home › Forums › Gear Forums › Make Your Own Gear › 2oz MYOG pack failure :(
- This topic is empty.
-
AuthorPosts
-
May 27, 2011 at 3:32 pm #1274511
So today I embarked on my first MYOG project: a 2oz pack made of 1.3oz silnylon. Everything was going well until I tried to load some weight in it and the left shoulder strap ripped the back panel.

For all those MYOG people how could have this been avoided? I don't mind sewing with Silnylon (it is really slippery!) and it's pretty cheap. Should I have layered multiple layers for a backing? I tried to have as much surface area for sewing the straps on and even ran them about 5" down the pack to transfer load across a broader surface.
Other than the rip I found the project to be pretty easy, just time consuming.
May 27, 2011 at 3:59 pm #17419331st if all don't look at it as a failure…
Secondly, I don't know how to sew.
Thirdly, it looks like you need to add heavier/stronger material to reinforce the shoulder strap area, then attach the shoulder straps to the heavier/stronger material.
May 27, 2011 at 4:15 pm #1741942As you can see, the tear began at a sharp corner. Smooth and widen that corner to spread that load.
May 27, 2011 at 4:18 pm #1741944I've used 200D 4 ounce/square yard nylon to reinforce
or you could use Spectra – numerous MYOG spectra pack threads
this is a good experiment – silnylon by itself probably isn't strong enough
you could probably have just doubled up on the silnylon for a few inches further out from the shoulder strap attachment
May 27, 2011 at 5:06 pm #1741961…but I am wondering if this is the sibling to the "peel effect" in gluing and welding. It seems that as the strap was being pulled away from the the pack, all the opposing loads/forces were concentrated onto the final row of stitching. No load distribution across all the stitching was achieved. You could have stitched all up and down the strap attachment site and the only stitches to ever get loaded were the last row.
Distributing the force/load over a wider area of stitch might help. I am wondering whether a "T" attachment point might distribute better (to clarify what I mean, you used an "L" attachment where the bottom of the "L" is what was sewn to the pack. To use a "T" you would have two flaps of material to sew to the pack).
Just some ideas from someone who has no idea what he is talking about.
Cheers
John
May 27, 2011 at 5:29 pm #1741969John:
That's what I was thinking after the fact. I think next time though I'll use a thicker material on the backpanel until I figure out what a better method is for attaching straps.Just for fun I tried to rip off the other strap to see if it was just dumb luck that caused the other strap to rip off but I held just fine after some strong pulling. Although it was an unfair test since I was pulling perpendicular to the seam.
May 27, 2011 at 8:28 pm #1742021Making a silnylon tent fly recently, I simply used additonal pieces of silnylon laminated at stress points. The result was very satisfactory – much stronger than anything else in the same weight range that I could have imagined; and although I used a roller, I did not use clamps or weights.
The trick, as discussed on a recent thread by the author of the BPL article on laminatng silnylon, is to use the GE silicone GLUE, NOT the sealants, like SilNet. Am going to peel up portions of the reinforcing patches on a recently made prototype tent canopy and reseal the edges with the glue, where SilNet was used before. The glue is awesome, and cheap.
On a different note, have you considered using the 1.26 oz. and 1.5 oz cubens that you can often buy in small quantities from Zpacks? Awfully strong, yet still as light as silnylon and much lighter than the Xpack materials. But yes, the least costly route by far is to laminate the silnylon. There is 2.4 oz silnylon available from Seattle Fabrics if you want something stronger.
May 28, 2011 at 1:11 am #1742089It's hard to see what's going on in this picture. I just see a failure, but can't visualize what kind of stress was applied to the area to help you out. Anyway you can show a more zoomed out picture so we can see exactly how the straps are attached and how the failure occurred when weighted?
As a preliminary idea, this looks like a design flaw. Your straps are connected simply to a face/panel of silnylon. Silnylon isn't particularly strong for this kind of attachment. You can overcome this weakness by laminating the fabric to bolster it's inherent weakness. Another option, which you'll find many people/companies use, is to integrated the strap attachment to a seam/joint between silnylon pieces. This way the stress are applied to the seam.
From your picture it looks like the attachment "peeled" away and tore. If the strap was sewn into the existing seam that is just below your attachment point, the forces would have pulled linearly on the seam and been spread across much more surface area. This puts more force on the thread of the seam, so backing up that area with a few hidden bartacks should do the trick.
Hope your next design works out for you!
May 28, 2011 at 6:55 am #1742131It looks like maybe you did a bar tack to sew the strap to the fabric?
That is, a zigzag spaced very tightly
And maybe it initially tore along that seam?
If you did a row of stitches with the needle holes less than about 2 mm apart, then it will weaken the fabric along that line.
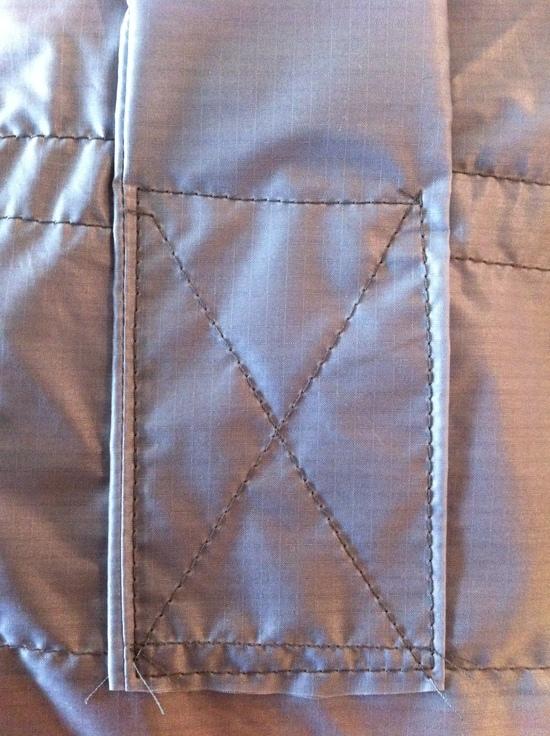
Better to do an X box – use regular stitches like 2 mm apart, sew a box maybe 1.5 inches square, sew an X inside between the corners
There's an article in BPL about this. Maybe Jay Ham?
Or do do a bar tack with a spacing of 1 mm, so it's 2 mm on each side. And then do another bar tack that's overlapped. You don't want any hole within 2 mm of any other hole:
 May 28, 2011 at 6:56 am #1742132
I can't tell this for sure form the photo, but did you bartack across the top of that strap (where it tore)? If it is a bartack, that may be part of the problem. I found out with my first all silnylon pack that you can't actually put that many stitches in one place because the fabric is too weak. It didn't dawn on me at first, but made since once it was explained to me. I definitely now use a second layer of stronger fabric now to help reinforce my straps also.
I know this article was very interesting to me
http://www.backpackinglight.com/cgi-bin/backpackinglight/sewing_primer_reinforcement_stiches.html
It tests the strength of different stitches on lightweight fabrics.
Edit:
Seems Jerry and I had similar thoughts. This is the article that he mentioned.
May 28, 2011 at 7:03 am #1742134Ha ha! I beat Chris by 40 seconds : )
Great minds think alike.
Chris took more than 40 seconds to find the link
May 28, 2011 at 7:59 am #1742138If you wanted a all silnylon fabric pack their was one way you could of avoided the rip. Is to sew the strap in to the seam below and then bind all three fabric layers in a cross grain ribbon the seam and then use not a tight zig zag stitch over the strap.
Do not use a bar tack stitch on light weight fabric in less it reinforced with a heavier or double fabric behind it because the tightly woven stitch will tear the fabric because the woven fabric has been damaged by so many needle punctures.
Don't look at this as a failure but a learning experience all things learned by your self with out any guidance or instruction is learned by trial and error. You learned a valuable lesson fabric stress points.
keep sewing,
TerryMay 28, 2011 at 12:20 pm #1742189Thanks for all the replies guys!
Sorry for the zoomed in photo. I only got one pic of it so I'll try to put up another. I originally attached the strap by making a 2"x5" rectangle and used just a straight stitch to make a "x box". When I did the initial load I heard the fabric ripping at the corner so I went back and did the zig zag stitch across it to reinforce. I guess now looking back I just probably weakened the fabric more than strengthened it. I'll read that article when I get a free chance to try and enlighten myself in this new MYOG world!
Overall I was surprised most by how straight I was able to sew silnylon. I went for a minimalist design with no pockets and only consisting of 2 panels for the pack in total, minus the straps. This would eliminate most stitching I thought.
Overall the straps were the hardest to get right. Anyone have any suggestions on how to get the right fit when sewing to the back panel. I hated not knowing if it would even feel comfortable until I sewed it down.
Thanks again guys!
May 28, 2011 at 4:09 pm #1742249Now looking at the photo more closely I see it was side ways and the top of the pack to the right. So you could not have sewn the straps in the seam. I am sorry that's what I get not waiting for the caffeine to kick in. So just back the seam with pack cloth ,cordura ,or my favorite x pac.
TerryMay 29, 2011 at 12:32 am #1742375Ah, after Terry's explanation it makes more sense.
Also to make the connection stronger you have have rolled shoulder strap over. What I mean is that you sewed the x-box stitch above the strap. When you weighted the pack this called the pack to pull down and the shoulder strap to pull up. This created the "peel" failure because with weight the two pieces were being pulled away (orthogonal/perpendicular) from each other.
If you complete the loop shape of the strap so that the x-box stitch is now BELOW the strap. Then when you weight the pack, instead of peeling the straps off the panel, the forces will be aligned parallel to each other. This way the weight isn't focused on just the first stitch of the x-box, but gets distributed along the entire box.

Hope this helps for the next project!
edit: Hmmm, won't let me put in spaces…had to upload a picture
May 29, 2011 at 11:36 am #1742485I'm really sorry I only put one photo in since there might be a little mix up. In the photo you can see the red color of my shorts. That is the bottom of the back panel. The straps are sewed so that the remaining fabric would drape down the backpanel, not up, to increase surface area on the connection. I'm out of town for today but I'll post a better photo tomorrow hopefully.
I do think backing it with something heavier is my best option for a connection. How many layers of silnylon do you think I'd need in order to hold a load of 15lbs? I say silnylon since I already have it handy.
Thanks again so much guys!!
May 30, 2011 at 9:41 pm #1742998"Anyone have any suggestions on how to get the right fit when sewing to the back panel. I hated not knowing if it would even feel comfortable until I sewed it down."
What has always worked for me is to find an old pack with a similar strap arrangement that fit well, and take measurements from that. If you don't have old packs, try some rentals, or even some in a store. Nothing wrong with trying on packs in a store. You might get some looks when you take out the tape measure and do a diagram. I just tell them what I'm doing, and usually end up in an interesting conversation. Working in a store can be quite boring.
I still think you just expected too much from just one layer of silnylon. In the 20-30 denier, 1.3-1.5 oz range, it is a great tent fabric if your design addresses the sag problem, but is easily cut or torn, and does have its limits. Even in a tent or tarp, you need reinforcements patches at stress points.
May 30, 2011 at 10:42 pm #1743010So after some thought about how I can improve my next pack I decided on using a different material for the shoulder straps and backpanel. Being relatively on a budget and trying to make a SUL pack what material would you guys recommend? Mind you I live by Seattle Fabrics and would probably only get stuff from them. Maybe just a heavy nylon? Sorry, but I'm so lost in this new MYOG world :)
May 31, 2011 at 6:41 am #1743063You live next to Seattle Fabrics? Nice!
200d Oxford works for me
I added a strip of 1 inch grosgrain, but this is probably unnecesary. Do a bar tack in the middle. Do another bar tack half the width of the bar tack down so the two bar tacks overlap. Sew a straight stitch around the perimeter of the grosgrain.
I've used this about a year, at least 500 miles, without problem.
Or a X box would be good I think.
May 31, 2011 at 6:55 am #1743067+1 for
"As a preliminary idea, this looks like a design flaw. Your straps are connected simply to a face/panel of silnylon. Silnylon isn't particularly strong for this kind of attachment. You can overcome this weakness by laminating the fabric to bolster it's inherent weakness. Another option, which you'll find many people/companies use, is to integrated the strap attachment to a seam/joint between silnylon pieces. This way the stress are applied to the seam".
I have a question about your stitch length and how many times you went over the seam at the point closest to the shoulder strap padding.
What was the stitch per inch setting on your machine? I generally use 8 stitches per inch.
Did you go over that seam closest to the shoulder strap padding a number of times to reinforce it? It's possible that there may have been too many needle holes in that area to be able to support the load.
Try not to run over any seam too many times. I recommend a box stitch pattern for reinforcement of shoulder strap attachment points. This is a sewn square or rectangle with the corners connected inside the box diagonally by two more lines of stitching. Sewing a piece of webbing over these attachment points across the back panel from seam to seam and capturing it in the vertical seams of the pack sides could help also.
Your problem may not be in the material. Many ultralight and super ultralight packs use silnylon and spinnaker. I have used polyester spinnaker cloth, 1.3 oz silnylon and 1.9 oz polyurethane coated nylon on packs that I have made without problem.
Wherever and whenever possible try to spread out the load on as large an area as possible.
BTW if you need more material Seattle Fabrics has 200 Denier Coated Oxford on sale for $4.99/yd. Here is their product description.
"4 oz. per sq yd. 200 Denier. A medium weight nylon with a urethane coating. This fabric has a nice smooth face and because it is urethane coated, it is waterproof".
Party On,
Newton
May 31, 2011 at 8:33 am #1743095If you are on a budget I'd consider looking at ripstop fabric from Walmart or Pacific Iron and Fabric. Seattle fabric has good stuff but they tend to be on the high side price wise.
May 31, 2011 at 10:39 am #1743141Alright I finally am back at home with a little free time to share some photos of what my R&D looks likes. Below is what I think everyone was/is talking about. I took a piece of the now discarded backpack and cut up a square piece. I then sewed a similar piece behind it to layer it. Then I found some ligthweight webbing from a old pack that I tore apart and sewed that to the two pieces as well.
The below photo are my test samples. The first is just a simple straight stitch x-box. After looking at my original concept of the pack I realized I was using a stitch WAY to close and now for these tests I spread out the stitch to about 10 an inch.

And this is the back:
And this is what it looked like after I pulled on it: Note that I pulled on it more diaginal then perpendicular to the top seam. What was interesting was that the thread just ripped out rather than fabric failure. This lead me to think that I did not start or end my sewing lines correctly by knotting them.Next I used a bartack stitch for the top seam:
And last you can see the direction that I was pulling in and also how it was all constructed.The bartack stitch (I think that's what's called) on the top seam did a MUCH better job holding. I had to step on the back fabric and pull with two hands to rip off the shoulder strap. So overall, I noticed that by putting a piece of material behind the backpanel as well with a small piece of webbing that NO piece of silnylon ever ripped during my tests not even my straps. It was only failure from the thread breaking lose. This was a great test for me to see load transfer over multiple layers of 1.3oz Silnylon.
So hopefully these photos help aid those of you who are helping me. I know it can be massively confusing when just trying to write out what you're doing. Pictures are worth a thousand words for sure!
-
AuthorPosts


- You must be logged in to reply to this topic.
Forum Posting
A Membership is required to post in the forums. Login or become a member to post in the member forums!
Our Community Posts are Moderated
Backpacking Light community posts are moderated and here to foster helpful and positive discussions about lightweight backpacking. Please be mindful of our values and boundaries and review our Community Guidelines prior to posting.
Get the Newsletter
Gear Research & Discovery Tools
- Browse our curated Gear Shop
- See the latest Gear Deals and Sales
- Our Recommendations
- Search for Gear on Sale with the Gear Finder
- Used Gear Swap
- Member Gear Reviews and BPL Gear Review Articles
- Browse by Gear Type or Brand.
