Topic

My DIY tarp: lighter, warmer, much cheaper than silnylon :)


Forum Posting

A Membership is required to post in the forums. Login or become a member to post in the member forums!

Home Forums Gear Forums Make Your Own Gear My DIY tarp: lighter, warmer, much cheaper than silnylon :)

  • This topic is empty.
Viewing 23 posts - 1 through 23 (of 23 total)
  • Author
    Posts
  • #1271470
    Cesar Valdez
    Member

    @primezombie

    Locale: Scandinavia

    I have been meaning to make this DIY tarp for a while now. When I was younger I made a few that were similar, but did it while camping, not before so I could take my time and make it extra nice. They worked alright back in the day, but I wanted to make it better, and today I think I did just that. In total it cost me about 5 bucks, and took about an hour to make, and I was being very careful, you could probably do it in like 15 minutes and have a good but sloppy version of the same thing.

    All it is: 4 garbage bags, 1 space blanket, and duct tape.

    3m x 2.2m, 403g, waterproof, reflects heat, fits in a 1.5l ziplock bag.

    I can't wait to test it out. Being broke sure forces you to be creative sometimes! Here are some pics:

    #1717926
    Daryl and Daryl
    BPL Member

    @lyrad1

    Locale: Pacific Northwest, USA, Earth

    Clever.

    I love seeing things made from everyday objects.

    At first I didn't realize that the bags were opened up to create single layers. I was thinking the bags could be filled with leaves for insulation. Nevermind.

    Daryl

    #1717928
    Erik Danielsen
    BPL Member

    @er1kksen

    Locale: The Western Door

    Let's just hope it doesn't get windy!

    #1717942
    Jerry Adams
    BPL Member

    @retiredjerry

    Locale: Oregon and Washington

    I like 5 bucks

    #1717961
    Cesar Valdez
    Member

    @primezombie

    Locale: Scandinavia

    Actually, I have survived out under tarps during pretty windy conditions. Including thunderstorms, rain, and snow. Being a hybrid bushcrafter/lightweight backpacker, I use my shelter skills with natural materials to adapt to the situation and conditions at hand.

    The thunderstorm I slept through last summer, sure it was a more advanced natural shelter with a tarp on it. But about 3 weeks ago when I went out for an overnighter and slept through very windy conditions and woke up to around 3-4cm of snow, and did it using a trimmed hardware store bought tarp, plastic rope, sticks, and rocks:

    To give you an idea of how windy it was, the trees above me were bumping into each other with some of the gusts.

    So should it get windy when I try out my new tarp, I am sure I can adapt. It is not much thicker than the trimmed tarp I used last time.

    #1717997
    Jeff Brown
    BPL Member

    @northshorehc

    Locale: New England

    I think this project is very interesting. It would be great to hear how it goes.

    #1718004
    Martha S.
    Member

    @kitfox

    That looks neat — how do you stake it down and keep it from tearing in high winds? Or is it an emergency-only kinda thing?

    Thanks!

    #1718019
    Tyler H
    BPL Member

    @ctwnwood

    Locale: Madison

    Awesome idea but I too would like to see some photos of this pitched. I hope that doesn't mean I'm nominating myself…

    #1718046
    Nick Gatel
    BPL Member

    @ngatel

    Locale: Southern California

    Ceasar! How many ounces is it?

    gotcha. 14.21541

    Nice job for cheap.

    #1718052
    Theron Rohr
    BPL Member

    @theronr

    Locale: Los Angeles, California

    So how do you pitch it? And won't it just disintegrate in the wind?

    #1718219
    Cesar Valdez
    Member

    @primezombie

    Locale: Scandinavia

    Thanks for the feedback everyone!

    I am going to test it next weekend. I am going camping this weekend, but we are sleeping in an improvised shelter that is already built, so no need to bring any shelter with us :)

    But next weekend I am going out and can bring my new de-lux El Cheapo shelter.

    To get an idea of how I plan on pitching it, check out the pic I posted of my other tarp (see: above the green trimmed hardware store tarp) that I have used several times in March in below freezing, windy, typical southern Sweden weather for March. One night it got down to -8 C, and I had to break out my space blanket to put in my sleeping bag. 50 grams of great warmth, btw.

    I will either tie a rope between two trees, or build an A-frame type improvised shelter to put the tarp on top. I prefer the rope and trees, but sometimes not possible or easy to find such a sweet spot to suit those needs.

    To secure the tarp to the rope, I just get a big pinch of leaves or moss and make a button-tie on the tarp, no need for holes to tie it. To anchor it I use rocks and logs, and like I said before, it is surprisingly sturdy and wind proof. The shape of the shelter helps, and it is low to the ground too.

    I will be sure to post field test pics in the future. Cool that there is an interest. I was half expecting to be made fun of. Which would be easy. I seem to be turning more and more into a hobo. My stove is made out of an old tin can, one of my water bottles is a recycled plastic bottle, now my shelter is a bunch of garbage bags?

    Well, it's not like I am going to bring a plastic bottle of Jim Beam along with me at least….

    Wait…

    #1718257
    Daniel Fosse
    Member

    @magillagorilla

    Locale: Southwest Ohio

    Sorry, I don't get it. Is the goal to make a kit out of stuff around thehouse? If so, then that's a neat concept. If not then why wouldn't you just use a plastic drop cloth from the hardware store? You could eliminate all those seams. At least you could use packing tape for the seams. It's lighter and likely just as strong. In fact I would think the bond between the packing tape and plastic is stronger than duct tape.

    Is the mylar reflector really efective? Why not make the entire tarp from a single section of mylar? I'm not bashing your idea, I'm genuinely curious about all these things.

    #1718521
    Diane “Piper” Soini
    BPL Member

    @sbhikes

    Locale: Santa Barbara

    When I was hiking the PCT I bought a garbage bag for 25 cents from the lady at the Kracker Barrel in White's Pass. I used it for a pack cover. The next section of trail was extremely overgrown and I was constantly rubbing up on overgrown brush and small fir-trees growing into the trail. The bag never got so much as a scratch on it. They make those things so you can put yard waste and maybe even broken glass in them. I'll betcha a garbage bag shelter has the potential to be quite durable, so long as you can find an effective way to tie it off. The pebble in the corner method might work, but also the material is sort of slippery so it might just slip its way apart. Should be an interesting experiment. I'm looking forward to the report.

    #1718616
    Franco Darioli
    Spectator

    @franco

    Locale: Gauche, CU.

    That "cord in between trees" (pup tent style) bit I think is the way to do it because it distributes the stress all along the top and the bottom. If you set it up A frame (with sticks) or any of the typical tarp set ups (corner pull out) I would imagine it will tear the plastic apart pretty fast.
    Franco

    #1719673
    Cesar Valdez
    Member

    @primezombie

    Locale: Scandinavia

    @ Daniel:

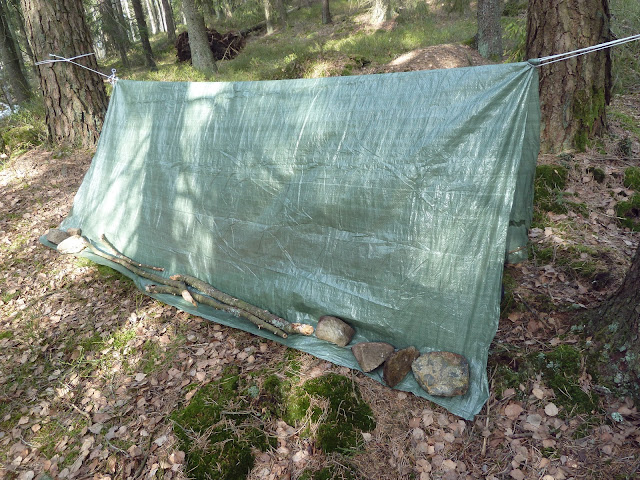
    The goal was/is to make a lager and better tarp for my shelter for camping as a broke full time student and father. I can't afford silnylon or any of those other fancy tarps. For over a decade I have used the humble hardware store bought cheapo plastic tarp, and that was what I used on my last solo camping trip (see: above, the pic of the green shelter) and it worked great even though a mild snow storm.

    The new shelter I built is bigger than my green tarp, lighter, and with the space blanket also adds extra warmth and insulation from wind/water should there be say, a small hole or rip in the garbage bag.

    I actually had planned on making another shelter, this was just my first run before I could find the clear plastic. But I finally found the clear plastic and this week will be making the UL version of the Super Shelter. And yes the space blanket really is effective, I love the stuff. For inside sleeping bags and for shelters mainly, but can also be used for singaling too.

    Check out this video to see the kind of shelter I aim to have:
    http://www.youtube.com/watch?v=EvKLOMgtM1Q

    And thanks for the tip on clear plastic tape, I made sure to pick some up! :)

    @ Piper:

    Thanks for the feedback, good to know that others have also used garbage bags and seen how tough they can be. I am conflicted about doing my shelter half garbage bag, half clear plastic or all clear plastic. The garbage bags are tougher and would provide some better shade, but the clear plastic would allow for more radiant heat to pass through like the sun or a campfire, plus it is also lighter I think.

    We'll see, I am leaning towards doing an all clear plastic. I will test out both this coming weekend. I am going with my camping club from my university, so there will be some good guinea pigs to help test things out. I think the all garbage bag with a centered space blanket is good for a solo trip with either a small or no campfire for warmth (relying more on sleeping bag and clothing for warmth). But I often go out with groups and we have a big campfire, in which case the clear plastic with the space blanket on one side would be good for warmth. Plus you can see what is going on outside your shelter too.

    @ Franco:

    Good tips, thanks, but keep in mind that you can do improvised shelters with only one stick (a sturdy ridge pole). You just tie it to one tree and then have the other end lean on the ground or a log or something to form a triangle type shelter. Just make sure to trim the stick so that it won't damage the tarp. As a hybrid bushcrafter / lightweight backpacker, I always have either a good knife, a good axe, or both, so this is not a problem for me. But I could imagine that a more resourceful and die-hard UL person could find the right kind of rock and smooth out a ridge pole, with much more difficulty and time, however.

    #1720784
    Cesar Valdez
    Member

    @primezombie

    Locale: Scandinavia

    Okay, as I said in my last post I got my hands on some clear plastic, and last night made another tarp with it and modified my other tarp by adding two squares to use as doors on each side.

    With doors the garbage bag shelter is 502g.

    I used space blanket to make doors for the new clear plastic shelter. Total it weighs 344g (including doors), measures 2.5 meters long and 2 meters wide.

    Going with a group for any overnighter this weekend and will be sure to take pics. I will be sleeping in the clear plastic one near the campfire, a friend will be sleeping in the garbage bag one away from the fire.

    In total I have yet to spend more than 10 bucks on everything. Granted, these tarps are more fragile than other ones. But for the price and time it takes to make, plus how light weight it is, I think it is a good option, even for a thru-hiker. Everyone has duct tape and plastic bags with them, so repairs are no problem on the trail. Then once you get into civilization again, all supermarkets have garbage bags and most hareware stores have clear plastic.

    Looking forward to testing them out!

    #1722684
    Cesar Valdez
    Member

    @primezombie

    Locale: Scandinavia

    Got a chance to test out both of my shelters. A friend tested the garbage bag one away from the fire, and I tested my UL super shelter next to the fire.

    The clear plastic and space blanket worked much better than I thought. I went for a simple tripod and ridge pole that I made sure to smooth down with my axe so it would not get ripped up.

    It was about 2-3 degrees C at night, but getting inside I would guess it was around 15-17 degrees. I feel asleep on top of my sleeping bag and was very comfy. I woke up three hours later when the fire died and it had cooled down, but I just got inside my sleeping bag and slept very well. After I got out when I woke up at dawn, I did notice that it was warmer inside than outside, even without any fire, though not by much. There was no condensation at all.

    I am definately going to use this shelter again. Cheap, easy to set up, water proof, and gets very warm with a fire near by. The down side is that to keep it warm you have to have a fire going all night. I guess if you pile on a bunch of thicker logs right before you go to sleep, that might work for a while.

    My friend told me the garbage bag shelter was good. Easy to set up, warmer inside, and he said he was surprised how well it kept wind out. It did get a few small holes in it from logs he used to weigh the tarp down (he didn't have an axe). But no big deal, they were down low and can be easily fixed up with some duct tape.

    Hope this helps! Let me know if anyone else tries this out.

    #1722700
    Hoot Filsinger
    BPL Member

    @filsinger

    Locale: Pacific Northwest

    This is what I used in the 60's and 70's — Very versatile.tubetent

    #1722714
    Michael Ray
    BPL Member

    @topshot

    Locale: Midwest

    Cesar,
    You may find some useful info in this thread.

    It appears in your pitches there's very little tension, but if you do try one that way, you'll need to add appropriate tape to the edges to prevent stretching.

    #1722731
    Justin Nelson
    BPL Member

    @jnelson871

    Locale: CA Bay Area

    Absolutely brilliant! I really like the Mylar insert idea. I will have to keep that in mind if I decide to take a shot at making my own tarp.

    #1722741
    Cesar Valdez
    Member

    @primezombie

    Locale: Scandinavia

    @Michael:

    Thanks for the link. Wow, dude, you really took this idea to a whole other level. I admire you, I really do. But I don't see myself jumping into the rabbit hole on this project. Just wanted simple, easy, cheap, effective–and I think I got it. The tension thing I am not sure what you mean. There was pleanty of room inside, and if there is any stretching, no biggie, I can either repair it with some tape or make a new one in like 15 for less than 5 bucks (or even cheaper if I re-use the space blanket).

    The other thing is that I have a Big Agnes FCUL1, which I plan on using a lot too. But for some trips, I like to go with a tarp, so my clear plastic UL super shelter is my new go-to tarp.


    @Justin
    :

    Thanks brother! Glad you like it. You should build your own tarp, it's just too easy and cheap to pass up! I now have a 20m roll of this clear plastic, and can pick up a space blanket anytime. I like finding the right spot between two trees, so throw some rope in there and that's it. If there are no trees, this presents some challenges, however…

    #1722749
    Michael Ray
    BPL Member

    @topshot

    Locale: Midwest

    > The tension thing I am not sure what you mean

    When you pitch a normal backpacking tarp, you aren't just letting it hang on a ridge line as you did. You have guylines pulling out the ridgeline and corners and sometimes side guys. These all are putting tension on the tarp material to get a taut (sometimes referred to as tight) pitch. If you do that with trashbags, they will stretch over a short period of time. However, if you reinforce the areas with tension with duct tape (3M 2120 is 6x UV resistant), the stretching is eliminated (until you reach the breaking point of the tape) and the same tarp will last far longer (barring any other issues).

    Mine was also quite simple to make. Adding the mesh for the buggy area I was going is what took a lot of time. That made the cost higher (maybe $20 total) but it was still MUCH cheaper than silnylon.

    #1759336
    Cesar Valdez
    Member

    @primezombie

    Locale: Scandinavia

    I always wanted to devote more to my shelter, so I finally set it up in my backyard, took more pics, and just put up a long post on my blog if anyone is interested: http://cesarandthewoods.blogspot.com/

    I also improved on the design some, like sturdier doors with easy-attaching loops. Plus I also replaced my 70g rope with some sturdy plastic string, and it works just as well. The rope I forgot to include in the OP, but anyhow now the whole thing plus string is 434g, so I was able to just about break even with adding more to the doors while going for lighter ridge line.

    In a few weeks I am planning on doing a SUL overnight with an even lighter version of this shelter, which lacks space blanket or doors, and clocks in at 250g (it's just plastic sheeting and a rope). I will be sure to document it, as it will also be my first SUL trip.

Viewing 23 posts - 1 through 23 (of 23 total)
  • You must be logged in to reply to this topic.
Forum Posting

A Membership is required to post in the forums. Login or become a member to post in the member forums!

Get the Newsletter

Get our free Handbook and Receive our weekly newsletter to see what's new at Backpacking Light!

Gear Research & Discovery Tools


Loading...