Topic

My New XPAC Pack


Forum Posting

A Membership is required to post in the forums. Login or become a member to post in the member forums!

Home Forums Gear Forums Make Your Own Gear My New XPAC Pack

  • This topic is empty.
Viewing 25 posts - 1 through 25 (of 38 total)
  • Author
    Posts
  • #1270787
    John Donewar
    BPL Member

    @newton

    Locale: Southeastern Texas

    Chris Zimmer has inspired Terry Trimble and myself to go and make new packs.;-)

    Once I saw Chris's packs made using the XPAC material I knew that I had to make one. I stuck with my old method of attaching the shoulder straps that I learned from Jay Ham's article on Five Yards to SuperUltraLight Part 4, Pack.

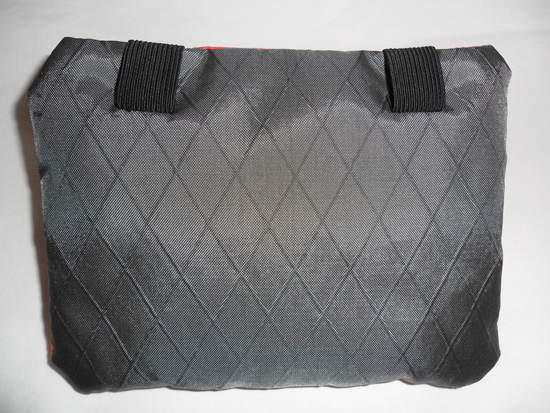
    The straps are captured in the seam between the orange material and the grey material. Everything is then stretched out flat and the seam allowance, shoulder strap, haul loop and Y strap ends are all top stitched. If you look really close you'll see the top stitch running between the ends of the haul loop. You can also see the box stitching that I did to the ends of the shoulder straps, haul loop and Y strap webbing.

    Shoulder Straps attached ala Jay Ham

    I used Leno mesh for all of my pockets. On my last pack I went to great lengths to make sure that all the pack pockets would drain if I were caught in a storm. The last pack used silnylon for the pocket material. With the Leno mesh I don't believe I'll have any problem with my pack pockets draining.;-)

    Pockets, Shockcord & Y Strap

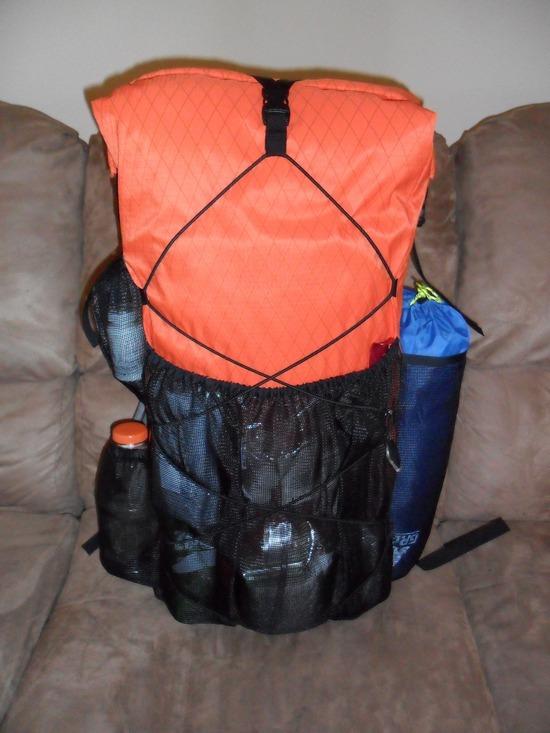
    My tarp, bivy, stakes and pillow are all packed in that blue cylindrical stuff sack on the deep right side pocket. There is no need to go into my pack anymore if I'm setting up my shelter in inclement weather. The other pockets hold my FAK, water treatment and assorted other gear.

    I used the same type of roll down top closure for this pack as I did in my last pack.

    Side View of Roll Down Top Closure

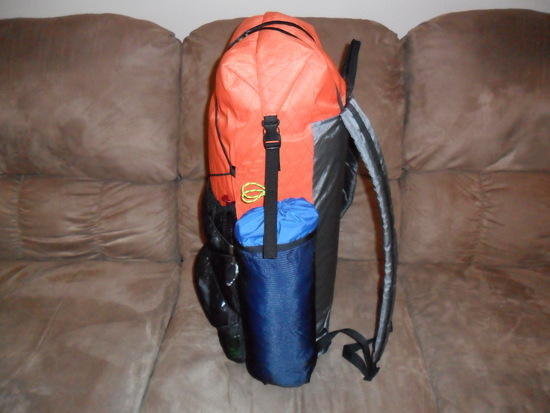
    The roll down closure is reinforced on one side with a 3/4" wide sewn in plastic strip that has 1/4" holes every 1/2" for lightening. The other side is "stiffened" slightly with a piece of 3/4" grosgrain that also holds the side release buckles on the ends of the closure. Nothing like dual use.;-)

    The side release buckles on the closure are adjustable to help cinch the top down along with the Y strap. The Y strap also has a 3/4" side release buckle that is non adjustable but is attached to the crisscrossed shockcord. The tension on the shockcord keeps the Y strap tight.

    All of the pockets but one have elasticized tops. The tent pocket is simply hemmed at the top using 3/4" grosgrain. The two smaller pockets use 1/2" flat elastic but the large main pocket uses 1/8" shockcord for the elastic. It is encased in 1" grosgrain.

    Side View of Small Pockets and Roll Down Closure

    I recently did a shakedown overnighter to check out my gear and found that while completely adequate and usable my 4.90 ounce SUL pack was a little bit of a challenge to repack in the field. The spinnaker and silnylon shell simply doesn't have much "body" when empty. Also the material is prone to siding down as I'm trying to pack up. This was my one of my reasons for sewing up this new pack.

    My New XPACk weighed on my digital scale

    I was aware that I would never get a 4.90 ounce pack out of this new material. A pleasant surprise greeted me when I rolled up my new pack and weighed it on my digital scale. It weighed in at 16.85 ounces. So I gained 11.95 ounces and a "stand up" heavier duty pack.

    The main body of the pack works out to a volume of approximately 1660 cubic inches or 27 liters. As near as I can figure the pockets add up to 761 cubic inches or 12 liters. So my total volume adds up to 2421 cubic inches or 39 liters.

    Most of the webbing is 3/4" medium weight nylon. The Y strap and its attachment to the shockcord is 3/4" light weight nylon.

    Yet to come is a sternum strap with a chest pocket for my camera and cell phone. Also I'll be adding a couple of no-see-um shoulder strap mounted water bottle carriers for those of you who thought I'd die of dehydration with just that one water bottle.;-)

    This pack isn't hydration reservoir compatible as I have tried using them and found that they are just not my style.

    I still have some odds and ends to clean up. I will be trimming the webbing on the shoulder strap adjustments and making the water carriers and sternum strap that I spoke of earlier. Also in the works is a removable padded hip belt that will be able to slip in or out of that "hip belt slot/loop" at the base of the grey XPAC material.

    BTW I didn't get a picture of it but the bottom of the pack is black 500D Cordura.

    Party On,

    Newton

    #1711654
    Terry Trimble
    Member

    @socal-nomad

    Locale: North San Diego county

    John,
    Really nice pack you made I like how compartmentalized the netting side pockets, I have always like the rolled down top design just never been brave enough to attempt it. You will really like the Xpac fabric verse the sil nylon.
    Terry

    #1711692
    John Donewar
    BPL Member

    @newton

    Locale: Southeastern Texas

    Thanks Terry,

    It's funny that you mention compartmentalized pockets. They turned out looking that way in the pictures but they are not really sectioned off as they appear to be in the pictures.

    All of the pockets have pleated bottoms. The pleats are folded in towards the center on all four of the pockets. Because of the location of the pleats, the particular pieces of my gear and where it is placed in the pockets it does give the illusion that they are compartmentalized.

    I was new to working with the Leno mesh. It was an accelerated learning curve. I was in kindergarten on the main pocket, junior high on the shelter pocket, community college on the water bottle pocket and I got my degree by the time I finished the FAK pocket.;-)

    Party On,

    Newton

    #1711962
    Christopher Zimmer
    BPL Member

    @czimmer

    Locale: Ohio

    John, great looking pack! I like the roll top design you used on this pack it looks great. Love the colors of the pack! Where did you get the Leno mesh from, and how do you like the material for pockets? Very nice job and thanks for posting the pictures!

    #1712054
    John Donewar
    BPL Member

    @newton

    Locale: Southeastern Texas

    Thanks Chris,

    The Leno mesh is from Quest Outfitters. As far as this material goes for pockets it is very soft and drapable. You have to be very careful when doing your layout because it has no resistance to being moved around. Don't expect to cut "inbetween" the fibers parallel to your cut line. A straight line seems to cross over multiple fibers/threads.

    Expect to hem the edges with at the very least 3/4" if not 1" grosgrain. If elasticizing the edges of the pockets I recommend 1/2" flat elastic and silnylon or any other material of your choosing for the hem/elastic channel. The bottoms of all the pockets are pleated and stitched to the pack body with a piece of 3/4" grosgrain sewn over the mesh creating a mesh sandwich. Grosgrain first, mesh second and then the Xpac fabric. The mesh would ravel badly if sewn by itself IMO.

    The vertical seams of all the pockets are trapped in the vertical seams of the pack body. These are all sewn with two parallel seams using 1/2" seam allowances.

    I'll add some pictures of the closure and pack"s 500D Cordura bottom soon.

    I neglected to mention that the shoulder strap padding is cut from a CCF, 3/8", sleeping pad.

    Party On,

    Newton

    #1736071
    Michael Bachman
    Member

    @rivrfox

    Locale: Western Slope, Colorado

    Badass. How's it carrying for ya?

    #1736082
    John Donewar
    BPL Member

    @newton

    Locale: Southeastern Texas

    Michael,

    Thanks.

    "I still have some odds and ends to clean up. I will be trimming the webbing on the shoulder strap adjustments and making the water carriers and sternum strap that I spoke of earlier. Also in the works is a removable padded hip belt that will be able to slip in or out of that "hip belt slot/loop" at the base of the grey XPAC material.

    BTW I didn't get a picture of it but the bottom of the pack is black 500D Cordura".

    It carried really well with a full load of what I carry for a week long trip, < 25 pounds.

    I made the water bottle carriers for the shoulder straps from 1/8" shock cord and cord locks similar to the style on ULA packs. I did make a hip belt for it. I used the grey Xpac fabric with some 3/8" foam from an old sleeping pad and bound the edges with some 1" grosgrain ribbon.

    I also added the Most Awesome Sternum Strap in the World from MLD. ;-)

    Work has been crazy busy lately. I plan to post some pictures of the additions and the bottom fairly soon.

    Thanks again.

    Party On,

    Newton

    #1742084
    Kyle Crawford
    Spectator

    @getupandgo

    Locale: SouthEast

    Man, I am diggin' that. Nice work!

    #1742229
    John Donewar
    BPL Member

    @newton

    Locale: Southeastern Texas

    Thanks Kyle.

    As soon as my work schedule frees up I will post some more detailed pictures as promised.

    Party On,

    Newton

    #1742999
    Sam Farrington
    BPL Member

    @scfhome

    Locale: Chocorua NH, USA

    John,
    That is amazingly light for such a sturdy pack made with Xpac, and a cordura bottom no less. Never would have believed it could be done until your post. Thanks.

    P.S. Care to share more info about the weight and sourcing of the Xpac?

    #1743037
    John Donewar
    BPL Member

    @newton

    Locale: Southeastern Texas

    Hi Sam,

    Not a problem and thank you for the good words.

    Here is the link to Rockywoods where I obtained my XPAC fabric.

    The fabric weights are variable, "Nominal, Fabric Weight : 4.9-5.5 oz per sq yard".

    I haven't weighed a sample of each but it seems that the Dark Grey is the heavier of the XPAC fabrics that I have handled. Keep in mind that I have only handled the Bright Orange and Dark Grey. Others on this forum have made similar comments about the weight of the grey fabric but just who and when escapes me. ;-?

    I'll do a little searching and see if I can find that similar post.

    If you are interested in seeing and handling some XPAC fabric I have some leftovers and cutoffs that I can cut out some samples from and send them to you. If you are interested PM me with your address and I'll get those out to you.

    Party On,

    Newton

    #1743040
    John Donewar
    BPL Member

    @newton

    Locale: Southeastern Texas

    Sam,

    I found info that I spoke about in my earlier post. Here is the link to that post on another BPL thread covering the same subject.

    Here is part of the post on that thread.

    "Rockywoods' XPAC appears to be VX07 70 denier based on their weight claims. Does the grey and lime green fabric feel like the same weight?
    The green xpac feels lighter then the grey, The green looks like it has a 70d ripstop for the top layer, where the grey is not ripstop, and feels heavier and stiffer, which i like for the bottom and back of the bag. I do want to try some of there red and orange xpac, I hope it is like the green."

    BTW work has slowed down to the point where I'll be able to post the other pictures of the pack showing the pack bottom, water bottle carriers, hip belt, sternum strap and cell phone / camera chest pouch that I have added lately.

    Party On,

    Newton

    #1743461
    Sam Farrington
    BPL Member

    @scfhome

    Locale: Chocorua NH, USA

    John,
    Thanks for all that info about the XPAC material from Rockywoods. Think I will order some of the green to check it out, and maybe use it for my next pack. Roger Caffin has posted that he is using it for packs now. Was going to use a silicone coated 1.9 oz nylon I got from Warmlite that is a little nicer than the stuff from Seattle Fabrics, because it has one side that does not have the shiny silicone finish. Have been using it for stuff sacks for several years, but it does eventually lose its total waterproofness. Also had considered nylon with the Dynema (excuse spelling) grid, or maybe even the pure Dynema that McHale was selling.

    But if you can get a pack that light with the XPAC, it has to be considered. The thicker mylar coatings did extremely well on Richard's recent water testing thread.
    Am not ready to go to frameless, but will enjoy the just arrived articles about frameless packs on BPL, and maybe learn something. Am trying to figure out how to get half inch carbon fiber, in the range of diameters seen on hiking poles, into a wicket shaped frame that will contour to the back. Probably with elbows made of aluminum alloy that can be bent on a tube bender. Not sure. Roger has made whole pack frames from Easton alloy tube the size of tent poles – 8-9 mm – described in the FAQ/DIY section of bushwalking.org. With that stuff, there are good T connectors available from Goodwinds Kites that work perfectly for crossbars. The trick is to bend the highly tempered tubing without heating it, which destroys the temper. Roger created a great gizmo to do this (no surprise there) using large diameter plastic rollers like might be used for clothes line or something. It can be done, and at 8-9mm, would probably be just as light (strong?)as larger diameter carbon, and would hold a mesh backband fully taut without collapsing in use. I have this thing about suspended mesh backbands because of their comfort, but they require some kind of a frame for sure.

    Anyway, thank you for giving me a much better understanding of the XPAC.
    And it is a very beautifully crafted pack, BTW.

    #1743507
    John Donewar
    BPL Member

    @newton

    Locale: Southeastern Texas

    Sam,

    Thanks Sam. I hope to be a little old pack maker when I grow up.;-)

    "Roger has made whole pack frames from Easton alloy tube the size of tent poles – 8-9 mm – described in the FAQ/DIY section of bushwalking.org."

    8-9 mm is hovering right around the 3/8" mark. I am familiar with bending tubing. There are many ways to accomplish this task. There are spring type benders that are slid over the exterior of the tubing to support the tube wall while the bends are made. You could fill the tubing with sand or a similar media and plug or tape the ends. You then bend as desired and finally empty the tubing of its filler. There are also dedicated tubing benders that can be gotten from hardware stores, automobile parts distributors and refrigeration supply houses. I have a set which is made from a high strength plastic that would be used for refrigeration tubing which is copper. McMaster Carr and possibly Harbor Freight could probably supply you with a set of 3/8" steel tubing benders that would do the trick and last forever.

    Remember that the trick is to support the walls of the tubing while the bending is being done.

    "With that stuff, there are good T connectors available from Goodwinds Kites that work perfectly for crossbars."

    I bend tubing on a regular basis and you can get relatively short radius bends in hard tubing that "could" eliminate your need for the T connectors. You would end up with something similar to the frame hoop that Gossamer Gear uses in their packs.

    There is nothing wrong with comfort! ;-)

    Party On,

    Newton

    #1743522
    John Donewar
    BPL Member

    @newton

    Locale: Southeastern Texas

    Sam,

    Here are a couple of examples of the tubing benders that I was speaking about. Just copy and paste the links to get a visual.

    http://www.harborfreight.com/tubing-bender-3755.html

    http://www.amazon.com/Superior-Tool-Spring-Bender-61600/dp/B000S8EXD4

    If you go with the Harbor Freight item just remember that the R and L on the benders corresponds to which side of the bender the measurement that you want to end up with is on.

    For example, if you make your first bend and want a 12" length after making the second bend follow these steps.

    Measure from the outside edge of the tubing that is at a right angle to the piece being marked.

    Make the 12" mark on the tubing to be bent. If the length that you want to "keep" is to your left put the mark you made in line with the L on the bender. If the length you want to "keep" is to your right line up your mark with the R.

    It's simple after a few trys. Doing it this way what you will wind up with is a finished piece that measures 12" from your outside edge of the first bend to the center line of the second bend.

    With 3/8" tube if you want your finshed piece to be 12" overall reduce your measured and marked length by 3/16" to 11 & 13/16" and your "hoop or wicket" should be 12" or very close to it when measured outside edge to outside edge.

    9 mm is very close to 3/8".

    Good luck with your project. Please post some pictures as you make progress.

    Party On,

    Newton

    #1743643
    John Donewar
    BPL Member

    @newton

    Locale: Southeastern Texas

    Sam,

    "Roger created a great gizmo to do this (no surprise there) using large diameter plastic rollers like might be used for clothes line or something".

    Can you post a picture or a link to a picture of Roger's tubing bending gizmo?

    I searched all over the bushwalking.org site and couldn't find it.

    Thanks

    Party On,

    Newton

    #1743815
    Sam Farrington
    BPL Member

    @scfhome

    Locale: Chocorua NH, USA

    John,
    The best tube benders I know of are the Ridgid brand, but they are quite expensive. Years ago, I bought 3/8" and 5/8" ones when they were relatively inexpensive and I was making all kinds of stuff out of 5/8" ski poles or Jansport tubing or 3/8" tent pole tubing. Have also bought cheaper ones from the mail order tool companies for use on other diameters.

    The problem with all of them for something as highly tempered as the Easton tent pole tubing is that the radius of the bends is not large enough to bend the tubes without splintering or at least weakening them.

    Roger calls his gizmo a Rolling Jenny, and it makes a very high radius bend with repeated passes. Suggest you email him at [email protected], and he may be willing to send you a photo. Right now he is probably buried in testing the oodles of fabric samples Richard sent him, not to mention his upcoming articles, and of course, he likes to get out now and then. I am spread pretty thin myself right now, so know how it feels. What ever happened to the retire in retirement?

    After my last message to you, I decided that the best way to make a frame for a suspended mesh backband might be to use a tent pole hub such as can be bought from FibraPlex. They sell undrilled blanks, so you can put the holes where desired on the perimeter. Instead of carbon tubing, I would use solid carbon rod, also available from the kite folks, and get just the right stiffness to bend or bow enough to hold the four corners of a mesh trapezoid back panel extremely taut. If the carbon were too stiff, there is also the 1/4" fiberglass rod that is common for flying pennants. For the outer ends of the rods, I would probably use the pole receptors I use for carbon tent poles. The receptors are made by taking apart a swivel hook, and using the bottom half that takes 3/4" or 1" webbing or tape. There is a photo of one in my XX tarptent April MYOG post. These would accept the ends of the rod, as well as grosgrain or twill tape sewn to the corners of the mesh trapezoid. This would be a pretty sturdy frame and very light. My only concern would be whether the acetal receptors would hold up. Of course, one can always sew sleeves of heavy fabric, as Jansport and many others used to put into their packs to hold the ends of aluminum stays; but that approach doesn't appeal to me for a number of reasons. I have some fairly heavy duty 1" swivel hooks that might work well for this application.

    The purpose of T connectors would be to secure crossbars on a ladder shaped frame; but as you can see from the above, I'm now thinking of something different. If you want to see an idea for a potentially cool mesh backband, go to a Subaru dealer and look at their mesh back rests. Of course you could also just look at the back of an Exos or similar Osprey pack to get ideas.

    Hope this is helpful. Please let me know at [email protected] if Roger doesn't have the opportunity to send you pix of his Rolling Jenny, and I will ask him for permission to do so.

    #1743895
    John Donewar
    BPL Member

    @newton

    Locale: Southeastern Texas

    Sam,

    I read a post by Roger on another similar thread where he suggests googling "Jenny" to see a picture. I did that and saw a very professional looking piece of machinery and got a very good understanding of what it is and how it works. I understand how the shorter radius of normal tubing benders wouldn't be an ideal solution for your application.

    I may email Roger as you suggested at a later date. Right now 6061 thin wall aluminum tubing will satisfy my requirements for a removable stay type "hoop or wicket". I'll be cruising the kite shops for some sort of rounded end cap or plug for the open end of the tubing prior to any actual work being done.

    A Chris Zimmer pack with this feature has my MYOG juices flowing again.LOL

    I'll check out your XX tarptent post later today as I am not retired as of yet and I have to scoot off to work.;-)

    Thanks again

    Party On,

    Newton

    #1744831
    John Donewar
    BPL Member

    @newton

    Locale: Southeastern Texas

    As promised long ago here are the pictures of the bottom and additions to my XPAC pack.

    The 500D cordura bottom is shown in this first picture.

    500D Cordura bottom

    The idea was to add some toughness to the bottom of the pack. Looking back the grey XPAC fabric could quite possibly been as tough or tougher on the bottom. Anyway I still like the looks of it. It's hard to tell in the pictures but the bottom of the pack wraps upwards in the front and the back of the pack about 1.25".

    The easiest addition that I made to this pack was the water bottle carriers for the shoulder straps. They are patterned after the ones on the ULA – Ultralight Adventure Equipment packs.

    Water Bottle Carrier Bungees

    They are made with 1/8" shockcord and plastic cordlocks/toggles. The shockcord is threaded underneath the webbing on the shoulder strap, around the bottle, through the cordlock and then knotted with a simple overhand knot. The ends of the shockcord are singed to prevent fraying. Simple, almost weightless and now my water bottles are always within easy reach.

    BTW the bottles are recycled from empty Shurfine or Great Value peanut "jars". They have just the right size, ridges and mouth openings for use as an UL water bottle.

    My hip belt was made using grey XPAC fabric, 1" grosgrain ribbon and 3/8" CCF foam from and old sleeping pad.

    XPAC Pack Hipbelt

    The edges were bound using the "stiff" grosgrain. On future packs I'll be using the softer grosgrain from Quest Outfitters for this application.

    I chose the easier to use, IMO, forward pull method of hip belt adjustment. The webbing is anchored at the bottom of the hip belt, threaded "loosely" through the side release buckle and then threaded through the ladderlock which is sewn onto the top of the hip belt. I snap the buckle together and then grasping both adjustment straps, pull forward to tighten the belt. I used 1" hardware and webbing on the belt adjustment.

    The sternum strap is from Mountain Laurel Designs and is the Most Awesome Sternum Strap In The World.

    MLD Most Awesome Sternum Strap I.T.W.

    I can make my own but it is so hard to improve on perfection! I particularly like the plastic hardware on the ends. It is very good looking, light and removable.

    My final addition was the cell phone / camera chest pouch / pocket.

    Cell Phone/Camera Chest Pocket

    I used some #5 waterproof zipper from Quest Outfitters, some orange and grey XPAC along with some 3/4" elastic for the pocket. I removed the metal zipper pulls from both sides of the double sided slider and replaced it with a piece of Kelty Triptease and plastic zipper pull cord end.

    Rear Chest Pocket Detail

    The pocket rides on the sternum strap. The sternum strap is threaded through the elastic on the rear of the pocket and then re-threaded through the buckle of the sternum strap. I can release the buckle of the sternum strap and not have the pocket slide off. My camera is now quickly and conveniently accessible.

    Now bring on the AT this Sept/Oct.;-)

    Party On,

    Newton

    #1744864
    Rob Hubbard
    Member

    @robwa10

    Locale: England

    Newton

    As with the rest of the pack the additions are excellent!

    You were right in my last post as well, currently deciding on and ordering materials for the next pack.

    #1744931
    John Donewar
    BPL Member

    @newton

    Locale: Southeastern Texas

    Hello Rob,

    Thanks for the kind words.

    "Will wear it for a year or two to get an idea of what I really want in a personalized pack." 5/24/2011

    "Been thinking about the next backpack I'll make at some point. Newton stop laughing to yourself and saying I told you so ;p." 5/26/2011

    "…currently deciding on and ordering materials for the next pack." 6/4/2011

    Rob, I'll give you the benefit of the doubt. I'll only remember that you said that you would wear it for one year. I will say that you made it 12 whole days. Remember that you are not alone!

    The following is copied and pasted from the bio on my BPL profile.

    "Bitten by the hiking bug in 2008. The "infection" persists and I am not in search of cure. :-)
    Reinfected by the MYOG bug in 2009 and I am still not in search of a cure. :-)
    If I am not hiking I am reading about it or working on my gear.
    Became a BPL Lifetime Member 5/1/11."

    I placed an order for materials for a new pack just this morning. ;-)

    You are not alone!

    I will only wink and smile a little knowing all to well what it is like. ;-)

    Party On,

    Newton

    #1744942
    Terry Trimble
    Member

    @socal-nomad

    Locale: North San Diego county

    John,
    You did some really great addition to your already great looking pack it will be bomb proof now. Making packs is really fun creative hobby of functional 3D fabric sculptures and you learn new things with each one you make.
    Keep on sewing,
    Terry

    #1744950
    John Donewar
    BPL Member

    @newton

    Locale: Southeastern Texas

    Hi Terry,

    I appreciate the kind words.

    "I really like your accessory pocket roll top closer idea I am going to use it on some pockets on a pack I am working on."

    "Making packs is really fun creative hobby of functional 3D fabric sculptures and you learn new things with each one you make."

    So where are the pictures of your latest 3D fabric sculpture? ;-)

    Party On,

    Newton

    #1745902
    Jamie Shortt
    BPL Member

    @jshortt

    Locale: North Carolina

    Newton, I missed this thread first time around. Nice job with the pack. I like everything about it. Top closure looks great! side pocket configuration is perfect, two smaller side pockets has me thinking. The xpac material looks solid as a rock.

    Great job and PARTY ON!

    Jamie

    #1745983
    John Donewar
    BPL Member

    @newton

    Locale: Southeastern Texas

    Jamie,

    Thank you very much for the compliments.

    I've got more fabric and supplies on the way for another pack that I have in mind.

    I really like my XPAC pack but I am going to make another one with a removable internal frame / stay for my brother-in-law. I'm "outfitting" him and my 14 year old nephew for an AT hike in Sept / Oct of this year. I really enjoy making packs and outfitting these two gives me a valid excuse to do it. ;-)

    Thanks again

    Party On,

    Newton

Viewing 25 posts - 1 through 25 (of 38 total)
  • You must be logged in to reply to this topic.
Forum Posting

A Membership is required to post in the forums. Login or become a member to post in the member forums!

Get the Newsletter

Get our free Handbook and Receive our weekly newsletter to see what's new at Backpacking Light!

Gear Research & Discovery Tools


Loading...