Topic

MODEL YOUR MYOG DESIGNS IN 3D – SEE FABRIC STRESS – COOL SOFTWARE!!


Forum Posting

A Membership is required to post in the forums. Login or become a member to post in the member forums!

Home Forums Gear Forums Make Your Own Gear MODEL YOUR MYOG DESIGNS IN 3D – SEE FABRIC STRESS – COOL SOFTWARE!!

  • This topic is empty.
Viewing 10 posts - 26 through 35 (of 35 total)
  • Author
    Posts
  • #1698800
    Andrew Schriner
    Member

    @lettheguydance

    Locale: Midwest

    Roger – not exactly. You could achieve what I would think would be a close enough match though in two ways:
    1. Line up the pattern in the window on the grid, and use the gridlines to measure your special fancypants curve.
    2. Export a figure describing your shape from the spreadsheet program you're using, and then choose that image in Marvelous Designer as the "texture" for a rectangular pattern block of the same size as the image. Then use the regular pattern creation tools to trace the shape as closely as you can.

    Jerry – too funny.

    #1698866
    James DeMonaco
    BPL Member

    @jdemonaco

    Locale: PNW

    I do 3D modeling and texturing professionally and am really interested in this (as I also want to get into MYOG sewing projects) but I might have to burst some bubbles here.

    Those "patterns" on the right side of the screen, are not patterns at all. They are called "UVs" and they are how we flatten 3D models so that we can add 2D textures to them. Although they can sometimes be proportional to how the clothing (or anything you model) really is, such as how a sewing pattern is, this is almost never the case and these UVs are almost always warped.

    Even in some of the examples posted, you may notice that the patterns really don't make much sense when you look at them compared to the model themselves. This is because it is often beneficial from a texturing standpoint to warp these UVs and lay them out in a way that makes sense for texturing. That could be scaling them, rotating them, or full on distorting them.

    What this basically means is, those "patterns" you see on the right, aren't actually patterns at all, not like you would use for sewing anyways. If you tried to use them as guides to sew a project, I'm sure you would end up with a project that doesn't quite fit.

    I could be wrong, and there could be a way for you to project the UVs as they are in real space, but looking at those UVs in your screen shots and watching the videos on their site suggests to me that they are indeed UVs and not patterns.

    Just food for thought :)

    #1699000
    Brian Austin
    Member

    @footeab

    Locale: Pacific Northwest

    Sorry guys, if you use that software to design your clothes/tents and then sell said product you will most likely be violating said licsensing agreement. That $99 package is for LEARNING ON IT. Just like every other CAD program out there. They have the free trial, followed by the learning package, followed by the real deal. They will all sell you a $99 "learning permit", but if you actually want to make a product with it and sell said product you have to buy the $3000 program officially.

    Since this is a cottage industry and you probably won't sell gobs of product, you could probably get away with it. For anyone building clothes, tents for themselves it is perfectly acceptable to use said program.

    Then again, some basic featured programs have been migrating down to the common joe, so maybe. I would be very leery of using said program though. I would defintely read the agreement before selling product though.

    Sorry to rain on your parade, but be forewarned if you start to sell quite a bit of gear and those who create said program find out about it, you will be buried in IP lawyers in short order.

    I do note you typed betaversion…

    #1699094
    Andrew Schriner
    Member

    @lettheguydance

    Locale: Midwest

    Addie, thanks for changing the thread title!

    Jerry, here are some tarp models re your request. I think this is actually somewhat instructive and I'm glad you asked.

    So here's what I did:
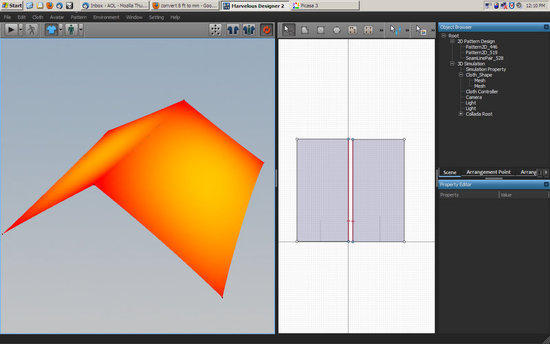
    -started with two 1.25 x 2.5 m rectangular tarp panels (about 4x8ft each)
    -hung it in space and adjusted the fabric properties until it looked like silnylon would hang (umm, very scientific here)
    -Used "pins" (software feature) to locate the corners in space, and adjusted until I got a mostly orange-red stress plot (assuming that as long as it's not all red, it's not overstressed and the behavior would more realistic). This is the first image.
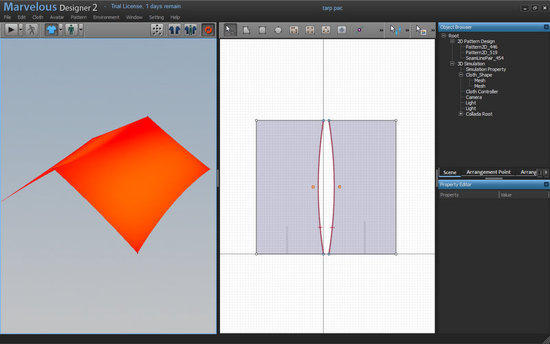
    -I used the "3 point curve" design feature to add curvature (no, it's not a catenary curve, because I didn't feel like getting that much into detail and I don't just happen to have spreadsheets lying around with cat curve calculations in them…I know, what kind of gear maker am I??). For the second image the curve is 25mm off the rectangular edge in the center of the panel (close to your 1" request but the grid in the SW is mm). I kept the pins in exactly the same spots for this and the next model.
    -The third image I pulled the curve 50mm off the rectangular edge.

    I think this is a reasonable approximation, especially given all the other unknowns in this software. Like I said before to Roger's question though, if you really wanted a cat curve, you could very, very closely approximate it.

    rect tarp

    curve 25 tarp

    curve 50 tarp

    And for kicks here's a tarp with a 100mm offset curve.
    curve 100 tarp

    I think it's obvious to see that adding the curvature along the seam helps distribute stress more evenly, and that the more curvature you add, the more it helps (up to a point…). A nice little visual to make that point. (Edit – it's easy for me to see in 3D when I can rotate the models – it's not nearly as obvious in these images)

    James, this software is taking the 2D pattern that the user draws, applying a mesh, and then modeling how that would drape in 3D using some FEA/physics engine, not taking a 3D object and flattening it. This company sells a higher end product to the textile industry which would be useless if it didn't at least somewhat accurately model how a flat pattern would drape in 3D. They say this is the "hobbyist" version of that software, missing lots of extra features, but I would presume using the same modeling engine (why would they do more work to put out a hobbyist's product?). Obviously there are all kinds of issues with getting fabric properties right, and that is essential to get models from the patterns, but I think the underlying capability is there.

    And Brian, you're definitely right. My interest is for making my own gear, and getting it right"on the first try so I don't have to make 2 or 3 of everything as I correct mistakes.

    #1699111
    Marco A. Sánchez
    Member

    @marcoasn

    Locale: The fabulous Pyrenees

    My interest is for making my own gear, and getting it right"on the first try so I don't have to make 2 or 3 of everything as I correct mistakes.

    Even the most advanced CAD software does not prevent the learning proccess. So some versions are needed, especially for something as complex as a tent ;-)

    Cheers

    #1699116
    Jerry Adams
    BPL Member

    @retiredjerry

    Locale: Oregon and Washington

    " think it's obvious to see that adding the curvature along the seam helps distribute stress more evenly, and that the more curvature you add, the more it helps (up to a point…). "

    That's cool – matches experience

    I don't think it's that important to have a catenary curve, any smooth curve probably works just as well

    You say it distributes stress more evenly – so what?

    It's not like the fabric will rip. I think fabric is way stronger and will never rip.

    Now if it flapped in the wind, then the force on the guylines would vary with time and the peak force would be higher.

    If an area is under stress, maybe it's less likely to flap.

    Just thinking out loud here.

    Good point – analyze as much as possible to minimze number of prototypes.

    What really bugs me, is the Dyson vacuum commercials that say it took 5000 (?) prototypes to get it right. That guy must be retarded. Or more likely written my a marketing person that's retarded.

    #1699188
    Andrew Schriner
    Member

    @lettheguydance

    Locale: Midwest

    >You say it distributes stress more evenly – so what?

    I think the benefit of even distribution of stress in the fabric is that you get even stretch, reduced sag, better shedding of rain/snow (due to reduced sag), better interior drip lines for condensation if it forms, and like you said, reduced flapping.

    #1699197
    Roger Caffin
    BPL Member

    @rcaffin

    Locale: Wollemi & Kosciusko NPs, Europe

    > I think the benefit of even distribution of stress in the fabric is that you get even stretch, reduced sag,

    Two different Qs here:
    Using something like a cat curve does what Andrew says, and is very beneficial
    Whether it is an exact cat curve or something close probably does not matter too much.

    Anyhow, adding hems and grommets upsets the stress distribution too!

    Cheers

    #1699901
    Andrew Schriner
    Member

    @lettheguydance

    Locale: Midwest

    FYI – I just got an email from this company saying that the cost of a personal license will go from $99 to $199 beginning March 1.

    #1833175
    Chase Norton
    Member

    @micronorton

    To awaken this thread…they are coming out with a mac version:
    http://www.marvelousdesigner.com/forum/feature-request/302/an-osx-version

    Chase

Viewing 10 posts - 26 through 35 (of 35 total)
  • You must be logged in to reply to this topic.
Forum Posting

A Membership is required to post in the forums. Login or become a member to post in the member forums!

Get the Newsletter

Get our free Handbook and Receive our weekly newsletter to see what's new at Backpacking Light!

Gear Research & Discovery Tools


Loading...