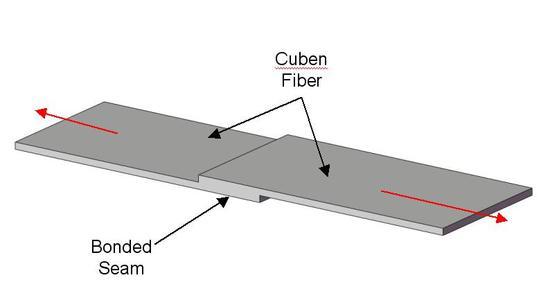
Am trying to make a combined ground sheet/bug shelter for my tarp using 1.6oz cuben for the ground sheet and nano-seeum netting. For practice I decided to make a stuff sack with .6oz cuben first. Initally I tried sticking the seems with Hysol U-90LV but it did not take very well so I tried it again and left it a little longer before testing and it seems to be holding – though my confidence was shaken so I tried to sew over the stuck seems – machine makes the holes but refuses to pick up the back thread on the loop so I just get one long stich over the area that has (dry) glue. Machine sews cuben fine without glue – single, double and tripple. Is sewing through Hysol a no-no for some reason or is my machine bust?
Another, possibly related problem is, for one part of the design I need to sew velcro tabs to the cuben, – same issue with sewing velcro to cuben, one long stitch that goes over the velcro. The needle holes are visible in the cubgen and velcro but the thread has not been picked up from the back bobbin. Any and all suggestions, recommendations and even criticism for even attempting this most welcome…..thank you.
Topic
need help with some cuben sewing/sticking problems please…
Become a member to post in the forums.
- This topic is empty.
I am a pretty regular sewing machine user but I don't know anything about even the most basic troubleshooting. I can't tell you why your bobbin thread isn't getting picked up.
But I do have some experience making seams with cuben and U-09lv. How are you applying the glue and securing the material during curing?
I think your sewing machine should have no problem sewing through the bonded cuben, and the bond may be strong enough to make sewing unnecessary, if the glue layer is thin enough. The bonded seam should be almost invisible and not perceptibly thicker or stiffer than the cuben itself. The way to do this is by clamping.
First, I refrigerate the glue. This increases it's viscosity a little (it's still more fluid than U-09fl), but, more importantly, it increases the open time. I apply masking tape (a blue kind for delicate surfaces) on the side to be bonded of each piece of cuben, about 1/2 inch from and parallel to the edge. I then apply the cold glue to one of the surfaces with a tiny plastic paddle, making the layer as thin as possible. Then I mate the two surfaces so the edge of each piece comes right up to (but does not overlap) the masking tape on the same side of the other piece of cuben. I then put a long strip of painter's plastic over and under the glued seam, and then a long strip of very thin foam (fleece or terry cloth would probably work, too). I have two, seven foot pieces of very smooth hardwood moulding. I put the glued seam, sandwiched between the plastic and the foam, between the wood pieces to cure and weigh the top piece down with several hundred pounds of weights. Large C-clamps could be used, too. This forces the excess glue out of the seam and onto the masking tape. Because the glue was cold, curing is delayed just long enough for the excess glue to flow out onto the tape even after ten minutes of fiddling with the foam and the weights.
After about an hour I disassemble everything (carefully) and very, very gingerly peel off the tape, and with it the excess glue. The glue is not cured yet, and the seam can be easily peeled apart at this stage, so be careful. If you wait longer, though, then the glue becomes stronger than the tape and getting the tape off becomes a disaster.
This is the best method I have found for achieving very strong, invisible cuben seams with hysol.
I hope this helps.
Hi Hugh
Yeah, known problem. Two possible causes.
The first cause is that the needle gets warm after running through the fabric a bit and this causes the glue to adhere a bit to the needle. Then the thread starts to stick to the needle instead of forming a loop, so the bobbin hook misses it. Solutions here are to skip the glue bit or to keep oiling the needle very lightly – so the glue and thread don't stick to it. Some commercial machines actually come with built-in oilers for this reason.
The second cause happens when sewing very heavy or tough layers. As the needle starts to lift it drags the fabric upwards, off the deck, and the loop at the eye of the needle only forms late in the cycle, after the bobbin hook has past the needle. This often happens with a light domestic machine sewing several layers of webbing. Sometimes you can increase the pressure on the presser foot to counter this. Otherwise, sew very slowly and use your finger to press down on the presser foot.
Of the two, I would put my money on the first as being your problem.
Cheers
Thank you both very much.
Colin, those detailed instructions tell me everything I was doing wrong. I was definitely using way too much glue as the seam was indeed a little "crispy"! I had been using foam brushes I got at a local craft store – did you buy the little paddles? That refrigerator trick is great – I was using blue tape and compressing during setting but never had enough time to get it right while the glue was runny enough.
Roger, I think you are right – I haven't tried the oil yet but I ran my fingers down the needle and it feels a little tacky. Will switch needles and try the oil.
Thank you both very, very much.
Hey Teegan make sure you come back and update us with your project.
Im specifically interested because im tossing the idea around on ordering up some cuben. You plan on gluing and sewing? I was leaning towards maybe just using adhesive.
Will do. I wasn't actually planning to glue and sew – it's just that the glueing wasn't working very well so I switched to sewing but that did not work well where the stitch had to cross an area that was already glued. With the advice above I'm hoping to mostly glue and only use sewing where I am joining cuben to nano-seeum.
Will keep you posted.
Got the sewing sorted out! Based on Roger's first suggestion I noticed that the glued fabric was indeed sticking to the needle but that oiling didn't help much. Suspecting the needles (Singer) were the problem (the entire package of 5 had exactly the same issue) I got some Schmetz Microtex needles which are said to be specifically for light materials and, yipeee, they work fine!
Not doing so good on the glueing though. Colin's suggestions have made the glue much easier to work with and by being careful to use only a very thin glue layer I don't have the "crispy" problem anymore. However, I'm not getting a strong bond – in fact the joints can be pulled apart quite easily even after two weeks. I've tried different compression techniques, rolling to get the glue layer even etc but nothing seems to make a difference. Any suggestions very welcome. One possibility that crossed my mind was, since I'm doing this work in the garage and the weather hasn't warmed up much here yet that it may not be warm enough for the glue to cure properly. The Data Sheet shows curing times for 25C which is way warmer than it is here at the moment – do I need to take the work inside the house or wait for warmer weather? All comments, suggestions and experiments most welcome and a big thank you to those who have already helped.
Hugh,
What kind of seam are you attempting to make, and how are you testing it when you try pulling it apart? Are the pieces loaded in shear or in peel?
Unfortunately, no bonding technique I know of can give a cuben seam that is strong in peel. Despite some early failures I have had pretty good results with Hysol seams loaded in shear. In fact, seams in which the pieces are butted and joined by bonding on both sides to tape-like strips of cuben can be stronger than the material itself (loading the seam to failure causes breakage of the fibers, not just delamination).
Even the best Hysol seams I've made can be pretty easily peeled apart, though. The 0.08 mil polyester film is very smooth (not microscopically rough like heavier grades). Just one of the shortcomings of the material.
If you are loading the seams in shear, they shouldn't easily come apart. The curing temperature experiment you mentioned seems like a good place to start. Maybe Lawson Kline, Steven Evans, or others with a fair amount of cuben bonding experience will chime in.
Hi Hugh,
Colin's detailed instructions above are great. I actually don't even take it to that level. I just apply with a foam brush, place the cuben overtop, and use my fingers to flatten it down. That said, Colin's technique is no doubt the way to go.
When I use Hysol, my bond is dead strong, especially in shear. It's important to design your seams to be in shear and not peel.
The only time I have had weak seams is when I have not used the correct amount of each part of the adhesive (I've since bought the applicator gun to stop this from happening) , and another time when I bonded the cuben in my garage during the winter…so I think this may be your problem.
Hope that helps.
I've no experience with Cuben or Hysol.
When I got up to speed on adhesives, nearly 30 years ago, some of the books emphasized that the most common cause for adhesive failure was failure to do adequate surface preparation. Others were excessively thick adhesive bond lines and failure to apply pressure during cure.
Colin described an excellent technique for adhesive thickness and pressure variables.
Adhesives don't typically form direct chemical bonds to the substances, as many appear to think. Instead the bonds are called Physico-chemical and are a combination of Van Der Waals weak bonds and mechanical bonds related to the adhesive penetrating surface irregularities. This leads to one of the reasons for use of mechanical sanding as a surface preparation or chemical etching as another.
Particularly bad for adhesive bonds are light virtually invisible coatings of oils, such as skin oil or oils that are associated with manufacturing.
In short, a solvent wipe such as alcohol could be useful in getting the desired good bond.
There are a variety of mechanical factors of joint design that are traditionally emphasized, but the need for testing of each new materials system is also emphasized.
Added in Edit
Contamination of surfaces
Dust is one of the surface contaminates that can inhibit bonding.
Certain films such as those resulting from silicone sprays can also prevent the good physical contact needed for Van Der Waals bonds. It used to be common practice in furniture shops (adhesive structural bonding) to absolutely prohibit any kind of Silicone spray products to be in the adhesive bonding areas of the workplace.
Thank you all once again. Colin, At this stage I'm just glueing two stips of Cuben together to see if I can get a good bond. The pieces I glued together in the garage (cool temperatures, though probably not quite as cold as Steve's winter temperatures!!!) have little peel strength and in shear they come apart at the glue with no damage (or even visible stress) to the cuben fabric. However, the test piece I just did indoors (higher temperatures) has way higher peel strength and the shear strength seems to be (at last!) higher than the cuben strength (I didn't actually stress to breaking point as it's already way stronger than I actually need).
Steve, so glad I'm doing these test pieces and little stuff sack before tackling the real project! I'd be surprised if the hysol even got tacky in your winter temperatures:-). I'll have to do a redesign of my project to avoid areas of peel stress – even the stuff sack needs a redesign.
James, I'm still at the stage of using squeeky clean test pieces of cuben but I will definitely need to do more prep on the surfaces for the actual project.
So, with my sewing and my glueing problems solved I'll have to do some real work and report back here. Thank you all very much.
Something everyone should keep in mind is that the cure rate of epoxies doubles for every 18°F (10°C) increase in temperature so changing the ambient temperature can have a massive impact on cure schedule. Also, many epoxies will not cure at all below 41°F (5°C). Obviously, degree of cure will play a huge role in physical properties such as peal strength and tensile shear adhesion.
On another note, I have access to some of the finest epoxies in the world and a tensometer with which to test specimens so it is only a matter of time before I look to improve upon the now standard Hysol performance. Of course I'll post my results as they are generated.
On another note, I have access to some of the finest epoxies in the world and a tensometer with which to test specimens so it is only a matter of time before I look to improve upon the now standard Hysol performance. Of course I'll post my results as they are generated.
Chris,
This is good news. As much as I love the Hysol, because it works, it is a slow and painful process. I can't imagine that MLD or even Lawson use this technique for their shelters or it would take forever to make them…I could be wrong though. Anyway, let us know if you come up with anything.
I'm pretty sure that MLD uses Venture tape — and based on discussions with some sailmakers who make Cuben racing sailes, they also use Venture tape. The funny part is that they seem to use a lot less Venture tape than MLD does :)
Hi Rakesh,
MLD does not use Venture tape.
We use one that we extensively tested and have used continuously for five years. It has a much higher amount of UV inhibitors than other tapes we have seen and tested.
Sorry we can not share the source as it cost us literally thousands of dollars in sourcing and extensive testing to get it dialed in and to develop many little production procedures we use to insure a very long product life.
Peace,
Ron
Hi Ron,
It's great to get a response right from the horse's mouth ;)
I understand your not sharing your source. One thing that I'm pretty certain about is that your stuff is built very well — after talking to the sail makers, we were pretty impressed, because (for example) the bond section for the ridgeline on the Grace Duo is at least 2x the width of what the sailmakers use for their racing sails :)
-Rakesh
One thing that anyone can do with any epoxy to get a little extra strength out of it (around 10% is a reasonable expectation) is to post cure it for 24 hours at an elevated temperature. For many products 140°F (60°C) is a good target temperature. This allows those last stray molecules of base and solidifier (or part A and part B, or Resin and Hardener depending on the manufacturer) to find each other and further increase the crosslink density.
Could anyone please explain to me what is a seam in shear? I don't know what that means and I have also bought some Cuben Fiber and Hysol to make some stuff sacks and perhaps use it as part of a rucksack (together with Dyneema)So you understand I am very interested and any help would be greatly appreciated!! As Englsih is not my native tongue may be the reason I don't understand all these terms.
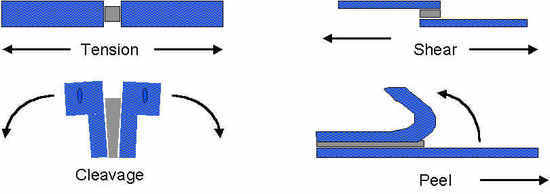
Perfect timing for this question. I just had this conversation a few days ago and I couldn't verbally explain the difference so I made this quick sketch.
The red arrows indicate the direction of force/load, so envision holding the fabric and pulling in the direction of the red arrows.
Seam in peel:

Seam in shear:
I'm terrible at trying to explain things, so hopefully that helps a bit.
Could anyone please explain to me what is a seam in shear? I don't know what that means and I have also bought some Cuben Fiber and Hysol to make some stuff sacks and perhaps use it as part of a rucksack (together with Dyneema)So you understand I am very interested and any help would be greatly appreciated!! As Englsih is not my native tongue may be the reason I don't understand all these terms.
Primary Four Modes of Adhesion
Nice, we were posting at the same time! I like your sketch better.
Actually, I like your diagram better. I wish I had that a few days ago. :)
I always considered peel and cleavage to be the same (kinda), but I am no expert in adhesion so I'll just note for those reading that Chris' diagram is "more" technically correct than mine.
…I always considered peel and cleavage to be the same (kinda)…
It essentially comes down to the difference between rigid and flexible substrates. I don't think you can have cleavage unless both substrates are rigid (I didn't mean for that to sounds as dirty as it does) and so stretch the entire bond area. Peel on the other hand only really stresses the leading edge of the bonding material and so clearly fails at a much lower force.
I wonder if your FEA software can handle fabrics and epoxies if I can characterize them for you…
Thanks to the wonderful advise given here, I have finally completed my project which is essentially a rework of the insert at http://www.backpackinglight.com/cgi-bin/backpackinglight/forums/thread_display.html?forum_thread_id=3470 in cuben and nanoseeum netting.
I used 1.5oz cuben for the floor and .6oz cuben for the trim – both from Zpacks. I used nanoseeum netting, zippers, thread and velcro from Thru-hiker.com and Hysol U-90LV from McMaster Carr for glueing.
Crucial advise and learnings turned out to be:
1. Hysol needs temps above ~70F to cure properly.
2. NB the design tips in several postings above. These required me to adjust the design to avoid testing the the peel strength of Hysol.
3. Keeping Hysol in the fridge beforehand gives much more realistic working time (Great tip!!!)
4. Cuben (particularly the 1.5oz stuff) eats needles. Several I tried did not go through even when new. I found Schmetz Microtex to be the best but even this relatively small project used 3 of them.
5. Cutting Nanoseeum is like cutting water – really easy but who knows what shape will result:-)
6. Nanoseeum sticks to velcro:-(. Somebody had asked me about this in my previous posting and the netting in that case did not stick. Nanoseeum does, and it can get damaged if not peeled off carefully. By opening and closing the velcro several times I've made it a little less stickly so maybe wear and tear will make this less of an issue.
The weight? 10.5ozs – just 2.3ozs less than the silnylon and regular netting version – a bit disappointing. With the gift of hindsight I probably should have done a complete redesign for the new materials. Set up in the yard, it is just as functional. I won't be able to give it a full field trial for several weeks.
Thank you all very much for the helpful advise and tips without which I would have been unable to do this project.
Become a member to post in the forums.
 New Ultralight GearSee the latest releases in ultralight cottage-brand gear from small makers.