I got my new Beercan stove in the mail last night and took it outside for a test. I put two cups/16oz water in the pot and fired it up. With two trials, one with a lid and one without, the water got hot and I got some bubbles on the bottom, but it would not boil with one Esbit tab. There was a very light breeze, temp was about 60F, cool tap water. It seemed like a lot of flame was going up the sides– should I just shorten up on the distance from the fuel pan to the pot? What kind of results have you gotten with your Beercan stove?
Topic
Beercan stove performance?
Become a member to post in the forums.
- This topic is empty.
I’ve used a Heinie can and Esbit for about 40 trail days – with both flashing and gutter screen pot stands. Because the can is narrow, you can’t avoid some flames getting high. However, I get good boils just about all the time. Here’s what works for me:
Close fitting wind screen of oven liner no higher than the first flange on the Heineken can, notched at the bottom for ventillation. By close fitting, I mean about 1/4 inch clearance, but I don’t worry about it much.
1 to 1 1/2 inches between pot bottom and top of the Esbit tab. Close is good.
Elevated tab, that is, the tab is not on the ground, but is about 1/4 inch up so air can reach it freely.
As much as I like the Heineken can, I will probably use the 600 ml Snowpeak cup on the AT next year. It chaps my butt that there is not a similarly sized lighter weight cup/pot, but there isn’t. The Snowpeak weighs 2.8 oz – as much as my entire Heinie kit. However, the wider cup heats more efficiently. You can tell by the amount of fuel left after the water comes to a boil. I have not done formal burn tests, just field experience. So what I suspect strongly is that greater fuel efficiency will make up for the pot weight difference between resupplies. Regardless, the Snowpeak will be durable enough for 5 months on the AT.
Dale: Are you talking about the Ultra-lite Outfitters Kit?? I had great results with mine. I did not pop the top on mine. I cut the lid off the fosters can with the beer still inside. After appropriatly disposing of the beer content I assembled my stove. I used the cut off top as my lid. Its heavier but fits tightly and that may make a difference. I have always been able to get 3 cups of water to boil with 1 esbit tab. I always use the windscreen. I tried a variety of potgrabbing methods but finally started using a MSR lite lifter with mine (I do not like grabbing a container full of boiling water with my hand) Adding the lid and the pot grabber made the weight go up. I also discovered I do not like the taste of coffee in an aluminum container. Now I have switched to the BPL Ti stove and windscreen with a Snow Peak mug.
I saved the cut-off lid from mine for the same purpose. I’m going to fiddle with the windscreen and see how that goes.
You shouldn’t be getting any metal taste from the can as it has a coating inside– to keep the beer from doing the same. I’m not a fan of handling a tippy can full of boiling hot water either and I found it pretty hot to handle even with the rubber band on the top. I don’t plan on drinking from it, so I may just junk the rubber band and add a wire bail as others have mentioned.
I wanted an uber-light *and* compact setup for solo hiking. All I do is make a little cocoa and two cups of hot water for a dehydrated dinner and some coffee and oatmeal in the morning.
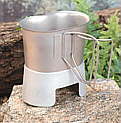
I have a couple more options to play with. The armed forces have used canteen cups and a little heating stand for decades. The US version of the canteen cup has been stainless steel. I saw some ads for what I assume was a UK version in aluminum and I found a Chinese knock-off for $4 on line. The part for the heater was available at a local surplus store for $4 and it is aluminum. The heater portion is just a stand/windscreen that nests around the cup when stored and you flip it upside down to set the cup in it. There are some holes punched in it for air and a larger notch to use hexamine or Esbit tabs or you could make a small twig fire too.

The stainless cup is way too heavy and I don’t have a weight on the aluminum version, but I know it will be a big improvement. The stand is a feather — very thin and light.
Option two for a really quick-and-dirty solo rig is an Esbit wing stove and a 14oz. GSI stainless steel cup. The cup is a little on the heavy side, but was $5 vs. $20 for a Ti version. Sooner or later I’ll replace it with a Snow Peak Ti unit. The wing stove and a handfull of Esbit tabs fit in the cup, along with some aluminum foil for a wind screen. Pretty simple and $8.
I got that Swiss Volcano stove in the mail, but I didn’t fire it up. I’m going to Boeing Surplus to see what I can find in the way of Ti or Al thin wall tubing to make a light version. I’m thinking of copying the basic layout of the Swiss stove with some 3″ tubing and putting a couple tent stakes in it for the cup platform (or beer can). With the little squared hatch at the bottom, I can use Esbit tabs, twigs, or a Trangia burner. We’ll see.
I used that canteen cup setup in the Civil Air Patrol. Its designed to do double duty when cooking MRE’s..you stick your unopened main meal pouch in there and heat it up while you boil your water. The pouches are made of material that is not toxic when boiled in water so you can also use the water for your coffee. I could never get it to boil with only 1 tab-it usually took another tab or some extra twiggs..pine cones worked the best. Ah the memories…HA. I think you will really like the Snowpeak Ti unit once you fiddle your way to it. I sure did. Now I have to go find something else to fiddle with :(
I think the aluminum cup will help with heating efficiency over the stainless steel one– those steel cups are heavy!
I have an MSR Titan Kettle and Coleman F1 stove which work together well. It has me spoiled too– fill it up with ice cold water and it’s boiling in a few minutes. But is is a fat little pot taking up room in my pack and there are lighter alternatives.
I like the hobo-ness of the Esbit and alcohol stoves– you get out your little rig and ‘ave a spot o’ tea. Most of my outings are overnighters, so I barely need to cook at all. Morning coffee drives 99% of my cooking wishes, so the trap widens: if I have something to make coffee with, then I might as well have a dehydrated dinner, some instant oatmeal for breakfast, and yes, some hot cocoa would be nice, and there we go!
Last time I went out, I left my dinner sitting at home and did just fine with some snacks and granola bars. I got started late and had a burger for lunch before heading up the trail, so I hardly needed a cooked dinner. I was so pooped that a snack and a warm sleeping bag were all I needed. I got up and had a hot cuppa Java Juice and a double share of instant oatmeal while I watched the snow come down outside my hemlock umbrella. No need for a blowtorch stove for that sort of trip.
Yes I too MUST have my coffee. (instant human-just add coffee :) I keep it very simple now. I like Esbitt because it is so liteweight and simple. What I really would love to is to go out on a long trip using a Gatewood cape for raingear and shelter and small wood burning stove to heat water with. Maybe the Kelly Kettle folks will make a Ti version of their smaller kettle.
Dale,
That outing sounds idillic. Wow. Just reading about it is a vacation.
I tried the stove again tonight and I’ll chalk it up to wind. Now I want a pop can version– just right for a little coffee or some soup.
Sunny… the 3 gram pot grabber I made from a BPL Ti rod works well for me. If you find that too flimsy, a wire coat hanger version is 10-13 grams and is rock steady. I’ve used this grabber design on a number of trips and it works great and it extremely safe (contrary to what some have said who have never seen it or tried it in person). Check it out here…
I think my windscreen is too big… diameter-wise. I’ve also swithced to a hardware cloth ring for a stand as I found the paper thin aluminum cookie sheet material + stakes was not always up to the task… the windscreen would often buckle under the weight of the water. It never collapsed… but it always made me nervous. With a hardware cloth ring… I never have to worry… and set up is much easier… no tent stakes to mess with and thread… and it’s much more stable.
Oops… another one for Sunny :) I found that the cut off bottom of an aluminum cat food can (what was the inside of the cat food can faces out) weighs only 3 grams… and is a perfect fit!! That will save you a whopping 3 grams over a beer can lid. There are pictures of this lid at the site mentioned above as well.
I didn’t find it mentioned, but the Heinekin can fits the stand for the Beercan stove. It won’t stow as neatly– the Esbit pan will for over the top of the Heinekin can and the bottom stand will slide over the bottom of the can, but that leaves the windscreen loose. It is a work around if you can’t find a Foster’s can.
So while I was fiddling with the Heinekin can, I thought of using that for the windscreen a la the Swiss Volcano stove– punch a few holes top and bottom with a square hatch at the bottom and a small can bottom for a fuel pan. You could use tent stakes for a platform or perhaps lace a wire platform through small holes in the sides of the can.
What to use for a pot. A soda can looks just right, but the Good Cook can opener won’t grab the seam on the cans we had around the house– the side taper won’t allow the opener to work. Looks like I need to buy some groceries :)
To get the top out of the can w/out a can opener, file, sand or grind the very top of the ring. soon, you will see a fine line when you have filed through the top and are seeing side of the can. Once you can see the line all the way around, just pop the whole top right out. I have even seen this done by turning the can upside down and scrubbing it in circles on the sidewalk (crude but effective). This removes the top and still leaves the outside portion of the top seam for stregnth.
Good tip. I was reading about making pop can alcohol stoves and a Dremel tool was used by one builder. I have a Dremel and I can use your technique to retain the top seam for reinforcement and grind down to the dividing line.
Become a member to post in the forums.