Topic

SUL Self Tightening Tarp


Forum Posting

A Membership is required to post in the forums. Login or become a member to post in the member forums!

Home Forums Gear Forums Make Your Own Gear SUL Self Tightening Tarp

  • This topic is empty.
Viewing 24 posts - 1 through 24 (of 24 total)
  • Author
    Posts
  • #1255521
    John Donewar
    BPL Member

    @newton

    Locale: Southeastern Texas

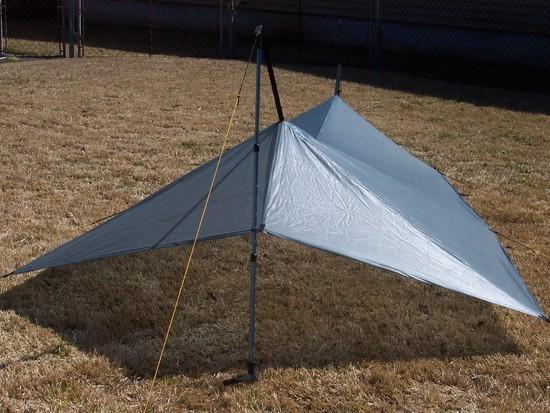
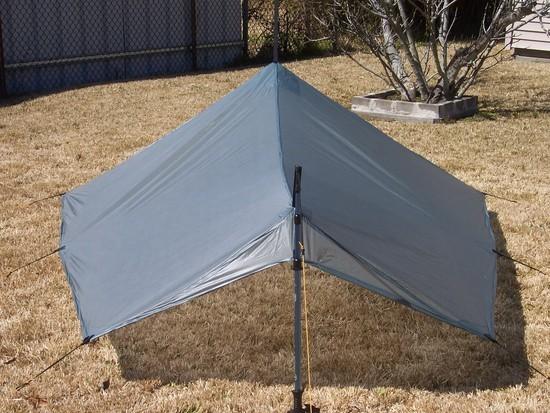
    I made this tarp using some of my own ideas and a combination of features from other tarp designs that appealed to me. I added 12 inches to Jay Ham's original ridgeline length of 78". I also used a catenary curve in the ridgeline. I used the spreadsheet to calculate the curve that is available on Lance's Web Page at http://www.wvi.com/~ulmyog thanks to Lance Marshall. The deviation was -2 9/16" at midpoint. I used 1.1 oz silnylon seconds and Gutermann thread for this project. This silnylon tarp in its stuff sack weighs in at 10.8 oz without lines attached. My hammock weighed in at 2 1/2 pounds.

    Front view of SUL Silnylon tarp

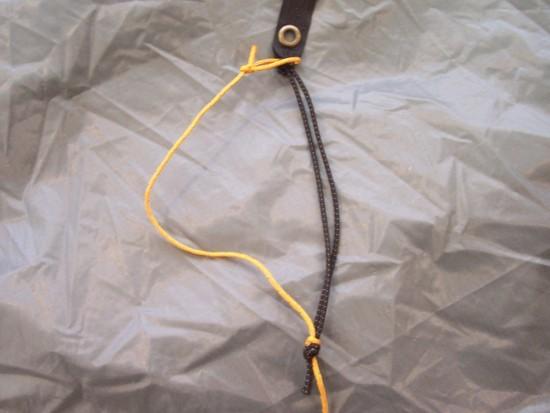
    All of the tieouts have 1/8" shockcord and Kelty Triptease Lightline attached to them. The shockcord and Triptease are joined together using two overhand knots threaded through each other and pulled tight against each other forming what is called a "fishermen's knot".

    Fishermen's knot detail

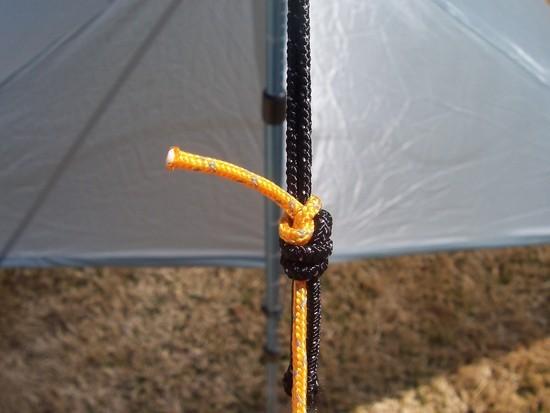
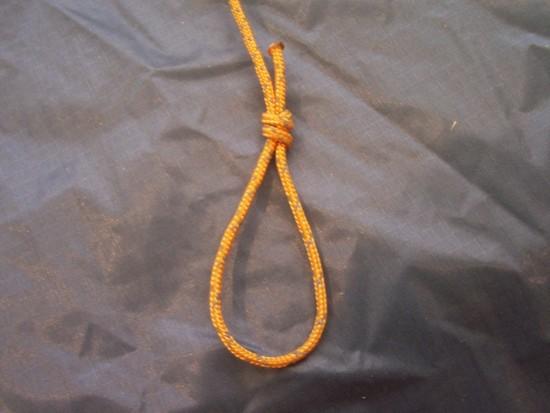
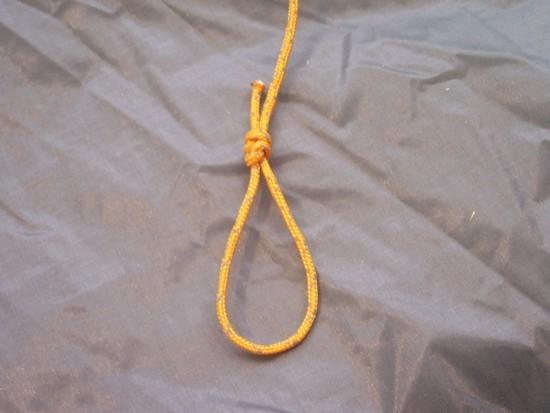
    The shockcord is attached to the tieouts using a "lark's head" knot and the Triptease is knotted to form a loop at the end using a doubled figure eight knot. The resulting loop is formed into a "lark's head" and attached to 6 1/2" titanium stakes.

    After adjusting and final setting my stakes the tension provided by the shockcord under tension should keep my tarp pitched tightly through the night.

    I made my front and rear tieouts using grosgrain ribbon and brass grommets.

    Front guyout detail

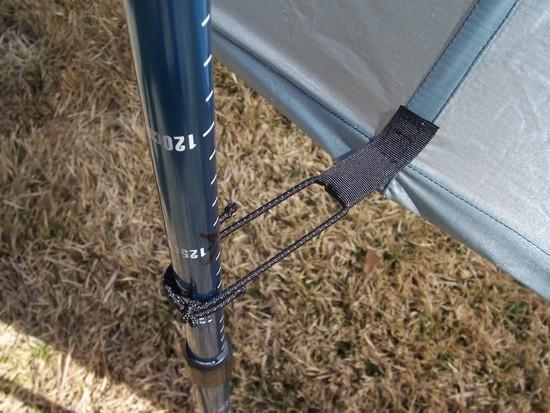
    The tips of my trekking poles are located in grommets installed in doubled over and sewn 3/4" grosgrain ribbon. These ribbons are attached via boxstitching to the tarps ridgeline reinforcements. I got the idea to adapt this method and modify it for use on my personal MYOG SUL tarp after viewing Glen Van Peski's 2009 SETUP VIDEO of the SpinnTwinn™ tarp. Thanks Glen. Now there will be no more guess work or fumbling with half hitches in the front and rear guy lines.

    Rear guyout detail

    On the front and rear overhangs I used shockcord threaded through the tieouts and joined at the ends using the "fishermen's knot".

    Overhang extension tieout detail

    I didn't pull the two overhand knots tightly against each other this time because I wanted some adjustability in the loop of shockcord.

    Inside on the underside of the ridgeline I sewed in two 1/2" grosgrain ribbon loops as attachment points for the support of a future bug net MYOG project of mine.

    Detail of underside of ridgeline and accessory loops

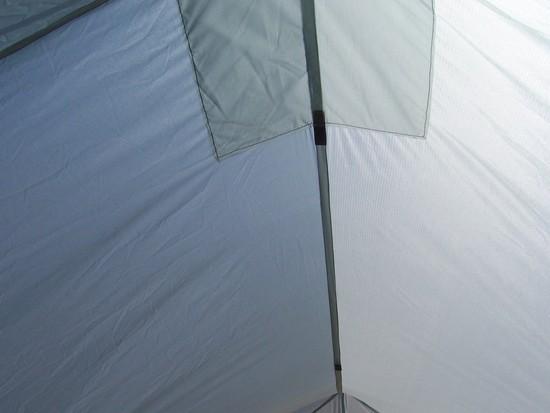
    The accessory loops are the two dark spots along the ridgeline. The front loop is stitched into the front tieout reinforcement and the rear is stitched into the felled seam of the ridgeline about halfway to the rear.

    Rear view of SUL Silnylon tarp

    This is not the end! :-) I still need to seam seal the tarp and melt the ends of the shockcord and Triptease to avoid unraveling of my guylines.

    Thank you very much to George Carr, Jamie Shortt, James Lantz and Matt Lutz for your kind words, advice and input on my thread "Pitching My Tarp Experiment :-)". Setting up this new tarp was very easy after applying your advice and suggestions.

    Making my own personal hiking gear is simply part of my hobby which is ultimately hiking. If I were doing it for a living I'd probably lose my shirt. :-)

    Party On ! 2010

    Newton

    #1576437
    george carr
    BPL Member

    @hammer-one

    Locale: Loco Libre Gear

    John, very nice! Create way of tensioning the ridgeline – I like it. I especially like that you were able to free up your interior space by moving the front pole out. You'll have to let us know how your tensioning system works. Very cool!

    #1576517
    John Donewar
    BPL Member

    @newton

    Locale: Southeastern Texas

    Thanks again George.

    I scoured the internet for images and articles on tying and tensioning guylines. My goal was to be able to set my stakes and forget about my guylines until morning. It also naturally had to simple and light.

    Most of what I was able to find on the web was bulky and or complicated in their design. I saw a few designs that allowed you to re-tension the guylines from under the tarp that were not bulky or complicated. But I didn't want to have to re-tension the guylines at all.

    I will be back with a field test report on how the tensioning system works as soon as my schedule permits. Until then for all of you dinosaurs out there that remember the term "shareware" feel free to try out and use the design. I only ask that anyone that does try it get back to us with a field test report of their own on this thread.

    My front and rear tieouts are probably not the lightest around but they simplified the setting up of the tarp. I can live with the additional "gram load" :-) if it makes life simpler.

    As you said they also allowed me to free up the space underneath the tarp by locating the pole outside. With the extra 12" of ridgeline that I added I should be able to stretch out in style and still have ample space for my gear.

    I'm a country music sort of guy but I do like K.I.S.S.
    Keeping It Sublimely Simple.

    Party On ! 2010

    Newton

    #1576542
    BlackHatGuy
    Spectator

    @sleeping

    Locale: The Cascades

    Don't know if you ever saw this thread about self-tensioning guylines, FWIW.

    #1576560
    John Donewar
    BPL Member

    @newton

    Locale: Southeastern Texas

    Douglas,

    Thanks for the link. I thought I had looked almost everywhere. Apparently I had looked "almost" everywhere and not "there". :-)

    So it seems that mine is just a variation of a theme then. The methods are quite similar though the knotting styles differ where the guyline and shockcord join. The parallel guyline and shockcord arragement is interesting. It achieves the same goal without "betting the house" on the non-paralleled shockcord not breaking.

    I had seen a tent guyline tip similar to the second style of self tensioning guyline on McNett's website.

    http://www.mcnett-outdoor.com/Repair-Guide/Tents/Tent-Tips/235.aspx

    It is interesting that this approach uses the "fisherman's knot". It's the same knot but a different manner of usage. I used it to join the shockcord and guyline and the author of the post uses it to join the ends of the shockcord loop that he ties into an unbroken guyline.

    I don't care for the look of the guyline paralleling the shockcord. But in the back of my mind a little voice is whispering, form follows function! I'd hate to go to sleep under a tarp and wake up in a bivy. :-)

    I am considering the parallel guyline/shockcord approach as an "upgrade" to my guylines.

    Thanks again.

    Party On ! 2010

    Newton

    #1576682
    Vick Hines
    Member

    @vickrhines

    Locale: Central Texas

    John,
    That's a good-looking tarp.

    You might consider using a curtain bug net attached along the hems. That can save a lot of weight and fiddling. I make them 18-20 inches on the sides and 6" longer than the center front and back heights. If you make the end pieces sorta diamond shaped, you can just lift the net to get in and out.

    #1576689
    Unknown abc
    Member

    @edude

    very nice tarp!

    #1576863
    John Donewar
    BPL Member

    @newton

    Locale: Southeastern Texas

    Vick and Evan,

    Thank you for the kind words. :-)

    Vick,

    Can you post a picture or 2 or 3 Heh! Heh! I kind of understand where you're going with your description. What is confusing to me is the diamond shaped entrance netting.

    I am all over saving weight and reducing the "fiddling". :-)

    Party On ! 2010

    Newton

    #1576980
    Kyle Crawford
    Spectator

    @getupandgo

    Locale: SouthEast

    I like this tarp/setup….alot.

    #1577253
    John Donewar
    BPL Member

    @newton

    Locale: Southeastern Texas

    Kyle,

    I am admittedly biased but so do I or I wouldn't be going back to the ground! Check out my soon to be changed avatar.

    One of my goals was to go lighter if not ultralight. I saw that the weight of my shelter of choice could be "adjusted" lower.

    I've been bitten by the MYOG bug and I like it! :-)

    My wet weight with water (2 liters) and food for three days is now at 14 pounds with my new tarp. :-)

    Party On ! 2010

    Newton

    #1579408
    John Donewar
    BPL Member

    @newton

    Locale: Southeastern Texas

    Douglas,

    >>Don't know if you ever saw this thread about self-tensioning guylines, FWIW.<<

    Thanks again. Your FWIW brought about a modification and improvement to the guylines on my SUL tarp.

    Safety line and shockcord arrangement

    I added what I call the "safety line" going to the tieout on the tarp from the "fishermans knot" and ultimately to the stake. I replaced the length of Kelty Triptease at each tieout point so that it would be one single piece as opposed to two pieces at each point. This was my effort at K.eeping I.t S.ublimely S.imple!

    I used a bowline to secure the Triptease to the tieout. I followed that with the fishermans knot to join the Triptease to the shockcord as before but left some length for the safety loop.

    Front side of stake loop

    The the knot that I used on the stake loop is what I call a modified slip knot.

    Backside of stake loop

    Above are the front and rear views of this modified slip knot.

    It is formed by first making a loose overhand knot. Follow this with threading the free end of the line back through the loosely formed overhand knot. Keeping everything you've done to this point "in place" form another overhand knot around the line coming into the first overhand knot using the same free end. Put your finger into the loop that you formed earlier and pull everything tight while holding the free end. Allow the last overhand knot to slide down to the first overhand knot and you're done. The result will be what looks like another fishermans knot that forms a locked loop for attachment to the stake.

    I originally looked at a similar knot called a lariat loop for an example of what I wanted to acomplish. If any of you boy scouts or sailors out there know the real name for this knot if there is one please post it. As far as I know it is simply a combination of two knots forming a locked loop.

    Party On ! 2010

    Newton

    #1579417
    BlackHatGuy
    Spectator

    @sleeping

    Locale: The Cascades

    Happy I could be of some assistance!

    #1579433
    John Donewar
    BPL Member

    @newton

    Locale: Southeastern Texas

    Douglas,

    You only got to see the part of the post where I expressed my thanks for the link. I inadvertently posted the message prior to adding my text & pictures of the final result. :-(

    Now let's play name that knot. :-)

    Did I create a new knot, combine two existing knots or just re-tie an already existing knot to form my stake loop?

    I don't know and I'm hoping someone else does.

    Party On ! 2010

    Newton

    #1579436
    BlackHatGuy
    Spectator

    @sleeping

    Locale: The Cascades

    I don't know about the knots! But it looks great, what a super modification.

    #1579464
    Paul Siegel
    Spectator

    @paulsiegel

    Locale: Southern Appalachians

    NM

    Why did you want to use that knot in your application rather than a bowline?

    #1579494
    John Donewar
    BPL Member

    @newton

    Locale: Southeastern Texas

    Paul,

    >>Why did you want to use that knot in your application rather than a bowline?<<

    I used a bowline at the tieout because it was simpler for me working with only so much line and one free end.

    I used the other knot or combination of knots on the other end simply because I liked the looks of it better and it performed the same function of a bowline in this application. I would have probably used this knot at the tieout also but the grosgrain and shockcord make tightening the loop a little challenging.

    I had originally used a doubled over figure 8 knot for the stake loops but I found it too bulky.

    I like lighter and leaner gear. By that I mean if I can't lighten it I try to at least make it less bulky.

    I hope this answers your question.

    Do you have an answer for "Name That Knot"? :-)

    Party On ! 2010

    Newton

    #1579497
    Scott Ames
    Member

    @quartermoon

    Locale: Mansfield
    #1579501
    John Donewar
    BPL Member

    @newton

    Locale: Southeastern Texas

    Scott,

    Not only did I see it, I bought all the supplies at my local Wal-Mart. I actually went so far as to cut to size the elastic tubing.

    Denis's idea is a good one. I just chose to go a different direction. I liked the "stuffability" of my tensioners over the elastic tubing style.

    Thanks for the link reference. Now, "Name That Knot". :-)

    Party On ! 2010

    Newton

    #1579503
    Paul Siegel
    Spectator

    @paulsiegel

    Locale: Southern Appalachians

    As it is a unslippable slip knot I'd call it a Non-Slip Slip Knot. Stake Knot? The Donewar Knot has an elegant ring to it.

    The customization possibility is one of my favorite parts of ultra light and MYOG in general.

    #1579528
    Bob Gross
    BPL Member

    @b-g-2-2

    Locale: Silicon Valley

    "Do you have an answer for "Name That Knot"? :-)"

    I'm a bit frazzled at the moment, so I'm afraid not.

    (a frayed knot)
    –B.G.–

    #1579556
    Nicholas Miller
    BPL Member

    @nmiller08

    Locale: Montana

    "The result will be what looks like another fishermans knot"

    I think you hit the nail on the head, this is still a fisherman's knot, but tied using one strand instead of two. As far as I know, using it in this manner doesn't have it's own name, but I'm far from a knot expert. I've used the same arrangement for ice axe leashes so they can loosen (one-way slippable) but won't overtighten on the wrist.

    #1579880
    John Donewar
    BPL Member

    @newton

    Locale: Southeastern Texas

    Kind people,

    I would "stake knot" my life on it but I am "a frayed" that I can "knot" call it a "Donewar" because I want to "slip knot" and cause "knot fishermens" to think of stringing me up! ;-)

    Party On ! 2010

    Newton

    #1582463
    Matthew Bishop
    BPL Member

    @mattsbishop

    Locale: Iowa

    Since I'm a bit of a knot nut, I just had to track this thing down. This knot is known by numerous names, most of which also refer to other knots: fisherman's, englishman's or angler's loop; the true love knot, and middleman's knot.

    Here are some links: http://www.scoutingresources.org.uk/knots/knots_mn.html and http://www.thedump.scoutscan.com/knotbook.pdf

    Thanks, that was fun :)

    #1582599
    John Donewar
    BPL Member

    @newton

    Locale: Southeastern Texas

    Matthew,

    >>Thanks, that was fun :)<<

    I'm glad that you enjoyed it.

    As you can tell from my last post I'm a bit of a "knut" myself. :-)

    Party On ! 2010

    Newton

Viewing 24 posts - 1 through 24 (of 24 total)
  • You must be logged in to reply to this topic.
Forum Posting

A Membership is required to post in the forums. Login or become a member to post in the member forums!

Get the Newsletter

Get our free Handbook and Receive our weekly newsletter to see what's new at Backpacking Light!

Gear Research & Discovery Tools


Loading...