Topic

Down hood for thru-hiker.com whitney jacket


Forum Posting

A Membership is required to post in the forums. Login or become a member to post in the member forums!

Home Forums Gear Forums Make Your Own Gear Down hood for thru-hiker.com whitney jacket

  • This topic is empty.
Viewing 12 posts - 1 through 12 (of 12 total)
  • Author
    Posts
  • #1255150
    Matt F
    BPL Member

    @matt_f

    After drooling over some Nunatak and Feathered Friends parkas but ultimately deciding they simply didn't fit in with a grad student's budget, I ordered the whitney down jacket kit from thru-hiker.com this morning: The idea is 5.5-6 ounces of 850+ down in a momentum shell and liner, sewn-through baffles and a front pocket with full zip.

    Adding to the complexity of what will be a challenge anyway, I am adding a permanent down hood to the pattern. I've noticed mention on the forums of this being done and would love any advice regarding how to go about this. Thru-hiker.com has a basic uninsulated hood pattern, and this is my likely starting point. Can anyone help me out?

    There is minimal information about this on the thru-hiker.com forum.

    Thanks,

    Matt

    #1572747
    Nicholas Miller
    BPL Member

    @nmiller08

    Locale: Montana

    The down balaclava on Nunatak's website is enticingly simple looking, and the baffle spacing matches the Whitney nicely. It looks like it is just a two dimensional, three chambers per side, straight forward affair. You could omit the bottom chamber of that design, which would be replaced by the collar on the whitney. The nice thing about puffy down garments is that they don't need to be nearly as form fitting (as shown by the pics on Nunatak's website) so you don't necessarily need a complex hood shape.

    #1574614
    Jan Rezac
    BPL Member

    @zkoumal

    Locale: Prague, CZ

    I've just finished hood for whiteny (a removable hood, but it could be used directly instead of the original collar), PM me if you're interested in the pattern (a simple 1:1 drawing, you'll have to figure out how to sew it yourself).

    #1574831
    Matt F
    BPL Member

    @matt_f

    PM sent to Jan. Thank you both for your insights. I'm hoping my kit shows up in a day or two, and I'll be sure to post some photos as I make progress or finish. If all goes well the end product will be a down parka with 6 oz of fill for somewhere around 11-13 ounces.

    Matt Foehrenbacher

    #1574979
    Jan Rezac
    BPL Member

    @zkoumal

    Locale: Prague, CZ

    There have been more interest, so I'm posting the pattern here. It can be downloaded from http://gear.rezacovi.cz/whitney_hood.zip, the file contains both the original, editable SVG file and a PDF for easy printing. If I remember well, my jacket was size L and the pattern matches its collar circumference. I made it (both the jacket and the hood) baffled (1 – 1.5 cm), so the size may need some adjustments depending on your construction and loft.

    I'm quite happy how it turned out, it sits well on the head, seals nicely around the face and does not limit the peripheral vision too much. An important feature in the design was also the possibility to cinch it to a small opening around the mouth and nose, so it will be comfortable for sleeping.

    Here it is:
    Whitney hood

    #1575161
    Matt F
    BPL Member

    @matt_f

    Jan, this is wonderful. Very impressive work and certainly something to emulate. The drawstrings look great. What was the last seam you sewed (after filling with down?).

    Thanks!

    Matt

    #1575245
    Jan Rezac
    BPL Member

    @zkoumal

    Locale: Prague, CZ

    How to sew it:
    1) make two 3D hoods, the shell and lining

    2) add the details, such as the velcro, size adjustment at the back etc.

    3 – removable hood) sew them together at the bottom, finish the flap in front

    3 – sewn-on) sew the hood to the jacket, sew in the zipper when it is needed

    4) sew the baffles

    6) fill it: it is filled through the open seam around the face. Before filling, close one end of the baffles that have two open ends. After filling, finish the seam around face by simple line of stitching close to the edge of the fabrics (for now, ugly visible seam and raw edge).

    7) Finishing: This visible seam is now hidden by the drawstring sleeve, a strip of fabric with edges folded in, sewn over the edge

    Trick I use to keep the cordlocks out of my face (as seen in the photo above): From the sleeve around the face, the drawstring continues to another sleeve sewn onto the shell that is reinforced by a piece of flexible tubing before it enters the cordlock. The tubing keeps keeps this sleeve from being deformed when the hood is cinched down. I made the tubing from two layers of heat-shrink tubing.

    #1589415
    David Franzen
    Spectator

    @dfranzen

    Locale: Germany

    Jan, how much down (weight and fill power) did you use for your hood, and what is its loft?

    #1589550
    Matt F
    BPL Member

    @matt_f

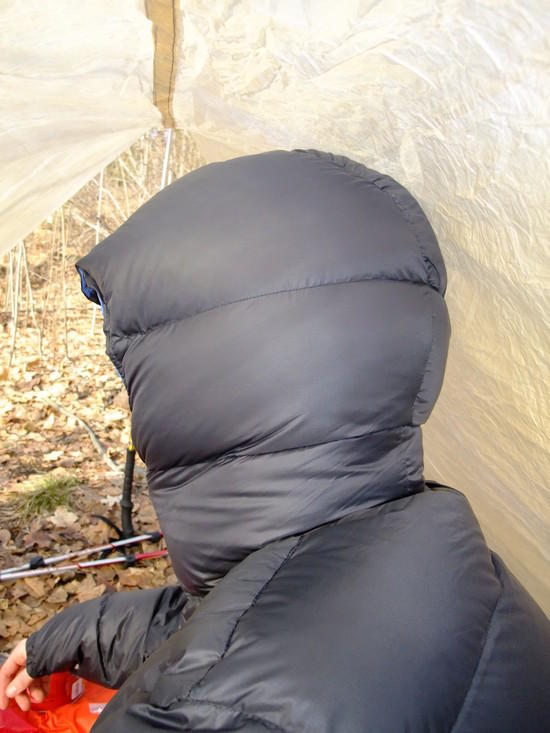
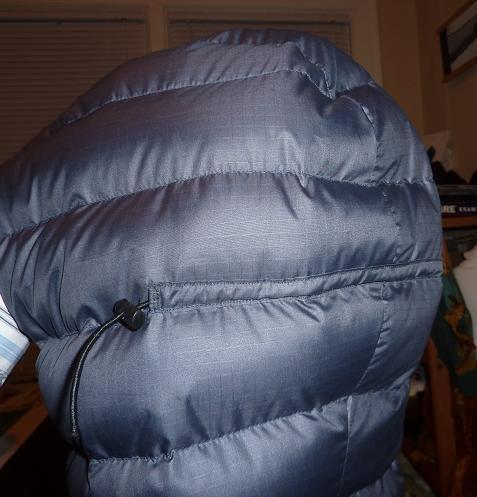
    On friday evening I all but finished my parka in time for a quick trip to Minnesota's North Shore with my girlfriend over the weekend. I haven't added a waist or hood draw cord yet, but the coat was very warm without them. Thanks to Jan for the hood pattern (used it, turned out great). Total weight without the drawcords is 12.75 ounces with 6.4 ounces of down total. I used 1.5 ounces for the hood, which lofts to 2.5 inches per layer with sewn-through baffles.

    Here are some photos:

    front view

    back view

    side

    quilt

    As I mentioned above, this thing warm. Its sewn-through, but has about 3" of single layer loft in the body. I am normally a bit of a cold sleeper (skinny), but was able to sleep comfortably down to 15 degrees using my baselayers, golite reed rain pants, a homemade Vapor barrier top, this parka and my MYOG thru-hiker down quilt pictured above (20.5 oz) on a full length foam mat and 48" montbell self-inflater. Of course, it was wonderful for hanging around camp under the stars in the low 20s well after the sun set.

    A few other details:

    I used the "large" whitney kit in momentum fabric. I trimmed the pattern by 2" in the center of the back and 1" on each side of the zipper in the front to result in a coat that actually fits my trim 6'0" 155 pound frame with long arms and plenty of length in the torso. Couldn't be happier with the fit. I also ordered 0.5 oz down overstuff as I planned on adding a hood from the start. I used gutterman thread and marked baffles etc with sidewalk chalk.

    Finally, for me this was a tough project. No specific step was terribly difficult, but it was a bit of a marathon and if you're not careful things can go wrong. I have previously finished a couple of bivy sacks, 2 "5 yards to SUL" article backpacks, three tarps, a sil-nylon vapor barrier hoody, a synthetic vest and a down quilt. I was ready to take this on, but wouldn't have been prior to doing the vest and down quilt. Of course, your mileage may vary.

    Matt

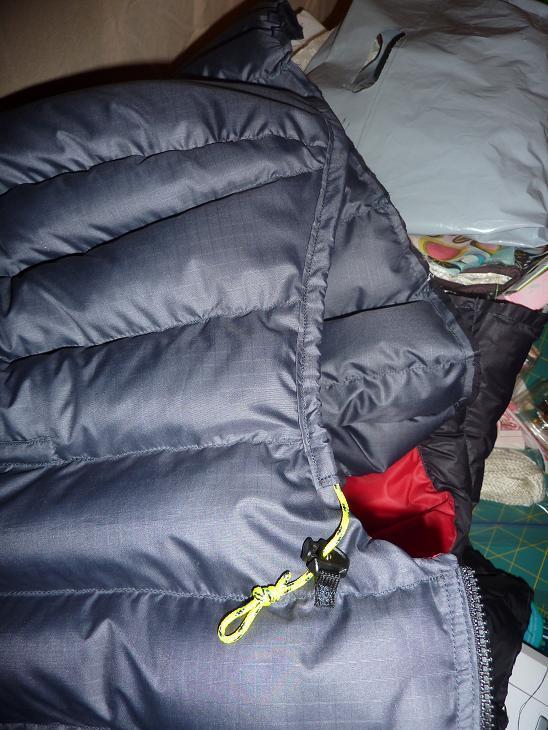
    p.s. I'll try to post a shot or two when I finish the hood draw cord, which i think will result in a cleaner look.

    #1589568
    Nicholas Miller
    BPL Member

    @nmiller08

    Locale: Montana

    Matt, that's great! I meant to come back to this thread and thank you for asking the question (and thank Jan for the pattern!!) because it inspired me to go ahead and add a hood to my latest project. I'll post pictures and specs when I get home…we went opposite directions with the hood, it looks like you made them bigger (and one fewer) than Jan's pattern while I made them smaller/more for a more mid-range down garment. Awesome job!

    #1589572
    Brian UL
    Member

    @maynard76

    Locale: New England

    Crazy good.

    #1589646
    Nicholas Miller
    BPL Member

    @nmiller08

    Locale: Montana

    hood side

    hood cord

    hood back cinch

    jacket

    to assist anyone doing the same thing, the baffle heights are 2.5" with a total fill weight for the hood of about .7 oz.

    I multiplied the length of the baffle by .14 (obtained by dividing desired volume of one inch length by down's fill power, then dividing by 28.3 grams/oz, then adding a little fudge factor for overfill) for an easy way to convert linear compartment length to desired down amount in grams. i.e. a 10" long baffle (2.5 inches high) would be 1.4 grams (10*.14).

    I put a rear cinch channel in the hood like Jan's example, but it fits so well I wish I would have just saved the weight and gone without like Matt did. I also made it exit on one side instead of the back to facilitate sleeping.

    And to avoid Jan's complex (though very good looking) tube system I just anchored a cordlock a little ways down from the edge and triple reinforced the end of the channel where the cord exits to guard against wear from repeated tightening/loosening.

    Thanks again Jan and Matt!!!

Viewing 12 posts - 1 through 12 (of 12 total)
  • You must be logged in to reply to this topic.
Forum Posting

A Membership is required to post in the forums. Login or become a member to post in the member forums!

Get the Newsletter

Get our free Handbook and Receive our weekly newsletter to see what's new at Backpacking Light!

Gear Research & Discovery Tools


Loading...