Topic

MYOG Hexamid?

  • This topic is empty.
Viewing 15 posts - 1 through 15 (of 15 total)
PostedFeb 6, 2010 at 5:49 pm

So after browsing these forums for a month or so I've caught the bug for making gear, because right now I just can't seem to justify spending so much money on UL gear. For a shelter, I've looked at the SpinnShelter, the SpinnTwinn, and the Hexamid, and while they all seem great, they're just way too far outside the price range…

I like all of them for different reasons, but I just keep coming back to the do everything nature of the hexamid, because it seems to be roomy, easy to pitch, and bugproof (all for less weight than a tarp/bug-bivy combo). I still don't have the greatest handle on fabric measurements, so how many yards of nylon/netting would I need to replicate this? I've searched these forums for any talk of this, but as the shelter is so new, no one seems to have tried to duplicate it yet. Does anyone have the measurements for this shelter?

As I said, I'd love to give Joe the money if I could, but I'd only be able to buy about 1/3 of a hexamid at his prices. Thanks guys, this site rocks.

PostedFeb 6, 2010 at 11:06 pm

From the specification on Zpacks website, just the cuben for the Hexamid weighs 2.65oz, which works out to about 4.5 square yards of cuben. Cuben is sold in rolls that are 1.5 yards wide. At a price of $25 per linear yard, you'd need an absolute minimum of 3 yards but realistically you'd want 4 yards so your Hexamid doesn't wind up looking like a patchwork quilt. So figure $100 for the cuben fabric.

In your post you mention nylon, if you used 30 denier nylon instead of cuben you'd be looking at a weight of roughly 1.4oz per square yard. At 4.5 square yards of material, you'd be looking at a weight increase of 3.6oz if you opted for nylon. Your cost would be roughly $12 linear yard or $48 for four 60" x 36" yards needed.

The netting needed for the Hexamid weighs probably 4 ounces since the tent weighs 7.35oz minus 2.65oz for the cuben and a bit more for the zipper etc. This mesh weighs 0.7oz per square yard, so you're looking at about 6 square yards or probably 4 linear yard off a roll of fabric about 5 feet wide. At $7 for a linear yard (Thru-Hiker.com) you're looking at roughly $30 for the netting.

So the fabric cost would be roughly $80 in silnylon or $130 in cuben. On top of this you'd need thread, a zipper etc.

The actual pattern and measurements for this shelter would be hard to get. You'd likely need an owner to carefully measure the shelter….or you could order one and return it but that's kinda shady.

PostedFeb 7, 2010 at 4:51 am

Thanks Dan,

I hadn't thought to do a weight analysis of the shelter to magic out the yardages like that. I was thinking about doing it in nylon, as it's so much cheaper, but I also have a boatload of tyvek home wrap to mock somthibg up, after which I might try spinntex with a good pattern.

I don't like the idea of buying one and then returning it, feels too much like running it through a xerox. Your weight analysis got me thinking about possibly running some simple trig on the dimensions he provides on the website. With a little magic of my own I may be able to get some of the pieces pretty accurately traced that way. I'll pull out my 9th grade math books and let you know how it goes.

If I can keep this shelter under $100 that will be awesome.

PostedFeb 9, 2010 at 1:06 pm

So after some trigonometry, I've come up with what looks like a pretty good pattern for a Hexamid clone. It makes good use of most fabrics on the market today, given a 57" width (which includes spinntex, and could be shortened 3" to accomodate cuben). This pattern involves only 3 seams, and may leave enough excess to fashion a deployable door. The two red triangles would be sewn together on their 25" sides, and then both would be sewn to the 150" side of the green piece.

While probably not an exact replica of the hexamid, does this look close enough to function in a similar fashion? The peak and corners would have to be reinforced obviously, and I'm pretty sure I would need to tweak the pattern a little to allow for seam allowances, but does it look like I'm going in the right direction? (I'm asking all those MYOG tarp guys out there.)

At about 4.25 yards, 4.5 if conservative this would be about $80 in Spinntex or $50 in silnylon before netting (thruhiker.com). What is a source for the .6 oz cuben that zpacks uses?

Hexamid Sketch

Joe O’Toole BPL Member
PostedSep 30, 2010 at 12:29 pm

looks good to me. how did this turn out? can you post pictures? I'm about to embark on something similar and want to mimic the same hexamid style you did.

PostedDec 9, 2010 at 1:24 pm

New to the forum but have been reading for a while. Looking to make my own shelter for bikepacking and this shelter looks like the one.

Did this project ever get off the ground?

Also what is the possibility of a hexamid 1+ for slightly room (for my bike) maybe with a two piece main body for the shelter. So it would only be 3 main seams.

Any ideas would be greatly appreciated to get me started.

Jerry Adams BPL Member
PostedDec 9, 2010 at 1:44 pm

You can get 2nds silnylon from owfinc.com or quest outfitters or other sources – $5.50 per yard (60 inch wide) – I've used this a lot and never noticed any significant defects.

PostedDec 9, 2010 at 1:48 pm

Just a word of caution about DIY tent project as a cost saving exercise.
( this is not relevant at all if you do it for the pleasure of doing it…)
People focus on the cost (and weight) of the fabric. Overlooked are all of the required trimmings such as netting,grosgrain ribbons,cords,zippers, nylon thread .
That is not so much the cost of the material but postage or trips to town to source the material from.
Not unusual for example to get the wrong zipper (size or length)
On top of that , most often the first (and sometime the second) version does not work out .
You may also need a new sewing machine, most likely at least new needles.
Again if it is a hobby, then it is all part of the fun; as a cost saving measure it may not work as cheaply as some think.
My guess is that 8 out of 10 people starting to make their own tent do not finish or end up using it.
At the same time note that many of the cottage manufacturers were started by a guy (or girl…) that made his own shelter first and it went from there.
Franco

Mary D BPL Member
PostedDec 9, 2010 at 6:38 pm

In sewing clothing, it was always recommended that anything not simple first be made up in the cheapest material available. That gives you a chance to practice without ruining a bunch of good fabric. That's even more important when you are making your own designs.

PostedDec 9, 2010 at 7:58 pm

"In sewing clothing, it was always recommended that anything not simple first be made up in the cheapest material available. That gives you a chance to practice without ruining a bunch of good fabric."

I've used this very same system throughout my dating life. Boy did I ruin a bunch at first. Good thing I went for the 'cheaper' material. I think I'm finally ready for the good stuff…..

John Roan BPL Member
PostedDec 9, 2010 at 8:25 pm

I agree with Franco. I make my own backpacks and other gear, and own a Hexamid twin tent, and I would only try to make my own Hexamid if I thought I could improve on the design. Making just 1, I doubt I would save much if any cost or be totally successful my first try. You should have seen my first MYOG pack!

PostedDec 10, 2010 at 2:05 am

Thank you for the comments, but this would not be my first project by any means.

I want to make my own for the satisfaction, plus I have already have a large amount of 50g ripstop sinylon. I am just looking to improve on my golite lair style shelter. So either the hexamid or mld trailstar look like good designs.

PostedDec 10, 2010 at 10:47 am

I made a GG "The One" clone a few years ago in silnylon (24oz)and am happy with it, but am always looking for new ideas and projects. My cutout for the roof was very similar to the one previously posted.

roof template

I am making my mockups with 6 mil plastic and duct tape (cheap). This cutout is based on 54" material (cuben demensions). I found that the rear waste cutouts were sufficient to make eyebrows (54" material) but I want a beak so will have to dedicate more material for that. I like the beak for storage and shelter space. The front pole is angled in at the top to get a taut pitch and give more floor space. The rear has an eyebrow sheltering for increased ventalation and view. Still need to add ventalation at top of front beak.

These are my ideas:

img src="/backpackinglight/user_uploads/1292006290_34095.jpg" alt="front view" width="550" height="283">Rear image

I would like to make this in cuben but like you there is the cost. If you make it in silnylon you should add tensioners to account for silnylons affinity to sag.
Not sure if I will get this project built, have others ahead of it, backpack and tarp project.

-Dale

PostedJun 16, 2011 at 6:05 pm

Sorry to re-open this thread but I thought I would throw in a few pictures for those wanting to try this project. I also want to refine that pattern to get a better proportioned tarp.

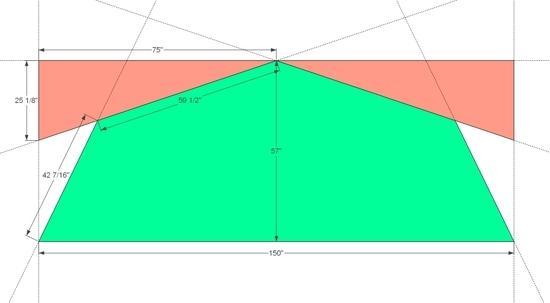
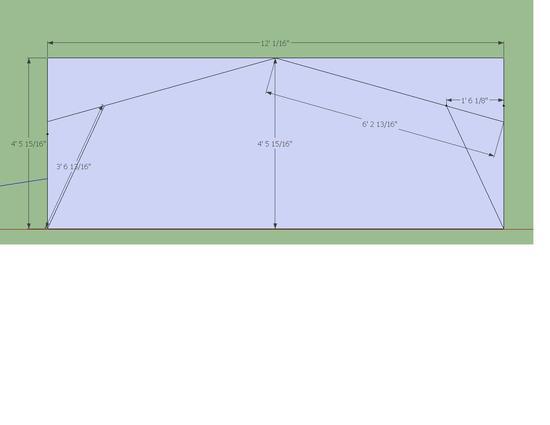
For this project I used Peter’s Hexamid like pattern with no modifications to dimensions. Flat felled seams were used for the beak and attaching the beak to the main tarp body.

Photobucket

Hexamid pitched in the back yard.

Photobucket

Guylines try as they might to achieve a taught pitch…

Photobucket

Lots of usable room under the tarp!

Photobucket

Back Left Side (Considering a heavy Cat Cut from back left side pull out to center back pull out)

Photobucket

Back Right Side (considering a heavy Cat Cut from back right side pull out to center back pull out)

Photobucket

Right Side (considering a light Cat cut from Front Right side pull out to Back Right side pull out)

Photobucket

Left Side (considering a light Cat Cut from Front Left side pull out to Back Left side pull out)

Photobucket

Beak details (I think the beak is also a big part of the problem as the angle of the beak is nowhere near as aggressive as needed requiring the front right and left tie outs to be pulled much further back than the Zpack Hexamid which throws off the pitch for the rest of the tarp)

The tarp in it’s current state is actually quite usable! I brought it on a Troop (I’m a scoutmaster) backpacking trip in Henry Coe State Park with about 2 inches of rain and several hard downpours and stayed absolutely dry. The Tarps ground cover is very expansive and the tarp was a hit amongst the troop, comfortably providing shelter for 4 seated persons during dinner.

Despite it’s current utility, I don’t like the loose backside or the tremendous force required to make it look remotely taught in some areas. I don’t know specifically what the remedy should be. Cat cuts seem like they could help to tighten things up a bit on the sides and back and I’ve considered shortening the front beak panels (in the area of the flat felled seam) to dramatisize the angle of the beak. I suspect that the tarp is a bit shallower (front to back) and longer (left to right) than the Zpacks Hexamid and this might be what’s throwing off the pitch.

I found this review of the Sil Hexamid to be quite helpful and I would ultimately like my hexamid to function and look like that.

Would anybody that owns a Hexamid be willing to carefully measure the perimeter of their tarp?

Also, any comments or advice are welcome!

Viewing 15 posts - 1 through 15 (of 15 total)
Loading...