Topic

Bevy of SUL

  • This topic is empty.
Viewing 18 posts - 26 through 43 (of 43 total)
PostedApr 9, 2006 at 9:10 pm

Peter,
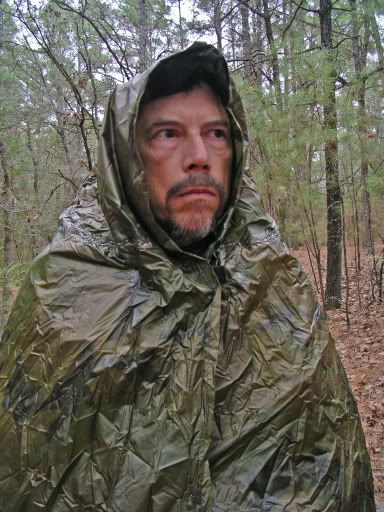
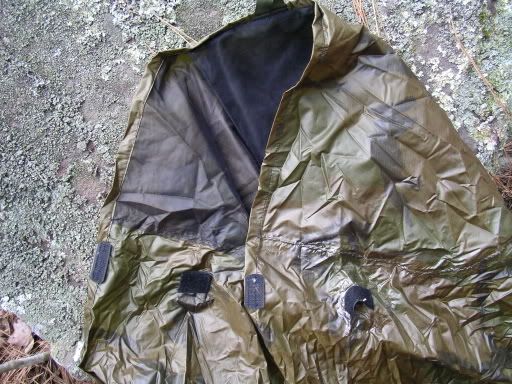
A cape forms the hood by folding a flat piece of fabric and holding it in place with some kind of fastener. For a coated nylon cape, I prefer to line the hood area to keep the clammy nylon off my face. It makes sense to also put the storage bag at the crown of the “hood”.

To get a feel for this, take any large piece of fabric like your tarp, locate the center of one of the long edges, layit over your head, pinch points over your shoulders and about 6 inches from the hem and pull the bunched fabric forward and together at your throat. That’s about it. You will notice that the two points are 28 to 30 inches apart (and as I said, 6 inches in from the hem). If you put a tab at one of those points on the outside of the tarp and one on the inside and add matching velcro or a button and buttonhole, you’ve got a cape. You can line the hood or not. If you use a hat, you can just throw it back and avoid having the clammy thing around your face.

The only other thing you might possibly want to do is put velcro tabs on the hems of the back corners — if they hang too low. With the size of your tarp, you probably won’t have to do that – at least when wearing a pack. That’s with the 8.5×5 or 9×5 foot capes I have made. I like the shorter tarp, despite my height (over 6′), because I mostly use a hammock that works better with a tarp of moderate length. And I can use even an 8×5 tarp on the ground using a pyramid setup.
PostedApr 9, 2006 at 9:21 pm

Miguel–Please see earlier post.

Erm, it’s true your first line mentioned the tarp being made of spinnaker, but thereafter nothing indicates what the bivy is made of. From the picture of the items lined up with the Coke can the floor material of the bivy looks like it’s spinnaker, but that still doesn’t tell me what the upper portion is made of. Might I ask again what the material is?

PostedApr 9, 2006 at 9:28 pm

One of the members here, Peyo, from France, posted some pictures of his cape-without-a-hood idea a while back. Here is the Google-translated link:

Peyo’s idea

PostedApr 9, 2006 at 10:04 pm

Yeah, Peyo got it the same place I got it:
Karen’s fun ideas

Her directions for making a blanket cloak are good for experimenting to find the right location for your hood tabs.
Image hosting by PhotobucketImage hosting by Photobucket
This hood is lined with bug net and has the storage sack attached at the crown. More comfortable that way. Two sets of Velcro tabs (outside and inside) hold the hood closed with an overlap.

PostedApr 10, 2006 at 3:32 pm

Miguel- I have copied and pasted below my earlier post, which was in answer to a question posed by Ryan F.

POSTED BY
Peter McDonough
(crazypete – M) SUBJECT Re: SUL stuff ON 04/09/2006 18:04:17 MDT POST REPLY
Dimensons of tarp: 52″x106″

Spinnaker Source: Friends with a sailmaking shop’s owner–Free

Fabrics on Bivy- Spinnaker Bottom(same as tarp) with 1.1 oz DWR Ripstop Nylon, with 1/2 grosgrain pullouts(same as tarp)

Oh yeah, and the reason for two cordlocks, for those who think they are unnecessary, the zipper opening prevents a connection between body panel and head flap. I chose to use two cordlocks instead of simply sewing one edge of the cord in because it was easier to adjust(notice ball of thread where I tore out the failed attachment point). It seems as if the two cordlocks operate almost independently, even though they are on the different ends of the same cord.

Edited by crazypete at 04/09/2006 18:07:39 MDT.

EDIT | PRINT

PostedApr 11, 2006 at 8:50 am

Thanks Peter. Sorry for the insistence on getting the information. I’ve been looking at putting together a new bivy/ hammock for quite some time now (already made five of them) and am still looking for something that works better than what I have right now. Looking for new materials, too.

Thanks for the information.

PostedApr 14, 2006 at 2:44 pm

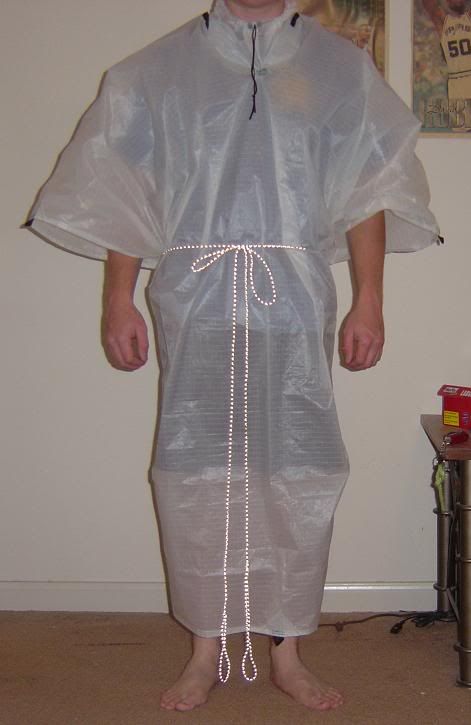
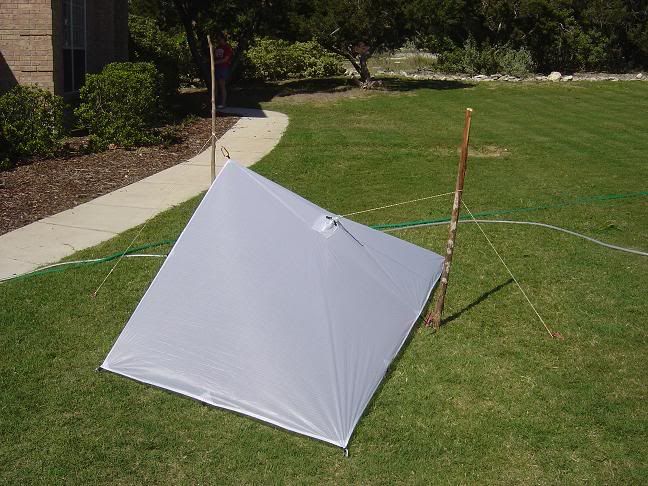
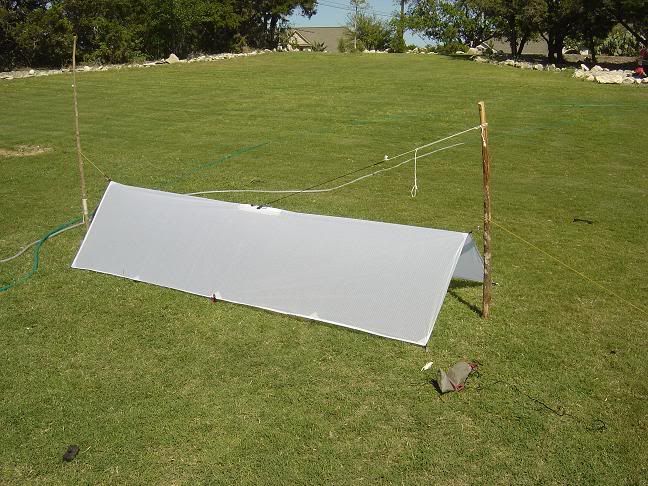
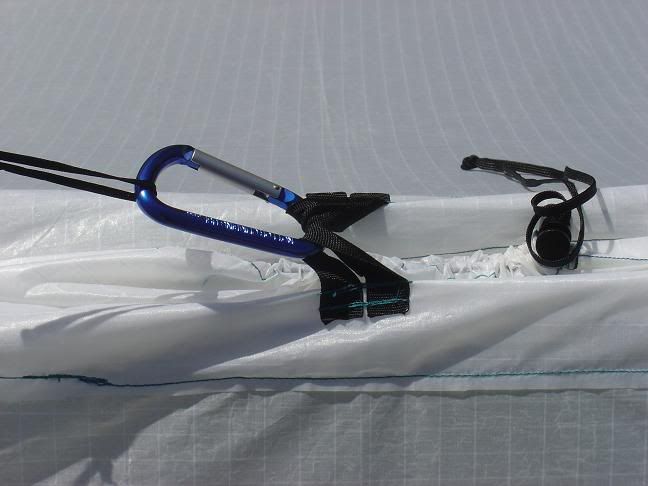
OK, Well it was the weekend again so I finally had enough time to sit down and finish off the poncho-tarp. Sorry Vick, but I decided upon a poncho over a cape because with a cape I was not able to use my hands (this could be a major problem if you tripped–you would get hurt and the cape would probably be torn). I decided to go with the neck gasket because we had a KILLER rainstorm during the week and I went out and tested using a rainjacket without a hood plus a hat, and that combination worked well, and I don’t believe I will see a more serious rainstorm anywhere. The gasket was placed as a slit in the cloth rather than a circle because that gives the tarp greater stength.

Image hosting by Photobucket
Me wearing the poncho. Notice how it falls all the way to the feet, eliminating any need for gaiters, spinn chaps, etc.

Image hosting by Photobucket
The poncho set up as a pyramid with the neck gasket tied out.

Image hosting by Photobucket
This is my ultra bad weather set up. I could add guylines to all the sides to raise it a little but I consider that a pain and unecessary.

Image hosting by Photobucket
A close up on the neck gasket in the closed position, that is, with the gasket cinched slightly and tied out. Notice the guyloops on opposing sides of the slit which prevent deformation of the slit and preserve most tarp stength.

Benjamin Smith BPL Member
PostedApr 14, 2006 at 2:53 pm

Pete,

That looks bloomin’ fantastic! Great idea on the guyouts on either side of the opening. When wearing the poncho “locked down” the way you show it in the picture, do you find that it ventilates well enough? That looks pretty enclosed.

Ben

PostedApr 14, 2006 at 3:03 pm

Pete,

did you put the hood in the very middle of the tarp, or put it closer to one side so the other side is longer to put over a pack?

PostedApr 14, 2006 at 3:59 pm

Hey, Peter, no skin off my nose. BTW, I think the gasket is a better fix than a hood… but I can’t tell how you seal it. Is it rolled or done like a sphincter? I’ve used the latter with a spindrift collar – a little extra ‘tube’ above the drawstring casing.

PostedApr 14, 2006 at 7:26 pm

Vick–It closes by both methods. I tighten the gasket about halfway and then roll the rest(Its not really rolled in the picture). The carabiner then holds the hold shebang in place.

PostedApr 14, 2006 at 7:30 pm

Ryan– The gasket is in the very middle of the tarp for two simple reasons.

A) In light rainstorms, I wear the backpack under the poncho to keep everything dry and thus don’t need as much coverage.

B) In serious rainstorms, I wear the pack over the poncho(everything in the pack is protected, if it is able to be damaged). This way, the poncho protects the back of me as well as the front.

If the hood was offset I wouldn’t be able to do this.

Adam BPL Member
PostedMar 6, 2007 at 8:44 pm

I realise this thread ended a while ago, but Pete, did you think of using velcro at all in your colar design? I am going to make a poncho/tarp of similar design-mine will be slightly shorter in length, and I like your colar idea immensly. I am thinking of adding some velcro to the colar so I can seal it a bit better. I will still have grosgrain loops like you have, and a draw cord and toggle.

I am thinking of putting the hook velcro on the outside of the colar at the back, and the loop on the inside at the front, to reduce irritation (and catching in facial hair on long trips).

I won't use the poncho/tarp as rainwear very often-pretty rare to have to use rainware in the conditions I am expecting

PostedMar 6, 2007 at 9:04 pm

Pete, how did you sew the tie-outs.

I've gotten a second breath and am about to try to tackle a tarp and a bivy (Meteor bivy unless someone has a full-scale pattern. I went blind trying to plot the curves on the meteor pattern).

Vic, what were there dimensions of yours again? And how did you do your tie-outs. The more ideas the better.

Dwight

Adam BPL Member
PostedMar 6, 2007 at 9:18 pm

Dwight, with the Bivy you could just trace an outline of your sleeping bag/quilt, and add a bit of leeway. I am going to make a bivy and do just that-cant go too wrong

PostedMar 6, 2007 at 10:03 pm

The drawcord is adequate for a seal in blowing rain, and in most conditions I just leave it loose.

The hem is the edge of the tarp folded over twice, the reinforcement trianlges were folded over 3 times in this seam, thus creating aa very thick bias hem to stich the guyouts to. The webbing was larksfooted and then two lines of stiching were used to secure to the hem.

PostedMar 7, 2007 at 8:45 am

Well, since I now have some expererience on making a bag liner, and making it wrong, I should have a leg up.

Instead of just drawing an outline around the bag, I need to take into account the lap up around the sides. I mean, I know I'm shallow, but I'm not flat.

I do want to be able to keep the mesh off my face though.

Viewing 18 posts - 26 through 43 (of 43 total)
Loading...