Topic
Diffrent seams to make tarp
Forum Posting
A Membership is required to post in the forums. Login or become a member to post in the member forums!
Home › Forums › Gear Forums › Make Your Own Gear › Diffrent seams to make tarp
- This topic has 29 replies, 1 voice, and was last updated 4 years, 1 month ago by
 Adam Kilpatrick.
-
AuthorPosts
-
May 11, 2016 at 9:57 am #3401780
You could sew the seam, maybe with a little extra width of fabric, then set up the tent and paint some silicone:mineral spirits at the seam from the side so the width of fabric is glued to the main fabric so it takes some of the load.
Or even just do a regular flat felled seam and paint mineral spirits:silicone on top and bottom and that might strengthen it. (that is, seal seams with silicone:mineral spirits)
May 11, 2016 at 12:43 pm #3401834Thanks for the feed back. I hadn’t seen Hilleberg’s tech section before.
Jerry – Interesting idea w/ leaving the edges long and bonding them as part of the seam sealing process. My one concern with this is that every how-to I’ve seen on bonding patches includes compressing the layers while they cure. That would be a challenge on a full ridge line. But I suppose it’s possible w/ a couple 2×4’s, drywall screws and foam weather stripping for padding. Might be more than I’m up for on this project.
Mario – A thought for your hem experiments. Make a normal single rolled him (2 folds, creating 3 layers), but make the hem deeper than usual – say 1″ finished, consuming 1.5″ – 2″ of material. Then fold that in half under the back side of the tarp. This gives you your padding and creates 5 or 6 layers.
And on that note, I just realized my dollar seam (thanks for naming it) is actually 2 rolled hems, back to back.
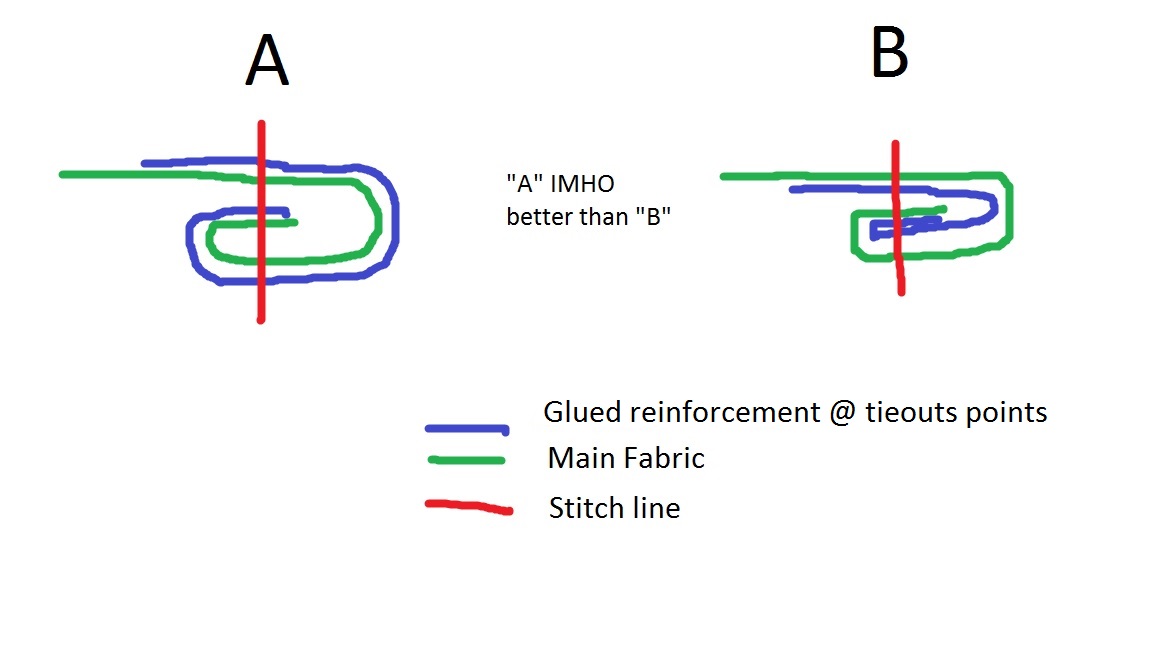
May 11, 2016 at 3:18 pm #3401862Thanks for the suggestion Rene, Although that would solve the problem of “padding the stitch” it would leave me with more layers of fabric than needed on the perimeter of my project. The problem can also be solved by using glued reinforcement patches and being a bit more mindful of in which side of the project the reinforcement patch goes.
This quick drawing shows how the reinforcement patch can be used to “pad” the stitches of the hem line. I know most people like to have their reinforcement patches on the inside of their project to minimize their exposure to the elements but perhaps this may not be the best when working with materials with lower tear strength. (i.e silpoly PU 4000).
 May 11, 2016 at 4:22 pm #3401871
Ah. You said “double rolled hem” so I thought you meant 5 or 6 layers.
Yeah, patch on the inside, roll to the outside.
Mar 1, 2020 at 4:21 pm #3633876Wowo Hilleberg’s method looks amazing… and cooling jets to reduce needle temperature to reduce seam hole! Intense.
-
AuthorPosts
- You must be logged in to reply to this topic.
Forum Posting
A Membership is required to post in the forums. Login or become a member to post in the member forums!
Our Community Posts are Moderated
Backpacking Light community posts are moderated and here to foster helpful and positive discussions about lightweight backpacking. Please be mindful of our values and boundaries and review our Community Guidelines prior to posting.
Get the Newsletter
Gear Research & Discovery Tools
- Browse our curated Gear Shop
- See the latest Gear Deals and Sales
- Our Recommendations
- Search for Gear on Sale with the Gear Finder
- Used Gear Swap
- Member Gear Reviews and BPL Gear Review Articles
- Browse by Gear Type or Brand.
