Anybody have an insulated hood or insul balaclava pattern ??
Topic
Anybody have an insulated hood or insul balaclava pattern
Become a member to post in the forums.
- This topic has 13 replies, 3 voices, and was last updated 3 years, 4 months ago by
 .
.
Viewing 14 posts - 1 through 14 (of 14 total)
i made this one
http://argo.in/zkoumal/pattern-balaclava.pdf
look up kinsmans with hood thread on make your
gearhttp://www.backpackinglight.com/cgi-bin/backpackinglight/xdpy/forum_thread/10988/index.html?skip_to_post=80331#80331
Bad Link
Lots of good info there, but I still cant get to that PDF. Its a dead link.
If its on a members computer, can you please email me the pattern ??
Thanks
My original post with the pattern and photos of my two balaclavas made is here (I corrected the download link):
Note that these balaclavas are designed mainly for sleeping, to be used with a hoodless quilt, so the face opening is rather small and it is possible to cinch it to leave just a small hole for mouth; the balaclava is also quite long to ensure good seal around the neck. It works perfectly for sleeping, but it is not completely fashionable for daytime use (especially the warmer one that is really huge).
I haven’t had success in finding a pattern for an insulated balaclava. The weblinks are pretty much dead to any past entry posts. I found plenty for fleece ones but I’m looking for one of the down or apex insulated ones.
I used this one a couple years ago to make a balaclava with 3 oz primaloft. I made a quick mock up with some scrap fabric and adjusted it slightly; it’s been great. https://backpackinglight.com/forums/topic/diy-down-hood-balaclava/
Thanks Michael for the link. For the longest time I couldn’t open that link to the zip file until I finally tried a different web browser and it downloaded into my download folder.
Meanwhile, I found 1 other pattern out there: https://ripstopbytheroll.com/pages/customer-project-climashield-insulated-hat
I’ve been working on a balaclava for a while. I’m still not satisfied. Current pattern:
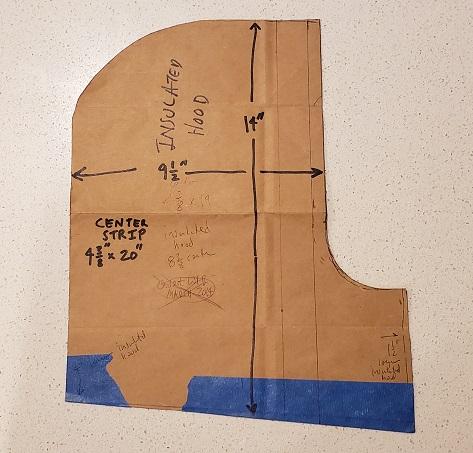
There is also a rectangular center strip.
The curves in the pattern are not critical, you can just approximate.
Worn:
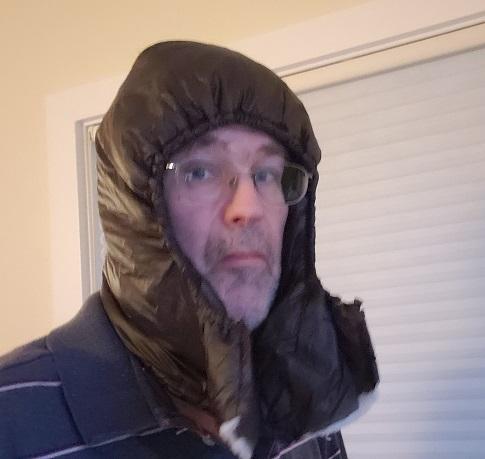
There’s a snap below my chin so I can unsnap if it’s not that cold or to take it off. I didn’t like a previous version that didn’t unsnap – it took off my glasses when I removed it and was too constricted.
But I like this better:
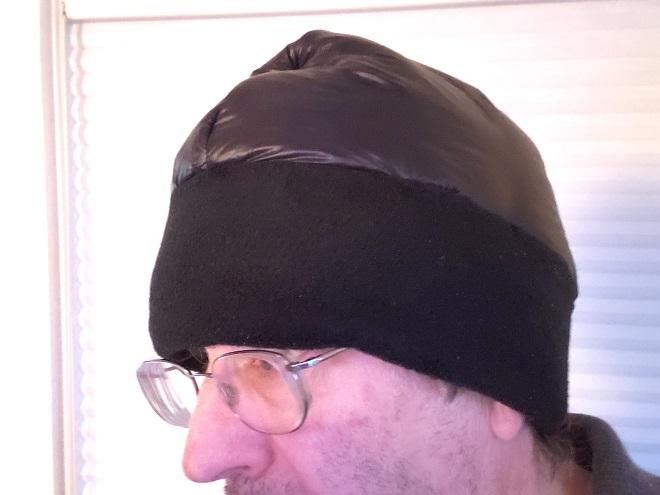
There’s a fleece strip down below, 7 inches wide folded over. This provides the elastic to keep the hat on my head. Then the top is just:
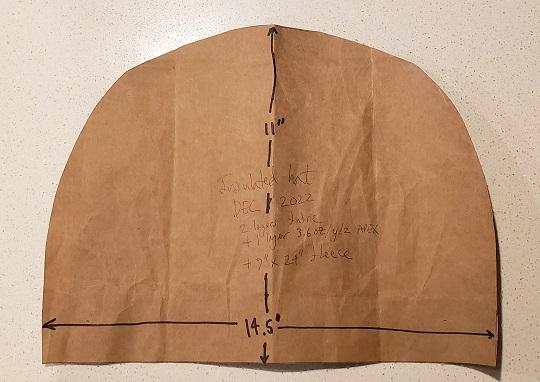
I used that pattern for 0.7 oz nylon inner and outer layer and 3.6 oz Apex insulation.
This was much warmer than the fleece hat I normally wear. The quilt butts up to the hat so I get full coverage.
I just remembered – that was too tall, 11 inches is too big. I just put it on too tall, pinched off where it was the right size, and then sewed a french seam. Maybe it should be 9 or 10 inches.
Both your creations look really good and warm. Thanks for sharing. I’m excited to work with down & synthetic insulation. 2 questions:
- If filling with down what fabric do you recommend I use for the internal baffle strip? Does it matter?
- For synthetic insulation do you have to hand sew it to the pattern or can you use the sewing machine?
the way I do synthetic is sew through outer fabric/insulation/inner fabric. Along a line laid out at the edge of the pattern. That completely captures the synthetic so it doesn’t slide around leaving empty (cold) spots). That is the edge of the finished garment.
Then, if it’s an edge, I’ll cut the inner fabric and insultation close to the line and cut the outer fabric 1 inch wider. Then fold that over twice and sew (that is, a hem).
Where I have to sew the right and left side together I’ll do a french seam. Sew the two pieces together about 1/2 inch beyond the line, cut all six layers off close to the line, then turn inside out and sew them together finishing the french seam.
Or just leave the raw edge of fabric and insulation inside the hat. Better do 2 rows of stitches to capture any unraveling.
“If filling with down what fabric do you recommend I use for the internal baffle strip?”
readers are yelling not to encourage me to talk about asymmetric baffles. Again.
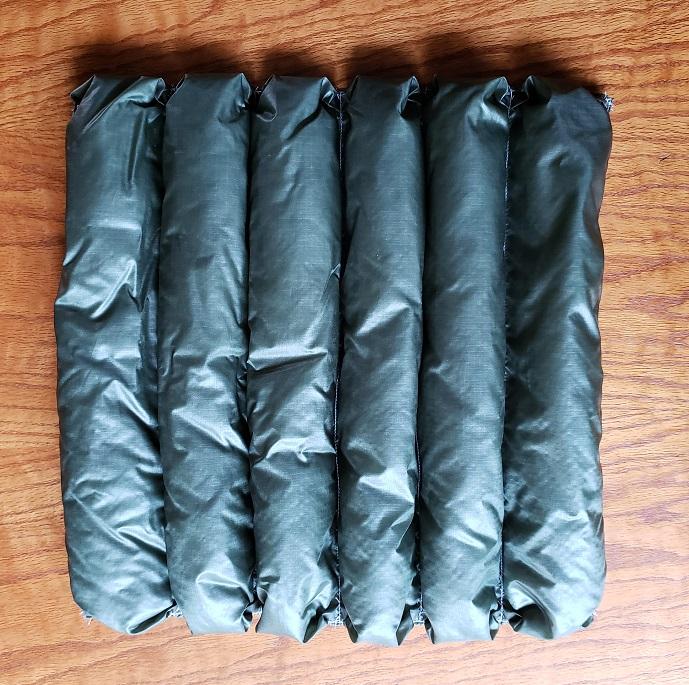
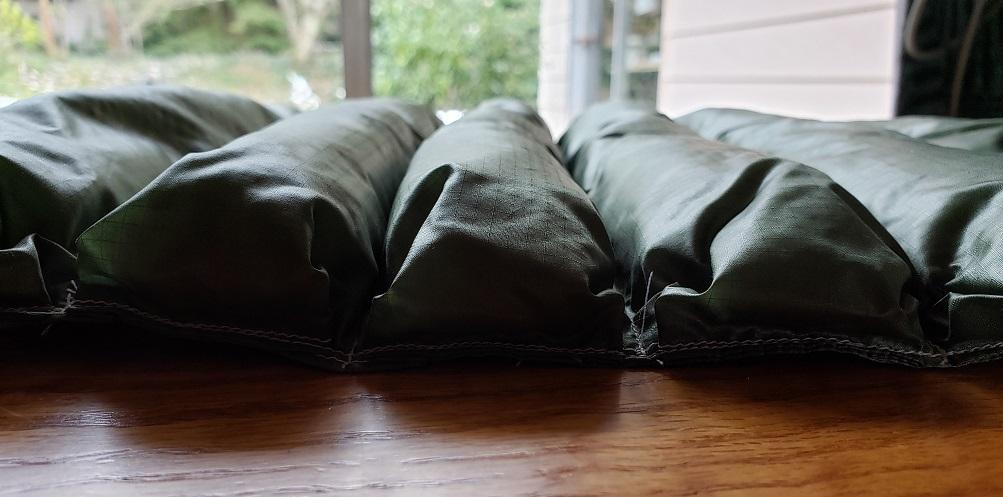
Top view and side view. That’s a 1 foot square test piece. The baffles are 2 inches.
I lay out 2 inch lines on one piece of fabric, 3 or 3.5 inch lines one the other piece. Then sew the pieces together on those lines. You also have to make the outer piece 3/4 inch wider on each side.
Then, there are no separate baffles strips to cut out. There are half as many rows of stitches compared to conventional baffles so it takes less time. When you’re done, all the seams are exposed. If a seam begins to come undone, you can just sew it back – with internal baffle strips there’s a side you can’t get to.
I claim this is just as warm as separate baffle strips. I’ve made several garments and quilts.
Viewing 14 posts - 1 through 14 (of 14 total)
Become a member to post in the forums.
advertisement
Garage Grown Gear Hidden Gems
Discover under-the-radar ultralight gear from small brands.

