Topic

How to Cut and Reseal a Neoair

  • This topic is empty.
Viewing 25 posts - 1 through 25 (of 25 total)
Steven Evans BPL Member
PostedJul 28, 2009 at 10:07 pm

Modified my full length Neoair today. Final “inflated” length is 32″. Click HERE for all you need to know about this project…enjoy!

**This is actually fairly easy to do, so if you want a shorter pad go ahead and give it a go. That said, a few key points to look out for is:

1) The top and bottom fabric seem to be slightly different widths (by just a tad) so it is important to follow the directions and start the bond in the center. Then work the corners down. I found this to be easier then starting from the corners and working the creases down in the center.

2)Keep in mind that when you cut the pad, you must leave sufficient space from the baffle bond line in order to leave yourself enough material to make another bond. If you muff that part up, you will have to cut to the next baffle which could be a few inches and therefore your pad will be a few inches shorter

3)I cut my uninflated pad to about 36″ and it measured 32″ when inflated…give yourself about 4 inches extra for inflation.

4)I’m not responsible for your leaky pad. ;)
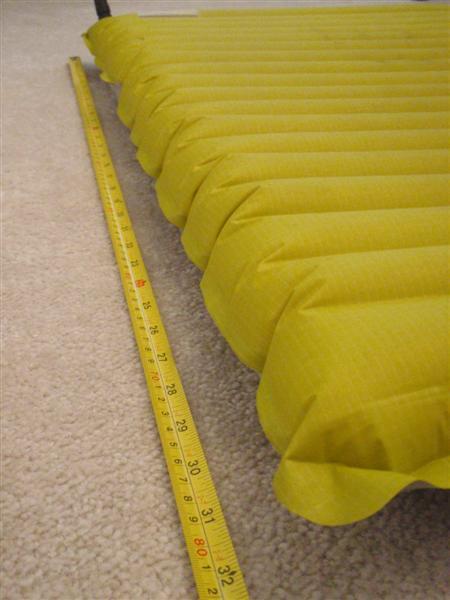
32" modified Neoair

. . BPL Member
PostedJul 28, 2009 at 10:19 pm

nice!

It's a bit of a mummer they don't sell them that size, although if you can get 2 pads out of 1, perhaps the price is a bit more within feason (feasability+reason).

PostedJul 28, 2009 at 10:43 pm

Awesome work! Will be interested to hear how much it weighs now and how it seems to be holding up.

There are a lot of folks who would love to cut down a 25 inch wide NeoAir to 25×48 inches.

PostedJul 28, 2009 at 11:10 pm

it was only a matter of time before someone started hacking them up and making them smaller. Anxiously awaiting more info and pics.

Ryan Teale BPL Member
PostedJul 29, 2009 at 12:41 am

A 25×48 Neoair would be awesome. I have the short but would enjoy the extra width. Anxiously awaiting the details!

Mike M BPL Member
PostedJul 29, 2009 at 6:35 am

looks great, get some sleep and then share the details :)

a 25×48 is what I'd really like (if I was really frugal I'd two 25×38.5's and sell one :))

Steven Evans BPL Member
PostedJul 29, 2009 at 12:08 pm

Just finished uploading all my info to my website…not really in the mood to do it again over here, so…

Click HERE for all you need to know about this project…I even made a video for you guys while I was doing it. Let me know if you have any questions! Enjoy!

Steve

p.s. I can’t watch that video without cracking up. My girlfriend watched it and almost broke up with me…:)

PostedJul 29, 2009 at 1:54 pm

Have you mauled the other half or could you apply a thermarest valve kit to it and make your own 2nd out of it. 2 pads for the price of one?

Casey Bowden BPL Member
PostedJul 29, 2009 at 2:32 pm

Steve,

You are "the man". I bow down to you. Thanks so much for risking your pad and documenting the steps.

Jesse H. BPL Member
PostedJul 29, 2009 at 2:32 pm

The force is strong with this one! LOL

thats awesome, I tried this on an old traillite some years ago, with no success it looked sealed, but had a leak… i thank you for doing this…

Steven Evans BPL Member
PostedJul 29, 2009 at 3:37 pm

Gary,
There was some "minor" mauling on the lower half. I practiced sealing the scrap section about 5 times and also made a sorry attempt at giving it a mummy shape, which is how I found out you can't "rebond" the baffled bond lines. That said, I did keep it and plan on grabbing one of the thermarest valves to see if I can make any use of it.

Casey, Jesse,
Thanks guys. That's my first of many little episodes I want to put together. I'm just glad it actually worked…when you see me inflating it in the video, that is actually the first time I did it. It may not look like it, but I was pretty hyped when it didn't blow open. I had a bunch of other clips with me sitting on it and stuff, but youtube has a 10 minute maximum so I had to cut some stuff out.

I've updated the first post to include some information which I think is important during the process – just to emphasize a few key points.

PostedJul 29, 2009 at 3:45 pm

Steve,

Great work. Thanks also for the video.

Would love to hear about your success with resealing the other half with a valve repair kit.

Victor

Brad Groves BPL Member
PostedJul 30, 2009 at 1:49 pm

Sweet! Thanks, Steve! Now if those size larges would just ship…

Steven Evans BPL Member
PostedAug 2, 2009 at 10:02 am

I checked for leaks (water submersion) a couple days after the video with no bubbles, and have had it inflated for at least 4 days. It's as firm as the day I inflated it, but obviously still have to test it in the field. I have high hopes!

Jesse H. BPL Member
PostedAug 2, 2009 at 5:01 pm

sweet, let us know…

slept on my neoair small last night… (great sleep BTW) and of course saying my goodbye.. ;)

I use a chair kit (BA cyclone)I figure Ill just fold down the sides, to the 20" needed for the chair…

PostedAug 3, 2009 at 2:25 pm

I can't help but wonder if the other half couldn't be sealed as the inflatible pillows sold here on BPL (FlexAir variety).

Insert a thin strip of material allowing inflation via a straw or plastic tube… when tube is removed the internal pressure on the flat material becomes self sealing.

Steve, I have the Large NeoAir and wondered when someone had the courage to do what you did. Thank you for the post. Can't wait to see your updates.

Steven Evans BPL Member
PostedAug 19, 2009 at 6:42 am

It held air for at least a week in my spare room…and I took it out on an overnighter last week. No problems – it "seems" to be as strong as the original bond. I have a 5 day trip planned for next week so keep those fingers crossed!

PostedApr 12, 2010 at 6:48 pm

Did any of you try this with other thermarest mats?
I own a prolite, which I would like to be a bit shorter.
I read that someone failed shortening an old traillite, any other experiences?

todd BPL Member
PostedApr 12, 2010 at 7:15 pm

Jack Ham (I think) wrote an article on this very subject. Worked well for him.

Steven Evans BPL Member
PostedApr 13, 2010 at 7:34 am

Jay Ham did the article and explains it very well. Link is here:

http://www.backpackinglight.com/cgi-bin/backpackinglight/make_your_own_gear_shortening_a_therm_a_rest_pad.html

It's essentially the same process, cut pad to length and and seal with heat from an iron. The older ones are a little trickier because they have the foam glued to the inner surface. You have to remove the foam before re-sealing, or it will allow air to leak out (Jay goes over it).

My pad is holding up fine. I have many nights on it now. I wouldn't hesitate to bring this on any length trip. It's as strong as when I bought it.

>> Bender << BPL Member
PostedApr 13, 2010 at 7:37 am

I would love it if someone wanted to volunteer sending me scraps from the neoair. I really don't want to do puncture tests on a new one!

PostedApr 13, 2010 at 1:34 pm

thx for the replies. I guess I'll check on ebay in the upcoming days; maybe I'll find a steal there on a broken mat to test.
Otherwise I'll just cut it open when I come home drunk from pub next time… in the morning I'll then figure out how to reseal it again.

Viewing 25 posts - 1 through 25 (of 25 total)
Loading...