Topic

A very not light pack.

  • This topic is empty.
Viewing 24 posts - 1 through 24 (of 24 total)
David Chenault BPL Member
PostedApr 18, 2009 at 3:24 pm

The last year has revealed a hole in the pack quiver. A ~50 liter, tough, simple pack for rough backpacking and more gear-intensive pursuits (like backcountry skiing). Nothing ready made was super-close to what I wanted, and I like projects, so I ordered up 2.5 yards of Ballistics and 2/3 of a yard of 1.9 oz silnylon, and made my own last night and this morning.

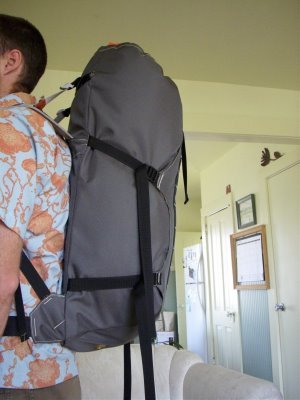
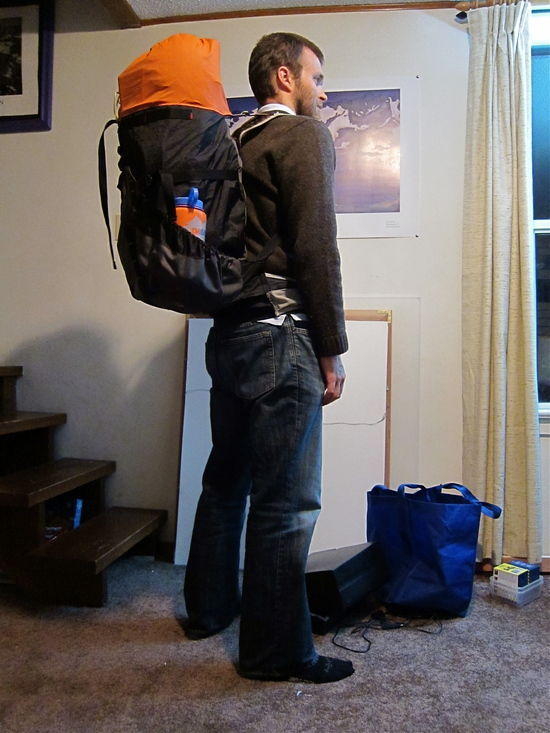
Pack, side view

I'm pleased. The fit is exactly what I wanted it to be, and was based on the dimensions and performance of my Osprey Talon 22, and my Cold Cold World Ozone. With a few adjustments.

More detailed shots are available here: http://bedrockandparadox.blogspot.com/2009/04/how-to-make-pack.html

Roger Caffin BPL Member
PostedApr 18, 2009 at 8:49 pm

Hi Dave

Looking at the attachment at the hip, it seems that the hip belt and the shoulder straps are held with just 1 and 2 rows of Bartack? That worries me a bit: I prefer to sew distributed rectangles with crosses to hold the webbing. It spreads the load better. Field testing will tell.

Any frame used?

Cheers

. . BPL Member
PostedApr 18, 2009 at 9:37 pm

I've been thinking of making a similar pack with an Ortlieb waterproof duffle-bags that weighs about 10 oz.

It should make a simple and reasonably durable waterproof panel-loading pack.

What do you think?

David Chenault BPL Member
PostedApr 19, 2009 at 5:48 am

Roger, there are some other bar tacks (holding the straps to only the inside piece of Ballistics) which aren't shown in any of the photos. I thought about this issue, and decided to mimic the structure from the CCW pack. If I haven't been able to break that one after 6 years of canyoneering and climbing, it should hold up fine. Those panels would be one of the few areas were adding bar tacks would be fairly easy.

I've never been a fan of the ULA Arctic-style packs where the drybag is external. Too much of my hiking is in desert canyons or involves nasty bushwacking. Hauling a pack also becomes potentially failure-inducing. I also like this sort of thing to be very overbuilt.

Brad Groves BPL Member
PostedApr 23, 2009 at 10:22 am

Nicely done, Dave. Very clean, functional design. Still relatively light, especially compared to other bomber packs.

David Chenault BPL Member
PostedSep 3, 2009 at 2:13 pm

I've taken to calling this the all-pack. If it's not a day trip or superlight overnight, I use this. It's also good for hauling all manner of technical crap, though I've yet to take skis anywhere but around the backyard.

Based on a summer of testing, I made a few tweaks which made a huge difference. They also made it lighter: 28.5 oz. including a full Ridgerest short inside.

all-pack revisions

All the nitty gritty and details can be found here:http://bedrockandparadox.blogspot.com/2009/09/all-pack-finalized.html

David Chenault BPL Member
PostedOct 22, 2009 at 2:09 pm

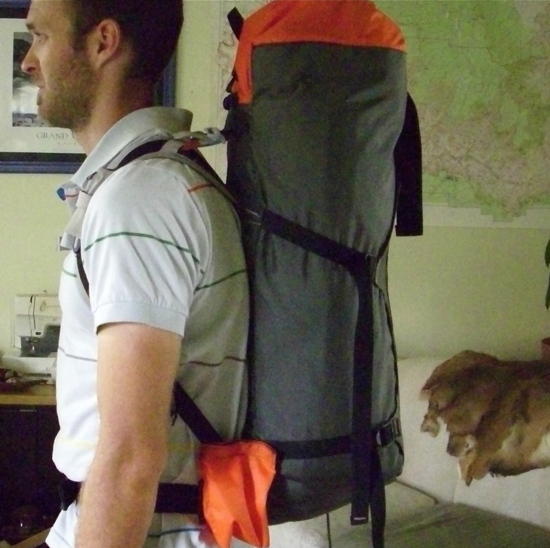
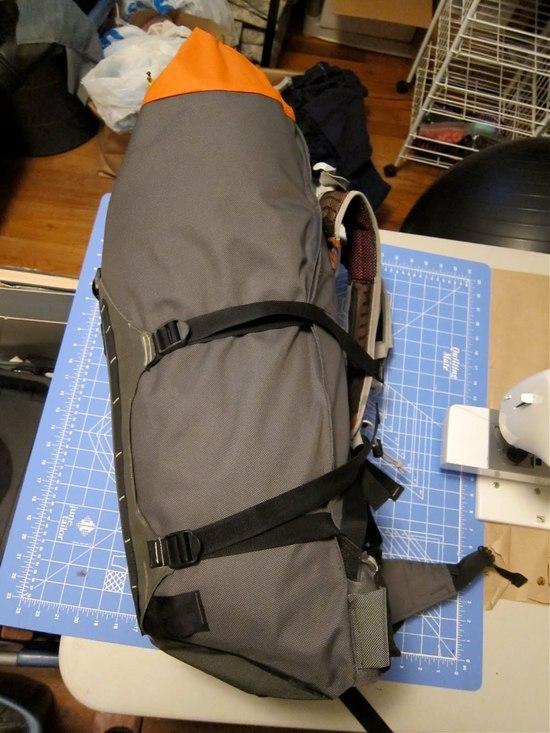
Parcour pack

I put this thing through it's paces enough hiking across the Bob Marhsall last week to call it done, with one modification. The 1/8" Thinlight I added to the shoulder straps packed down to nothing by the end of the trip, so I added in some burlier 1/4" rubberized foam and burlier mesh as well.

Otherwise, it's perfect. I started the Bob trip with over 30 lbs, and while definitely on the outer edges of it's comfort, the pack carried very well. Most obvious was the mobile, body hugging design, and the clean weather-shedding and quick drying properties of the fabrics. The beavertail also held big showshoes perfectly.

Very pleased.

David Chenault BPL Member
PostedApr 7, 2010 at 9:59 am

There's always something else, it would seem.

The heaviest loads I've yet carried in and on this pack have been on day trips, lugging all my ski gear (boots in the pack) up dry trails to access our miserable snowpack. I decided I needed a proper hipbelt. I had an old Mountainsmith lumbar pack in the scraps box, added some yoga mat to the lumbar portion only, and bartacked it on at the outside edges. Eh voila:

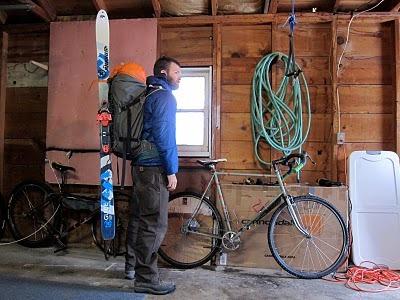
all pack again

It's only attached at those two points along the sides, which allows a bit of sag when loaded, but also promotes a nice range of motion. A successful experiment.

As can be seen above, I also added a bit of webbing in the upper left corner to facilitate a diagonal ski carry, which has proven more stable and out of the way in brush than the traditional A-frame carry.

While I was at it, I put on some hipbelt pockets to keep snacks, maps, and compass handy.

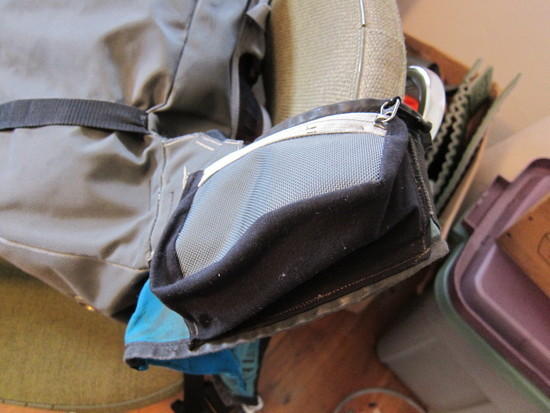
hipbelt pockets

The gray fabric is ballistics, same as the pack body. Zippers don't match, were scrounged from the scarps bin. Black fabric is a poly stretch woven job from some old and worn out Patagonia pants. The pockets fold down and stay out of the way when empty, but can easily hold three snickers bars each. The design does make the zipper opening fairly small when the pack is on. Not a problem given the larger items I put in them, but some might prefer to have the zippers out from the belt a bit for easier access.

Lastly, key this winter has been a vintage Sawchuk innovation:

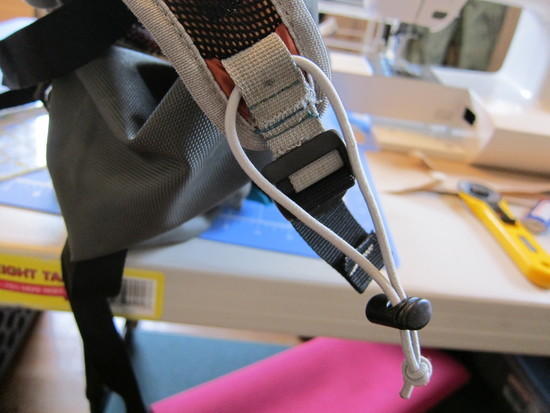
glove holder

I bit of shockcord and a cordlock on the shoulder strap makes for a perfect glove and/or hat holder when skinning uphill. Put the fingers up so you don't get snow in them. When doing some orienteering the other day, I realized I can stuff my trekking poles through the lower part of the shoulder strap, then cinch down the shockcord around the handle and have a nifty pole holder a la the Osprey Exos series. Nice for taking bearings on the run.

Making and refining this pack has been such a fun experience. I've had to tweak it a few times (load lifter height ended up being crucial, and quite finiky), but it works great and adds a bit of "soul" to my backcountry experience. It should be around for a while.

PostedApr 7, 2010 at 10:27 am

I like the look of this pack. Just an observation, but the torso lenght looks off by several inches – it appears too short. If you were to raise the shoulder straps (think Mchale here) you could get away without having the need for lifters.

David Chenault BPL Member
PostedApr 7, 2010 at 11:45 am

David, a very good observation. Based on all my prior experience with far too many packs, I choose that torso length deliberately. For me, the wrap of the straps down my scapulas combined with load lifters makes for a much more comfortable carry than the current fashion (which I lament) of straps attached not far below shoulder level. The shoulder straps also come together much closer together in my design (5.5" center to center), which provides for a more freedom of movement and a better carry when doing things like skiing.

I do wish that the straps were about a half inch longer, that would put the load lifter attachment point a bit more forward which would be best.

I forgot to add the weight earlier. 34 oz. That hipbelt was heavy.

David Chenault BPL Member
PostedJul 28, 2010 at 8:57 am

This is the final update, for real!

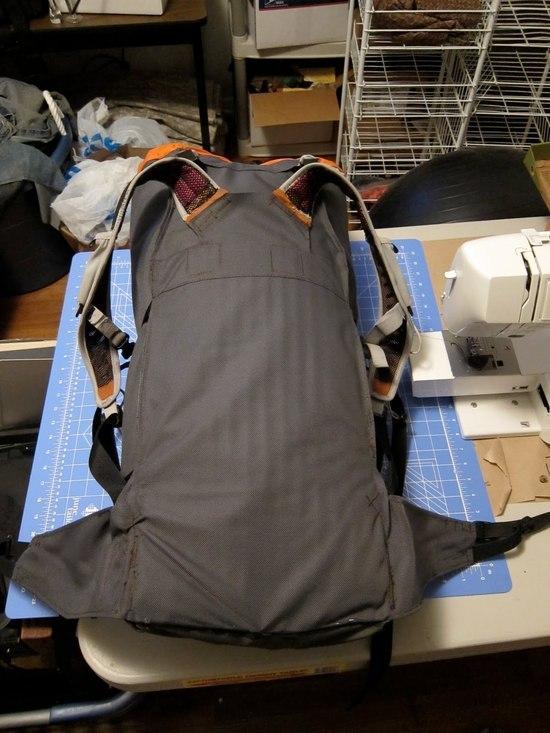
allpack

Lengthened the shoulder straps with the yoke shown above, and changed the hipbelt (again). As David noted a little while ago, the straps were indeed too short. They are much more comfy now, and the pack fits like a glove. The Mountainsmith hipbelt was ok, but I decided it was overkill. These changes necessitated a new piece of fabric for the backpanel.

allpaaaaacckkk

I also changed the shape of the pack subtly. It's a bit narrower at the bottom, and a bit wider at the top. This seems to agree with my center of gravity best. Spring skiing and overnight packrafting trips have borne this out.

To make this version really permanent, I aquasealed the bottom seams. No going back now! (As if..)

Long term report: yoga mat makes for very effective shoulder strap padding. It has proven very durable, and doesn't absorb water.

PostedJul 28, 2010 at 9:58 am

Looks good, and I completely agree with your observations about strap attachments. I've been thinking of modding my jam with this exact setup.

Thanks for sharing!

PostedAug 17, 2010 at 8:23 am

Disregard, i just saw your link to the details…..

Nice pack!!! I plan to make a larger version maybe this weekend.

David Chenault BPL Member
PostedAug 17, 2010 at 5:25 pm

Thanks for your interest Kyle. Between that and the fact that a surprisingly large number of hits to my blog come from this thread, I thought I'd post an update. The pack has gotten a lot of use this summer.

The basic design of clean tough bag with beavertail and minimal harness is very applicable to a wide range of activities. The beavertail pocket (much respect to Dana Gleason!) is useful for all sorts of things; I can't imagine building a pack without one.

With all the backpacking and packrafting I've been doing this summer, I do find myself wanting side pockets for water bottle access. However, I'll soon be building a bigger pack which will have easy-access side pockets (and really be the culmination of the design and experimentation process this pack started), and the pack of side pockets makes bushwacking, skiing and climbing much better.

In short, I occasionally wish for more/different features, but those ends are better served by a different pack.

Feel free to continue to ask questions here or via PM.

Jerry Adams BPL Member
PostedNov 11, 2010 at 6:05 am

I have that disease too

Making ever evolving models of packs, and other stuff

How much does it weigh?

David Chenault BPL Member
PostedNov 11, 2010 at 6:23 am

Not sure on the weight. We moved a month ago, and the scale must still be in one of the unpacked boxes. Will advise.

PostedNov 11, 2010 at 7:24 pm

Your side pockets look great.
I've been wanting to hack my Jam2 and put some bign's like that on.

David Chenault BPL Member
PostedNov 11, 2010 at 9:55 pm

Craig, part of my inspiration for packs was the Pinnacle. Kevin S. had one on our Bob trip last year, and with a few notable exceptions I really like the feature set.

I'd be fairly simple, depending on how the seam around the edge of the bottom is done. Undo that seam, cut most of the side pockets off (leave a bit close to the backpanel (the part your back goes against). Then cut or undo the side seams of the back pocket. You could remove the zipper, or leave it. You'd then be adding a piece of fabric to each side that would connect the edges of the back pocket with the remains of the side pockets. I'd make it 8-10" longer than the actual distance between the two. Probably take a 1/2 yard of fabric.

PostedNov 11, 2010 at 10:06 pm

Interesting- that's a totally different approach to what I was thinking. I was going to cut out the side pockets entirely, opening all the seams that meet them (back panel, bottom, and main zippered pocket side) and sew in much larger, gusseted pockets like yours.

It didn't occur to me that I could sew them into the existing zippered pocket, thus connecting it and the side pockets and creating a giant pocket…
Is this how you've been sewing your packs, basically with one large pocket that wraps around to the sides? If so, I missed that. I assumed your side pockets were separated from the main back pocket.

This is hard to explain…

David Chenault BPL Member
PostedNov 12, 2010 at 7:24 am

Craig, the latest two packs have one big pocket that wraps around the pack. Apparently I've done a poor job showing that. If you make the back and side pockets one pocket, and design extra length into both the sides (8-10" depending) and back (2-4") you end up with a very flexible design.

You could remove te side pockets totally, for sure. Just more seam ripping, which can get old. I should add that in this pocket design, the biggest stress point is where each side pocket joins the back panel. Definiely put a bartack or two there.

Viewing 24 posts - 1 through 24 (of 24 total)
Loading...