Topic

My First Daypack

  • This topic is empty.
Viewing 11 posts - 1 through 11 (of 11 total)
Matthew Bishop BPL Member
PostedMar 31, 2009 at 1:14 pm

I finally finished sewing my first pack and wanted to share with all you fine fellow gear makers. I’m reasonably happy with my quality of workmanship (been sewing for quite a few years now), but the numerous design flaws have me eager to make more packs in the near future.

The pack body is made from 200d urethane-coated packcloth and dyneema x gridstop for the high-wear bottom. Heavier than silnylon, sure, but still pretty darn light and much easier to work with.
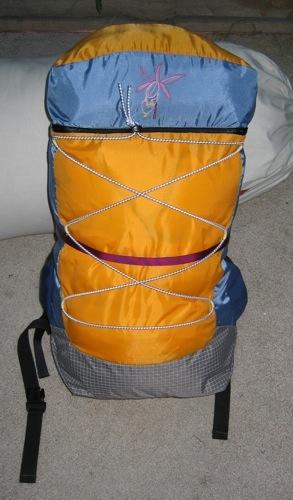
Pack front

I was trying for a daypack, but the volume (including lid) is something like 2000 cu.in. and feels like it has a lot more usable volume than my old REI pack since it isn’t divided into a bunch of silly little compartments. I still want that lid though, since it’s a handy place to keep small essentials separate from other items. Makes me feel better, anyway.

The shoulder straps are essentially unpadded, made with 3d mesh from thru-hiker and 3/4″ binding tape on the sides (from para-gear) for bearing weight. This design was inspired by another pack I saw on here a while back, and I’ve got to say it works rather well. Very light and airy.
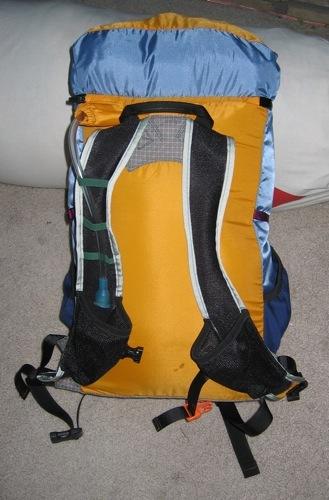
Pack back

The straps attach to the pack body with a reinforcement patch. Unfortunately this still causes point loads at some of the stitches and the thread has pulled holes open in the fabric.
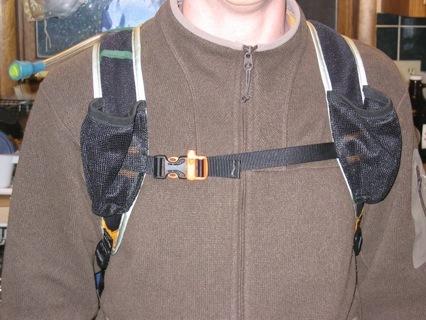
Shoulder pockets

Another important feature is the shoulder strap pouches. They’re good for holding items I’m constantly putting on and taking off like hat and sunglasses. These are a little small, but their utility to me has been proven.

Then there are the side pockets. I changed their design at the last minute after seeing ULA’s line of packs. Originally they were going to be side-entry instead of top-entry like my REI pack’s pockets. They work well in place of waist strap pockets when the bottom of the pack is wide enough to reach them without taking it off first. The top-entry pockets are nearly as convenient and hold things more securely. The material is spandura I got from Seattle Fabrics. It’s a lot like standard lycra but thicker, less shiny, and maybe a little stronger stretch.
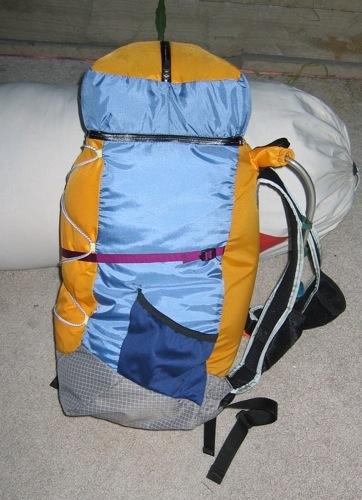
Pack side

I used water resistant zippers for the lid and main compartment. The lid zip works nicely, but the main compartment zip has a lot of resistance and takes work to open and close since it snakes around the pack and thus doesn’t support well against the slider drag. If I do it again, I’ll use a standard zipper/flap for the main compartment. I am happy with my decision to have a single slider on each zipper though. Some OCD part of my nature is never happy with where I leave the two sliders on a zipper. Having a single slider eliminates this niggle.

I added a single 1/2″ compression strap about midway up the main compartment. It goes all the way around the sides and front and has a single ladder lock on the right side. It works well enough but is redundant with the bungee cord net arrangement on the front. I’ve never had a pack with one of these things, but they seem nice enough as an alternative to stretch mesh pockets like on my Osprey pack as well as doing double-duty as a compression system. (Btw, does anyone know where to source that stretch mesh?) The loops the cord goes through should all be a little lower though.

I’ve got this fabric tube elasticized at the end for the hydration port. I was going for something more water resistant than the normal slit in the side. Unfortunately the elastic wouldn’t stretch down enough and still let the bite valve through, so it looks pretty goofy and probably doesn’t work as intended.
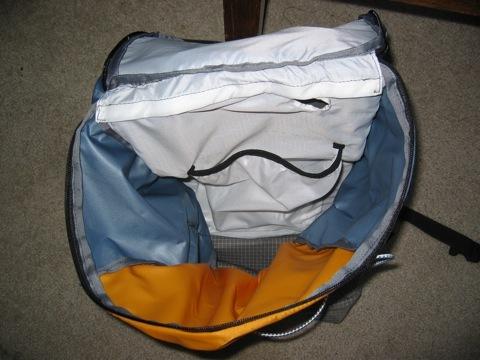
Inside pack

Inside I’ve got a velcroed foam backpad compartment and a bladder sleeve. Unfortunately the bladder sleeve allows the bladder to hang below the pad and I can feel the hardware digging into my back. I’m inclined to leave the sleeve out in future designs since you can just put the bladder wherever and pad it with other items in the pack.
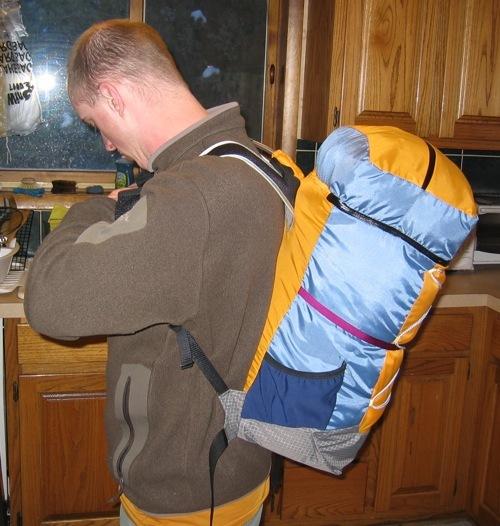
Wearing pack

Finally, because the pack rides pretty high, has straight sides and the lid is above the straps, it hangs away from me pretty badly. I’m hoping a taller pack that doesn’t terminate in the small of my back will hang better. Also, if the main compartment isn’t completely full, the lid hangs down awkwardly making it harder to use the main zip and bungee net.

More images on Flickr.

PostedApr 6, 2009 at 9:38 am

Wow – great looking pack! I've wanted to make a pack for quite a while but just keep making something else instead. Great job!

PostedApr 8, 2009 at 7:41 pm

Great job,really nice workmanship.

where did you buy that dyneema gridstop fabric?

Qiu

Jim Colten BPL Member
PostedApr 8, 2009 at 7:50 pm

Real Nice!

Finally, because the pack rides pretty high, has straight sides and the lid is above the straps, it hangs away from me pretty badly.

GG Virga is similar in may respects and it's load lifter straps help the situation a lot, especially when packed full like in your pictures.

Tim Marshall BPL Member
PostedApr 9, 2009 at 4:25 am

To me it looks like it hangs back because the straps attach a little too low to the pack. If you make another try moving the strap attachment up and i think it will pull in tighter for you.

I agree with Jim that load lifters on the current design would also help with that issue.

-Tim

David Chenault BPL Member
PostedApr 9, 2009 at 7:07 am

I like it! Great colors, too.

My feedback would be that, for it's size and yours, the pack is too fat (extending from your back outwards and backwards) and not tall enough. You'd also likely be able to obviate the stitch pull out on the shoulder strap patch with bar tacks (if your machine sews them) and especially a patch which extends across the whole back panel and tucks into the seams on each side. A woven 1.5" piece of flat webbing works well for this, albeit more in the bombproof camp than the lightweight camp.

I have a pack project on the back burner, it'll likely get built built in a month or so. Thanks for the kick forward.

Matthew Bishop BPL Member
PostedApr 9, 2009 at 1:16 pm

Hey, I appreciate all the feedback. And thanks for the compliments :D

Qiu: The dyneema gridstop is from Thru-Hiker. Really interesting material. It’s stiffer than the packcloth, with a thinner urethane coating but it sure feels like it’ll take a lot of abuse.

Jim: Yeah, a friend suggested load lifters too. I’ll have to think through that, though I can see how a properly compressed pack would have enough inherent stiffness for those to work–a concept I didn’t understand when I designed this one.

Tim: I can see how moving the strap attachment point higher would pull it in, but will that work without a hipbelt holding the pack up? Part of the design criteria for this pack (which I failed to mention above) is optional use of the hipbelt–it’s narrow and unpadded since it’s just meant to keep the pack from flying away from me when skiing or climbing, say. I was trying out the minimalist Jardine style of pack, but it may just not be practical for my needs.

Dave: I really want to agree with you. Taller and narrower seems to be the way to go. I made it wide like that so I could get at the side pockets without removing the pack, but after a little use I don’t think it’s worth it–proper hipbelt pouches would be better.

Also, a wider panel of heavier fabric for shoulder strap attachment does seem like the way to go. Plain 200D packcoth is too light for such a small reinforcement patch. Webbing may not be all that heavyweight either if used carefully. The name of the game is reinforcing enough in the places that matter so you can use less in the places that don’t. Finding out where it matters is the tricky part.

If I’m helping to motivate others, awesome. I’m glad to return the favor since you’re all motivating me, too.

David Chenault BPL Member
PostedApr 9, 2009 at 8:33 pm

Yellerstone start

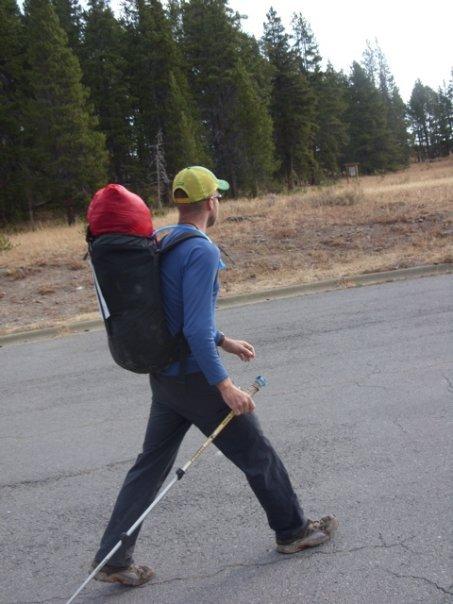
Here's a shot of me that Pivvay took last year, starting our three day Yellowstone trip. A full load (of bagels!) in the modified Cold Cold World Ozone. As you can see, works quite well without load lifters. The backpanel is 10" wide, the pack 7" deep. The backpad is a cut down Z-rest which is quite stiff.

I'll be making a pack based on that one, a little wider, a little fatter, and with a beavertail pocket and side straps (for skis and a shovel, mostly). I'll add load lifters, as in my experience they make a big difference when things get north of 25 or so lbs.

Little things make such a big difference!

Jeff Jeff BPL Member
PostedApr 17, 2009 at 9:03 pm

Dave, does that pack have a frame? I've been wondering if I can find a way to add load lifters to hug the load in without a frame. The Golite Pinnacle does this, but I don't know if it works well or not.

David Chenault BPL Member
PostedApr 18, 2009 at 9:47 am

Just a cut-down Z-rest that just barely fits in the pocket, and provides a very nice blend of flexible and supportive suspension.

I made a pack last night that is "frameless" and uses load lifters. Pics posted within the hour.

Jeff Jeff BPL Member
PostedApr 18, 2009 at 11:45 am

Sweet. You must have it dialed in pretty well to get a framless pack fit like that without it pulling away and without using load lifters.

Viewing 11 posts - 1 through 11 (of 11 total)
Loading...