Topic
new tarptent
Forum Posting
A Membership is required to post in the forums. Login or become a member to post in the member forums!
Home › Forums › Gear Forums › Make Your Own Gear › new tarptent
- This topic is empty.
-
AuthorPosts
-
Mar 8, 2009 at 12:58 pm #1234634
So my wife and I are planning a bike tour around Nova Scotia for the end of the summer, hoping to make it the better part of a month, towing the dog in a trailer behind us (she's only 35 lbs.) I've been debating shelter types, trying to stay light as we also hope to make one week of our trip a backpacking portion if possible. We usually use hammocks or small tarps, but I am worried about hammocking with a dog, and while I love minimal tarps for shorter trips I'm thinking our experience will be enhanced by eating a few ounces and going roomier. I took my inspiration from Jared Cook's great work on his tarptent for two, and added a few elements of my own.
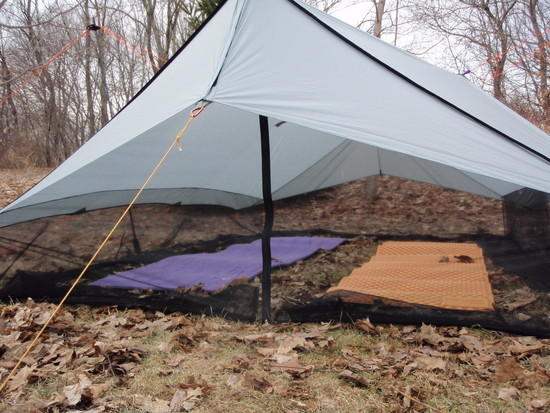
The finished shelter is kind of a cross between a RayWay tarp and a tarptent for two, weighs about 26oz and gives about 50 sq ft of space inside the netting. I took Shires dimensions and extended the tarp out over the netting another 6 inches or so, moving the drip edge out at minimum 4 inches from the floor. The ridgeline and edges are catenary cut with 4 tie outs per edge. I sewed in mid panel tieouts to act as lifters and provide more interior headroom and stability. There are beaks front and rear, the fron one split in the middle and velcroed to allow easier access. I decided on a center puptent style vertical zipper, so that both occupants have equal access to the door (I know my wife appreciates this). I installed an internal ridgeline to hang clothes, lights, etc. Finally, the netting sides are tall enough to allow about 16 inches of ventilation down the long sides if the weather allows. I still need to design and build a floor, trim up the netting, finish bartacking the tie outs, and sew an organizer for the ridgeline, but it is a nice day and I figured I should take my photos while I can. I shot it set up in a pretty stormworthy pitch, high enough to sit up at the head end but no more. In fair weather I would certainly go higher. I'm eager to hear any ideas you all might have for a floor (anyone have experience with dog claws and silnylon?)
Mar 8, 2009 at 1:00 pm #1483769Mar 8, 2009 at 1:05 pm #1483770Mar 8, 2009 at 1:24 pm #1483776I have a black lab and she has never punctured any of my floors.
-Tim
Mar 8, 2009 at 1:28 pm #1483777nicely done!
Care to post a couple closeups of your tie-out loop attachments and reinforcing patches?
Mar 9, 2009 at 3:01 pm #1484091Wow, great looking tarp. I'm planning on making a new one that's fancier (like yours here) than my old one which was just an 8×10 piece of Sil. I'm planning on making a bathtub floor out of Sil seconds that is removable. I have 2 dogs and figure the price for sil seconds is low enough if they puncture it, I'll just make a new one. Can you post a few more specifics about your dimensions here? I'd like to borrow some aspects of your designs. GREAT JOB!!!
Mar 9, 2009 at 10:08 pm #1484238looks awesome! I've been thinking about raising the other side on my tarp tent to increase the airflow combating the condensation and give the second person more room. Definitely looks very clean!
Mar 10, 2009 at 4:17 am #1484274Thanks for your complements Jared (and others) your project really was a great inspiration for mine. I think I want to sew a floor very similar to yours, I really like the way you used the mitten clips and shock cord to hold it in place. I want to devise a system of holding the netting snugly in place too (loops and stakes maybe), not really a necessity, just my own desire for a neat and clean set up. You mentioned condensation, is it a big problem for you? I'm eager to hear, as I won't get a chance to test it out until Easter time at the soonest (possible overnite bike trip on Outer Banks if weather allows).
I'll try to get actual dimensions posted as soon as I get a chance for anyone interested…
Christian
Mar 10, 2009 at 11:42 pm #1484574it wasn't a huge problem, but i bet if the low side was raised a little i would of had a little better airflow. I did get condensation on the roof, mainly on the low side, the temps were hovering just above freezing, it was raining, i was in the trees (very little airflow to begin with), i had the netting fully closed because there was hords of skeeters hovering at my door. Basically any and all unfavorable conditions for causing condensation were present. I didn't notice till the morning that their was a decent amount of condensation. I only saw one or 2 drips, but my bag was still dry and the floor inside was dry, so i didn't really care too much. I just wiped it down before tearing it down. Also raising the low side would give the second person more room. I've been tossing the idea of raising it since the last hike along with a few other minor things like velcro tabs to attach the floor to the netting. which would keep the floor over the net during the initial setup.
Mar 11, 2009 at 6:09 am #1484605Are you thinking the velcro tabs would be sewn to the bottom of the floor, around the perimeter, so the netting tucks under on its own, or along the sides of the bathtub edges?
I guess factors that cause condensation are so varied it's hard to predict. I've had my pitched high, open ended hammock tarp get condensation on it…can't get much more ventilated than that!
When I have some more time I'll try to get my floor together and figure out a clean way to attach the netting.
Christian
Mar 11, 2009 at 8:59 am #1484639I'm still trying to decide whether to have a sewn-in floor or not for my family tent. One thought is to spray the perimeter netting and groundsheet edges with permethrin fabric treatment. Especially if the two overlap it seems that ought to stop the crawlies. (though not the slithering serpents…)
We mostly have big wood ants. They never really bother me but my wife doesn't care for them in the tent.
Mar 12, 2009 at 11:10 am #1484956I was thinking 6 tabs on the bottom of the floor (4 corners and halfway down the sides) then 6 small strips on the mesh to give a little adjustability to how I can setup the tarp. however I still would like a removable floor so it can be dried seperately on long hikes, so that I can have a ground sheet to sleep under the stars, and the ability to keep the ground sheet and tarp separate in the pack if the tarp is wet with condensation/dew and the floor is dry. but since I have a line of projects lining up I won't get to it for awhile. I have a couple bivys, vests, tarp, stuff sacks, rain jacket… plus i'm swamped with college work…
-
AuthorPosts
- You must be logged in to reply to this topic.
Forum Posting
A Membership is required to post in the forums. Login or become a member to post in the member forums!
Our Community Posts are Moderated
Backpacking Light community posts are moderated and here to foster helpful and positive discussions about lightweight backpacking. Please be mindful of our values and boundaries and review our Community Guidelines prior to posting.
Get the Newsletter
Gear Research & Discovery Tools
- Browse our curated Gear Shop
- See the latest Gear Deals and Sales
- Our Recommendations
- Search for Gear on Sale with the Gear Finder
- Used Gear Swap
- Member Gear Reviews and BPL Gear Review Articles
- Browse by Gear Type or Brand.