Topic

Tarp and Bivy

  • This topic is empty.
Viewing 7 posts - 1 through 7 (of 7 total)
PostedFeb 9, 2009 at 5:59 pm

Tarp details: Spinntex EXP from Thru-hiker for the body and .33 oz cuben fiber for the beak. The beak has velcro down the middle to assist in entry/exit when pitched low and wide. The main tarp is 8 ft. x 8 ft. x 6ft and has a curved ridgeline.
Why did I use two different fabrics? I had the tarp already sewn when I decided I wanted a front beak! I would have used spinn for the beak also but had some cuben left over from a bivy. Im actually glad I did it like this since the main tarp body is made with beefy fabric and the beak added very little weight. If it rips off in a storm then the tarp will still hold up! Total weight w/ spectra lines is 9.5 oz.
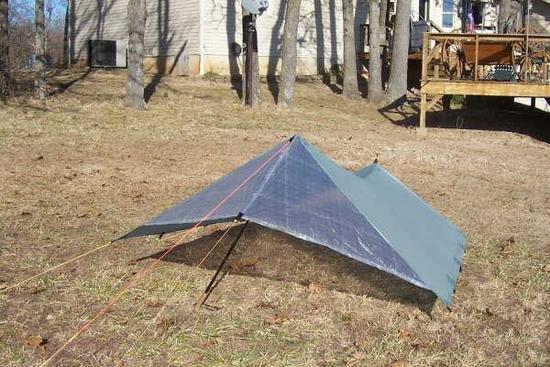
Spinn Tarp

The bivy was inspired by cuben bottom bivy projects from Steven Evans and Bill Fornshell. I really liked the weight but wanted something usable in buggy areas so I figured an oware drawcord bivy ripoff with a cuben bottom was just the thing!

Bivy details: Momentum Ripstop and Nanoseeum for top and .33 oz cuben for bottom. Mini cord lock and masons line for drawcord. The length is about 6 ft (which is a little short . . .) and 35 inches wide at shoulders. I will use a groundcloth with foam mats on top under the bivy to protect the fragile cuben bottom. Total weight 3 1/8 oz (90 grams)
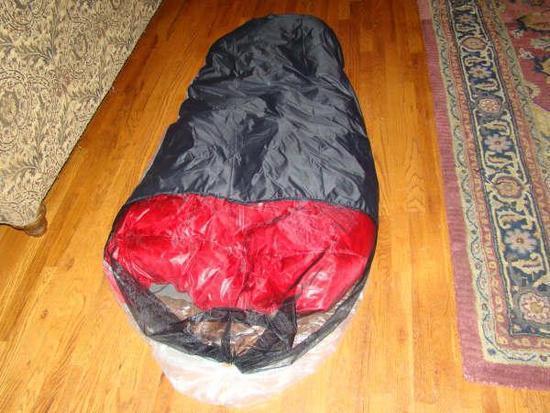
Bug Bivy

Steven Evans BPL Member
PostedFeb 9, 2009 at 7:33 pm

Luke, first off, fantastic work.

The bivy was inspired by cuben bottom bivy projects from Steven Evans and Bill Fornshell

I should say that my bivy was inspired by Bill :)

Now, how did you go about sewing the mesh to the cuben? Type of stitch? Did you just butt them up and sew or did you use a specific type of seam? Can you post an up close pic? I'm interested because I would like to make another bivy with a mesh upper to use during very buggy trips and yours looks to be the way to go…

PostedFeb 9, 2009 at 8:46 pm

Steven-thanks for the complement.

I used a french seams on all seams except for the drawcord channel. This bivy is a very easy project. I suggest sewing the top pieces together first and then use that as a pattern for the floor.

Bill Fornshell BPL Member
PostedFeb 9, 2009 at 9:46 pm

Hi Luke and Steven,

Luke you have added a couple of nice innovations to your two items.

It is also always nice to read comments about how easy most of this gear is to make. Over the last few years I have posted a lot of what I have made but have always tried to show that this stuff is just not that hard to make yourself.

We are lucky that we can get really first class material for our projects.

Both of you keep, up the good work.

J B BPL Member
PostedFeb 10, 2009 at 2:38 am

I should really learn to do that myself, looks awesome and the weight is just great.

Darren Johnson BPL Member
PostedFeb 23, 2009 at 10:29 am

Anyone have an extra sewing machine they want to sell me? I'm feeling inspired!

PS – I'm serious about the sewing machine!

PostedFeb 23, 2009 at 12:19 pm

Luke,

That is awesome! Curious… Did you use a CAD program for the catenary curve in the ridge line or did you trace the curvature of a line or chain on poster-board or dod you use some other method?

Darren,

I got my sewing machine last week on Craig's List for $10. It's 35 years old, in great shape(just time for servicing) and will do most projects I'm told. So, they're out there.

Viewing 7 posts - 1 through 7 (of 7 total)
Loading...