Topic

waist cinch for montbell inner jacket

  • This topic is empty.
Viewing 19 posts - 1 through 19 (of 19 total)
PostedFeb 3, 2009 at 8:51 pm

I've just received a montbell inner jacket, which I've discovered is somewhat quirky in its sizing. I am slim, with a long torso and long arms. The arms on this jacket are great… plenty long. But the torso is an inch or two too short. I can't imagine what body shape they are designing for… short torso and long arms (a gorilla?). ;-)

Anyway, I can handle the shorter torso if I can rig up a waist cinch cord around the hem. Then at least I won't have to deal with drafts.

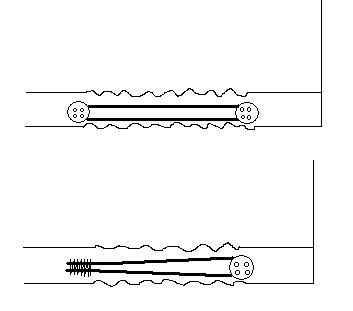
I'm not much of a sewing expert though. Can anyone suggest how I should go about it? I was thinking of maybe some light shock cord (1/16" thick, 0.1 oz/yd from thru-hiker) and one of those little plastic cord lock thingys. But what might be the best way to attach it? Or do you have a better idea?

Thanks!

PostedFeb 3, 2009 at 10:19 pm

One of the simplest ways I've seen used to make a cinch cord channel is to simply fold up the fabric about 1/2 inch and sew along the (former) hem to make a channel. I think this is called a rolled hem? Anyway, you'd have to add some way for the cord to exit the channel before sewing it up, like grommets or buttonholes or something. The problem with this method would be that you would lose another 1/2 inch of length. Something I'm sure you'd rather avoid.

Another idea might be to use a new piece of fabric to create a "hanging" channel off the bottom of the jacket to get you a little extra length, or simply re-wrap the bottom so the length stays unchaged. The difficulty might be in finding matching fabric. I haven't inspected any montbell jackets, maybe someone here who owns one can see a way to integrate a drawcord into the existing design?

Matt Mahaney BPL Member
PostedFeb 4, 2009 at 6:07 am

I have been contemplating this as well. I would say for your longer torso adding a cord channel along the bottom is your best bet. 1/16" sound like a good weight and AYCE is a great help. He may have some suggestions too. I would give him a call. If you place the cord channel along the inside of the existing hem you don't have to worry about matching your fabric, if its a concern. I think I'm going to try now too. Good luck with it.

Dale Wambaugh BPL Member
PostedFeb 4, 2009 at 7:11 am

How about sewing loops and buttons on the jacket? What you are trying to accomplish is to make the jacket fit tighter in that area. I would use the elastic shock cord and a couple suitable buttons or toggles. It should be lighter than a full drawstring too– mere grams, but here we are!

PostedFeb 4, 2009 at 9:06 am

Dale, I'm trying to visualize what you're describing, is it something like this?:

loops

That's an interesting idea, I thought about just using plain old elastic like for cuffs, sewn along the hem, which would create a permanent tightness, but the loops and buttons would be do-able, undo-able. Also, if you used two buttons, you wouldn't have a loop of elastic hanging down when not in use (and would just have to be careful about not losing the loops, but sewing extras would be easy).
However, you wouldn't have as much adjustment variability as a continuous drawcord.

PostedFeb 4, 2009 at 10:24 am

One issue with the method as illustrated is that the pucker created in the jacket hem by the elastic compression would tend to ride up and out, exposing the elastic to snagging on things. It also might not reduce the effective circumference of the hem by all that much. If it were my problem to solve, I'd probably sew a very light 3/4" grosgrain sheath to the inside of the existing hem, installing 3/32" round elastic on the second, closing stitch to make a casing for it. Make the closing stitch the bottom one, and leave a backstitch-reinforced opening on one side for the extra bungee to hang out, for installing a cordlock.

PostedFeb 4, 2009 at 11:10 am

I drew it up as a cinch, but of course it wouldn't scrunch up at all, but create more of a fold than anything (unless you enclosed the shock cord in a sheath anyway, negating much benefit over a drawcord).

Maybe what Dale was talking about in the first place wasn't what I drew, but rather small loops positioned a couple inches from a button to simply "take up" a portion of the hem. This would also create a folding/protruding effect on the hem, but would be easy, light, and quick to do/undo.

The grosgrain would be easier to work with to get an even, nicely sewn channel, but a strip or tube of fabric could be used too, at some cost to durability-the benefit being that fabric might scrunch more evenly and easily than a full circumference of grosgrain. Even so, if the OP is looking for ease of installation, the grosgrain seems like a really good idea. Just cut to lenght, sear the ends, and install.

Matt F BPL Member
PostedFeb 4, 2009 at 3:04 pm

Hi Ashley –

I had a similar issue with my down inner jacket last summer: I'm about six feet tall and slim, and felt that the loose waist let drafts in like crazy. I wound up just cutting a thin piece of elastic (1/8 inch i believe) to about two inches shorter than my waist, then stretching it slightly (to the length of the hem of the jacket) while sewing it to the inside of the jacket with one long zig-zag stitch. Melt the ends of the elastic before you sew if you elect this option.

I've had the jacket along on about 50 nights in the backcountry since doing this, and so far I've not had any issues with durability or catching the elastic on anything. However, I am under the impression that the tighter the elastic is stretched while you sew it, the more tendency it will have to ride up on your hips.

Also, I should note that I chose this option because I thought it would be easiest, not because I think it is the single best method. Still though, it has worked great and added at most a quarter of an ounce.

Good luck,

Matt

PostedFeb 4, 2009 at 3:22 pm

Thanks guys for your suggestions! I think I might try making a cord channel something like this:
– take a wide piece of fabric that goes all the way around the hem, and sew the bottom of it on to the bottom of the hem
– add another row of stitches above the first to create an enclosed channel, sewing the cord inside as you go
– trim off the remaining fabric above the channel

Could end up looking a bit messy, but would probably be easier than trying to sew a pre-cut tube on to the jacket. I might need to consult a good friend who knows sewing!

The button idea is a nice simple one. I might end up going that way if it all looks too tricky!

PostedFeb 4, 2009 at 4:29 pm

The 'old' MB UL inner jacket was considerably longer and had a drop tail. So, they added a zipper and pockets but to keep the weight the same they now short change us on the length. I like the old style MUCH better.

Roger Caffin BPL Member
PostedFeb 4, 2009 at 4:29 pm

> – trim off the remaining fabric above the channel
Can I suggest this won't last long? The fabric will pull out of the sewing.

Take a strip of (matching) fabric maybe 1.5" wide and long enough to go right around.
Fold each long side in by 1/4" and iron down.
Fold each end in by >1/4" and pin down.
Fold in half to conceal the other folded bits.
Pin this to the bottom edge of the jacket, right around, adjusting ends to just meet.
Sew in place with two rows of stitches.

Now you have a channel around the bottom edge of the jacket, with a gap/junction somewhere. A smart user will put this gap at the side (assuming pullover style).
Thread 2 mm bungee cord through, add cord lock, tie knot in ends so cordlock can't fall off.

This construction will last for many years.

Cheers

PostedFeb 4, 2009 at 4:39 pm

Yeah, what Roger said. You can use the fabric from the stuff sack that the jacket came with if you want it to match.

PostedFeb 4, 2009 at 5:22 pm

Using grosgrain, though, you'd avoid having to worry about folding in any raw edges, since the edges of the grosgrain are already "finished" and won't fray. And if you sew the grosgrain as a single flat layer with the bungee within, sewn on the inside of the jacket perimeter, then the casing won't show in the event that it comes out messy. This would also be much easier for a novice sewer than trying to form a casing that extends below the existing jacket perimeter.


< top edge of 3/4" grosgrain (sew 1st)
======== < 3/32" elastic run inside grosgrain


< bottom edge of grosgrain (sew last, feeding the elastic inside the gg as you go)

Two stitch passes and you're basically done.

Side-cinch bungee & cordlock detail:


=========


==


< leave small gap in bottom stitch for elastic to escape
       ==
       ==
       == < install cordlock
       ==

PostedFeb 4, 2009 at 5:39 pm

Thanks Brett. Nice ASCII pic! I think keeping the cord loop hidden inside the jacket (not below the hem) is a good idea. It will probably look a bit amateurish and so better that it's not seen! I'll check out the grosgrain as an alternative.

Roger Caffin BPL Member
PostedFeb 4, 2009 at 7:29 pm

> Using grosgrain, though, you'd avoid having to worry about folding in any raw edges,

Oh sure, very true. I didn't suggest it because it can be harder to find a suitable colour – although black is often suitable.

I would be more reluctant to sew through the jacket for the upper line of sewing, but ymmv.

Cheers

PostedMar 1, 2009 at 2:40 pm

I just received a MB down inner and am experiencing this same problem. I was just wandering what your final solution was, and if you had any pics to share.
Thanks

Nick Grba BPL Member
PostedMar 4, 2014 at 10:52 am

I still can't believe that Montbell hasn't fixed this one glaring deficit by now. I'm a lanky dude who needed to pull the bottom hem of the jacket in a bit. I wanted to remedy this quickly & easily, but didn't want to risk dorking up the bottom of the jacket by sewing a chunk of elastic inside it.
I thought about taking it to a tailor shop and having them add a buttonhole and a button – about 1" apart – on both sides of the jacket at the hem. Depending on the thickness of my underlayers & my current girth, I could take in the right amount of hem by buttoning both buttons, neither button or just one button. Cheap, easy and lightweight solution.

Edit – I ended up selling the XL & going with a Large instead.

Viewing 19 posts - 1 through 19 (of 19 total)
Loading...