Topic
Canister Stove “Ring Of Fire” design
Forum Posting
A Membership is required to post in the forums. Login or become a member to post in the member forums!
Home › Forums › Gear Forums › Make Your Own Gear › Canister Stove “Ring Of Fire” design
- This topic is empty.
-
AuthorPosts
-
Aug 11, 2008 at 7:07 am #1230587
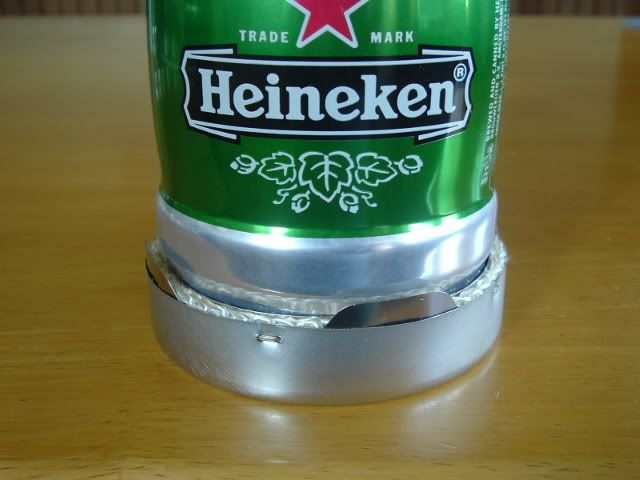
This stove is made from the top and bottom of a quart can.
I used the valve from the Brunton Remote adaptor stand.
It weighs 44grams (without valve )
The stove is very thin, 7/16ths at it's highest point. Fits in my shirt pocket.
I made 7 test burns
2 cups are boiling around 7.5 min average.
Fuel usage is 7.5 grams = 7ml of fuel per boil.
110 grams of fuel per canister equates to 12 meals per.
I use 1 cup water per pack of Ramen and 1 cup to make a drink.
I'm still far from finishing my tests. I have different ring designs using different materials. The ring concept is what I'm trying to perfect. It worked great with alcohol and now it seems to be working pretty good with canister fuel.
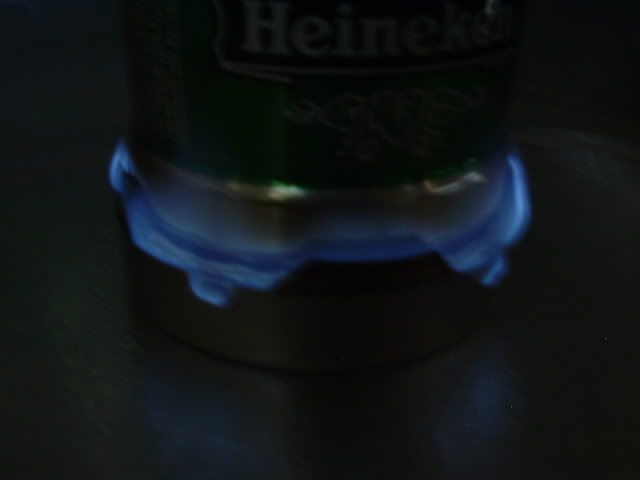
This new stove is "radical". I heats the water against everyones notions that flames up the side of the pot are a no-no. There are no flames that touch the bottom of the pot. This is a complete stove, no pot stand required. The pot sits right on ground zero, just as stable as you could ever want.
Just wanted to throw this concept out to all DIYselfers. Proceed with caution. More photos and information will follow as it becomes available. This is new territory for me so I'll move slow on this one
l'll post as new new info becomes available.
The video shows the flame increase and decrease as I turn the valve. No oxygen has been introduced into the system as of this posting. I'm working on a way to introduce it. Right now it's straight out of the canister. It's working fine as is. At it's bluest flame is where the tests were performed. For this designated pot set-up, introducing air may not be necessary.
<center>

</center>
<center>
</center>
<center>
</center>Aug 11, 2008 at 7:53 am #1446619Neat design Dan! I'd like to see some shots of how you connected the stove to the canister.
Aug 11, 2008 at 11:21 am #1446636Hi Jason, thanks. The stove is connected basicly the same as Tony does his. For safety reasons we won't show photos of it.
Aug 11, 2008 at 12:01 pm #1446643Zelph, you've outdone yourself. Innovation!
Aug 11, 2008 at 2:44 pm #1446678Thanks Sam!!!!
I took a break from alcohol stoves to see what it's like on the other side.
I did some modification to the stove to reduce weight and got it down to 31 grams.
The Brunton valve weighs 33 grams
Total for the two = 64 grams/2.25 oz
<center>
</center>Aug 11, 2008 at 9:32 pm #1446737How did you feed in the fuel when you tested it with alcohol?
Aug 12, 2008 at 5:39 am #1446758Hi Dave, I made an alcohol version of the Ring Of Fire first. Here are some photos of it. Fuel is poured into the center of the stove, it gets absorbed into the fiberglass wick material around it's inner circumfrence. The beer can pots are can then be put into it;s center and then lit. It's a very stable set-up for beer can pot. It also can be used for pots of a larger size because of 4 raised tabs that you can see in the photos. The stainless steel tabs support the regular pots at the just the right height.
<center>
</center>
Aug 12, 2008 at 3:03 pm #1446812Hey Dan,
Your gas stove gave me an idea for a stove with 2 sets of burner holes. One inside my volcano kettle, and the other on the outside, like your fosters pot. Works like a charm.Would you like one of my kettles in lieu of those tubes that never made it to you? Let me know.
Cheers
Rog tallbloke
Aug 12, 2008 at 4:34 pm #1446831Hi Dan,
Welcome to the MYOG canister stove club. Your design is interesting.
"This new stove is "radical". I heats the water against everyones notions that flames up the side of the pot are a no-no. There are no flames that touch the bottom of the pot."
No one has said that only heating the sides will not work but it will not be as efficient as a small burner under the center of the base of the pot, my published tests which you have seen have shown this.
Publishing your test results with your canister and alcohol ring of fire stoves under larger diameter pots would help solve this issue.
(Hint) As it is very difficult to reproduce a canister stove tests a series of tests should be done through a range of flow rates and then graphed to compare.
"Fuel usage is 7.5 grams = 7ml of fuel per boil."
According to my figures liquid Propane has a density of 0.51 kg/l and liquid Butane has a density of 0.58kg/l which if you where using a 70/30 butane/propane mixture the volume of 7.5g fuel would be about 13.5 mls.
Tony
Aug 13, 2008 at 7:08 am #1446911"Would you like one of my kettles in lieu of those tubes that never made it to you? Let me know."
That would be nice tallbloke, send it on over =)
"No one has said that only heating the sides will not work but it will not be as efficient as a small burner under the center of the base of the pot, my published tests which you have seen have shown this."
It's my way of saying "dont't worry about the flames going up the side of the pot"
"Publishing your test results with your canister and alcohol ring of fire stoves under larger diameter pots would help solve this issue.
"I agree with you on that point, I'll slowly work my way into being more comparative. I'm in a clean out garage mode and hope to find some of my better test equipment =)
"Fuel usage is 7.5 grams = 7ml of fuel per boil."
I used a website that told me grams to mls was the same. I'm glad your here to keep me in the right direction. Thanks Tony!!!! Just yesterday I was reviewing your test results on pot sizes vs fuel consumption and heating times. I have alot of time to study up on canisters. I think I said 4 years might get me in shape to make a good stove =)
Aug 13, 2008 at 2:53 pm #1446976Hi Dan,
"I agree with you on that point, I'll slowly work my way into being more comparative. I'm in a clean out garage mode and hope to find some of my better test equipment =)"
I look forward to seeing some results.
and good luck with the cleanup, I am unable to find anything after my garage cleanups.
My motto is a 'place for everything and everything all over the place'
Tony
Aug 13, 2008 at 5:55 pm #1447011Hi Tony, all is going well. I found my digital thermometer while cleaning. I adopted your motto long time ago and I can't find anything. ;)
<center>
</center>
"Fluke" is the brand name.
Aug 15, 2008 at 1:41 am #1447176Dan: PM me your address.
Rog
Oct 17, 2008 at 10:17 pm #1454950Wow, great job on that stove! It looks really cool. Just out of curiosity, what is the advantage of having the flame burn on the side of the pot rather than underneath? I've never seen a design like that before and it intrigues me. Anyway, great job!
Oct 17, 2008 at 10:26 pm #1454954Very Impressive!!!! Love this website!!!!
Oct 20, 2008 at 8:14 pm #1455437Justin, the design was of the "out side the box" way of thinking. It's the most stable stove for the Heineken pot. The pot sits inside the stove on ground zero. Totally stable.
Nov 8, 2008 at 5:06 pm #1458183From one extreme to another. This one is a single jet sideburner. It turned out to be a little too large of a jet. I need to do some serious tweeking. Made with an aluminum beer bottle.
<center>
</center>Nov 8, 2008 at 9:32 pm #1458201I never cease to be amazed at the creativity displayed!
That said, I too would like to see some figures on fuel efficiency and CO emission. They would be nice to have.
Cheers
RogerNov 8, 2008 at 9:33 pm #1458203Creative, but … not inside MY tent in a storm thank you! You need to shorten those flames a bit.
Cheers
RogerNov 9, 2008 at 11:46 am #1458242That is extremely scary, but just think of the dual use possibilities. Just bring an oversized tent, create a rig for holding the burner, lash on your backpack as a harness and there you go – 1 man hot air balloon.
Jan 5, 2009 at 8:42 am #1468034I finally completed my DIY valve for the stove. Now I can say I've made my own complete canister stove. No pot stand required. Heiny /fosters can fits just right. Maximum stability. Some of you will say it's heavy. I can use it as a boat anchor. =)
The stove weighs 44 grams
The valve weighs 13 grams (made of brass)
The valve body is made from a tire valve(Shraeder)
Jan 5, 2009 at 12:37 pm #1468093Very nice. Questions (of course!):
Sticking it all together? JB Weld?
Why use a Schrader valve? Junichi uses the central pin going into the canister and the valve inside as the primary regulator. This works, with some care.
What did you use for the screw thread part? It looks like the base of another stoves machined down?
Cheers
Jan 5, 2009 at 12:37 pm #1468094Hi Dan,
Nice work, how fine is the adjustment. Look forward to seeing some more pics of the stove working.
Tony
Jan 5, 2009 at 12:56 pm #1468101Hi Roger and Tony.
I used items I had in my garage. I've worked with the shreader valve before and have lots of them.
The base of the valve is made from an air horn.
Parts are held together with JB weld.
I'll try to do a video to show how fine of an adjustment it has. It has hi, med and low. One quarter turn of the cap goes thru the 3 steps of adjustment.
This was my first try. I was inspired by the two of you. Thanks Mates
"Junichi" I don't get around much in canister circles to know what this word refers to.
Jan 6, 2009 at 9:48 pm #1468416Hey Dan,
The "Junichi" Roger is talking about is mostly likely the accomplished Japanese canister stove builder Junichi Takahashi. Here is a sample of one of his stoves, http://www.backpackinglight.com/cgi-bin/backpackinglight/forums/thread_display.html?forum_thread_id=15239&skip_to_post=113974Take care, Mark
-
AuthorPosts


- You must be logged in to reply to this topic.
Forum Posting
A Membership is required to post in the forums. Login or become a member to post in the member forums!
Our Community Posts are Moderated
Backpacking Light community posts are moderated and here to foster helpful and positive discussions about lightweight backpacking. Please be mindful of our values and boundaries and review our Community Guidelines prior to posting.
Get the Newsletter
Gear Research & Discovery Tools
- Browse our curated Gear Shop
- See the latest Gear Deals and Sales
- Our Recommendations
- Search for Gear on Sale with the Gear Finder
- Used Gear Swap
- Member Gear Reviews and BPL Gear Review Articles
- Browse by Gear Type or Brand.
